
Esta página se tradujo del inglés con ayuda de IA. Mejora esta traducción o lee el original.
Comandos de Player y Target
Debes saber que por defecto todos los comandos los ejecuta la consola, así que si quieres que el jugador ejecute el comando, añade SUDO o SUDO_OP antes.
(Haz clic en SUDO o SUDO_OP para más información)
No uses esta opción para comandos vanilla ni para CUSTOM COMMANDS. Para usar correctamente los comandos vanilla, ve a la FAQ y a "Cómo usar los comandos vanilla",
Compatibilidad "multi-world" para los comandos vanilla.
execute in <<NAMEOFYOUR_WORLD>> run ...
Ejemplo: quieres invocar un Zombie en el mundo SsomarWorld:
execute in <<SsomarWorld>> run summon zombie 100 50 100
Ejemplo con un placeholder:
execute in <<%player_world%>> run summon zombie 100 50 100
¿Quieres mantener el formato HEX en bruto en tu comando? Añade la etiqueta BRUT_HEX en tu comando. Funciona en cualquier parte de la línea de comando, pero se recomienda ponerla en la primera parte del comando para que resulte menos confuso.
Por defecto, ningún comando se ejecuta si el jugador está desconectado (los comandos se ejecutarán cuando el jugador se conecte).
Pero puedes añadir la etiqueta [<OFFLINE>] en tus comandos para quitar esta restricción.
(Muy útil para comandos de broadcast, boost, giveall, ...)
Ejemplo:
- [<OFFLINE>] broadcast hello !
- [<OFFLINE>] execute at %player% run setblock %block_x_int%+3 %block_y_int%-1 %block_z_int%-14 minecraft:air
Puedes usar [<CLEAR_IF_DISCONNECT>] si quieres borrar los comandos pendientes cuando el jugador se desconecte.
Ejemplo:
- [<CLEAR_IF_DISCONNECT>] say meow
Comandos mixtos
Además de la siguiente lista de comandos, también puedes usar:
docs/tools-for-all-plugins-score/custom-commands/mixed-commands-player-and-entity
Estos comandos pueden usarse en los comandos relacionados con el jugador O en los comandos relacionados con entidades.
Comandos personalizados
Ordenados alfabéticamente
ABSORPTION
- Info: Da el efecto de absorción al jugador
- Ajustes del comando:
{amount}: cantidad de medios corazones de absorción. Admite valores negativos para quitar.{time}: duración del efecto en ticks. Déjalo vacío o en "0" si lo quieres infinito.
- Ejemplo:
activators:
  activator0: # Activator ID, you can create as many activator on the activators list
    option: # Here goes an activator that is at least instance of player
    playerCommands:
    - ABSORPTION amount:5 time:200 # Gives the player absorption
  activator1: # Activator ID, you can create as many activator on the activators list
    option: # Here goes an activator that is at least instance of target
    targetCommands:
    - ABSORPTION amount:5 time:200 # Gives the target absorption
¡El valor de tu atributo MAX_ABSORPTION debe ser superior a 0!
Comprueba el valor escribiendo: /attribute PLAYER_NAME minecraft
_absorption base getY puedes aumentarlo escribiendo: /attribute PLAYER_NAME minecraft
_absorption base set 20activators:
activator0: # Activator ID, you can create as many activator on the activators list
option: # Here goes an activator that is at least instance of player
playerCommands:
# You can do that to temporary up the max_absorption value of the player
- minecraft:attribute %player% minecraft:max_absorption base set 5**
- ABSORPTION amount:5 time:200
- DELAY_TICK 200
- minecraft:attribute PLAYER_NAME minecraft:max_absorption base set 0
activator1: # Activator ID, you can create as many activator on the activators list
option: # Here goes an activator that is at least instance of target
targetCommands:
# You can do that to temporary up the max_absorption value of the target
- minecraft:attribute %player% minecraft:max_absorption base set 5
- ABSORPTION amount:5 time:200
- DELAY_TICK 200
- minecraft:attribute PLAYER_NAME minecraft:max_absorption base set 0
ACTIONBAR
- Info: Muestra la action bar con tu texto + el tiempo restante (59, 58, 57...).
- Ajustes del comando:
{text}: Tu texto a mostrar{delay}: Duración en segundos
- Ejemplo:
activators:
  activator0: # Activator ID, you can create as many activator on the activators list
    option: # Here goes an activator that is at least instance of player
    playerCommands:
    - `ACTIONBAR &6Hey &e%player% ! 10` # Sends an ACTIONBAR to the player
  activator1: # Activator ID, you can create as many activator on the activators list
    option: # Here goes an activator that is at least instance of target
    targetCommands:
    - `ACTIONBAR &6Hey &e%player% ! 10`# Sends an ACTIONBAR to the target
ADD_ITEM_ATTRIBUTE
- Info: Añade un atributo a un ítem como operación de suma o resta.
- Ajustes del comando:
{slot}: El slot donde se aplicará. -1 para la mano principal{attribute}: El atributo que quieres añadir. Lista de Attributes{value}: El valor de la operación{equipmentSlot}: El slot donde se activará el atributo. Lista de EquipmentSlot{mode}: selecciona el modo de adiciónmode:ADD: Añade el atributo al ítemmode:OVERRIDE: Quita los atributos actuales del mismo tipo del ítem + Añade el atributo al ítemmode:STACK: Se acumula con el atributo presente en el ítem; si no existe ninguno, lo añade
- affectDefaultAttributes: true or false # Cuando es true, el modo OVERRIDE también sobrescribirá los atributos por defecto, y el modo stack permite acumularse con los atributos por defecto (en verde)
- Ejemplo:
activators:
  activator0: # Activator ID, you can create as many activator on the activators list
    option: # Here goes an activator that is at least instance of player
    playerCommands:
    - ADD_ITEM_ATTRIBUTE slot:%slot% attribute:GENERIC_ATTACK_DAMAGE value:1.0 equipmentSlot:HAND mode:ADD # Add this attribute to the player
  activator1: # Activator ID, you can create as many activator on the activators list
    option: # Here goes an activator that is at least instance of target
    targetCommands:
    - ADD_ITEM_ATTRIBUTE slot:%slot% attribute:GENERIC_ATTACK_DAMAGE value:1.0 equipmentSlot:HAND mode:STACK affectDefaultAttributes: true # Add this attribute to the target
ADD_ITEM_ENCHANTMENT
- Info: Añade un encantamiento a un ítem en un slot específico con un nivel determinado
- Ajustes del comando:
{slot}: El slot donde se aplicará. -1 para la mano principal{enchantment}: El encantamiento que quieres aplicar, no uses espacios, usa los nombres de encantamientos de Minecraft, no los que se muestran en pantalla. Enchantments{level}: El nivel del encantamiento
- Ejemplo:
activators:
  activator0: # Activator ID, you can create as many activator on the activators list
    option: # Here goes an activator that is at least instance of player
    playerCommands:
    - ADD_ITEM_ENCHANTMENT slot:-1 enchantment:unbreaking level:1
  activator1: # Activator ID, you can create as many activator on the activators list
    option: # Here goes an activator that is at least instance of target
    targetCommands:
    - ADD_ITEM_ENCHANTMENT slot:-1 enchantment:unbreaking level:1
ADD_ITEM_LORE
- Info: Añade una línea de lore
- Ajustes del comando:
{slot}: El slot donde se aplicará. -1 para la mano principal{text}: El texto de la nueva línea de lore
- Ejemplo:
activators:
  activator0: # Activator ID, you can create as many activator on the activators list
    option: # Here goes an activator that is at least instance of player
    playerCommands:
    - ADD_ITEM_LORE slot:%slot% text:&7Item of %player%
  activator1: # Activator ID, you can create as many activator on the activators list
    option: # Here goes an activator that is at least instance of target
    playerCommands:
    - ADD_ITEM_LORE slot:%slot% text:&7Item of %target% added by %player%
BOOTS
- Info: Coloca el ítem de tu mano principal en el slot de las botas. (No funcionará si el ítem tiene "Curse of Binding")
- Sin ajustes del comando
- Ejemplo:
activators:
  activator0: # Activator ID, you can create as many activator on the activators list
    option: # Here goes an activator that is at least instance of player
    playerCommands:
    - BOOTS
BOSSBAR
- Info: Crea un texto de bossbar durante un tiempo determinado.
- Ajustes del comando:
{time}: La duración de la bossbar en ticks{color}: Color del texto de la bossbar{text}: texto de la bossbar (usa guiones bajos "_" para añadir espacios en tu argumento).{count}: cuántas veces quieres que cuente- si esta opción está presente, el argumento de tiempo dejará de importar
{countTicks}: true/false, indica si quieres que cuente en ticks o, en su lugar, en segundos{countOrder}:- ascending: hace que el temporizador cuente desde 0
- descending: hace que el temporizador cuente desde el valor dado
{overrideMode}:- NO_OVERRIDE: No sobrescribe las otras Bossbars
- OVERRIDE_ALL: Sobrescribirá todas las demás BossBars enviadas por SCore
- OVERRIDE_SAME_TEXT: Sobrescribirá las otras Bossbars enviadas por SCore que contengan el mismo texto
{barProgress}: (por defecto = 1.0) El progreso inicial de la barra (0.0 a 1.0). Funciona tanto con barras estáticas como con cuentas atrás (solo cuenta atrás descendente)
- Ejemplo:
activators:
  activator0: # Activator ID, you can create as many activator on the activators list
    option: # Here goes an activator that is at least instance of player
    playerCommands:
    - BOSSBAR time:200 color:RED text:This_is_a_bossbar text
    - BOSSBAR time:20 color:BLUE text:Hello_world count:50 countTicks:true countOrder:ascending
    - BOSSBAR time:200 color:RED text:This is a bossbar text overrideMode:OVERRIDE_SAME_TEXT
    - BOSSBAR time:200 color:GREEN text:Half filled bar barProgress:0.5
CANCEL_PICKUP
- Info: Desactiva la recogida de ítems de un jugador durante un tiempo determinado
- Ajustes del comando:
{time}: La duración en ticks hasta que el jugador pueda volver a recoger ítems{material}: Si se define, el jugador no puede recoger solo el material especificado; si es null, no puede recoger nada
- Ejemplo:
activators:
  activator0: # Activator ID, you can create as many activator on the activators list
    option: # Here goes an activator that is at least instance of player
    playerCommands:
    - CANCEL_PICKUP time:600
    - CANCEL_PICKUP time:600 material:stone
La única forma de RESETEAR este comando después de definir un tiempo en ticks es recargar o reiniciar el servidor. Si te gustaría tener una forma de resetearlo, sugiérelo en el canal #suggestions de Discord.
CHAT
- Info: Envía un mensaje del jugador al chat
- Ajustes del comando:
{text}: Texto a enviar
- Ejemplo:
activators:
  activator0: # Activator ID, you can create as many activator on the activators list
    option: # Here goes an activator that is at least instance of player
    playerCommands:
    - CHAT &6Hello !!
CHESTPLATE
- Info: Coloca el ítem de tu mano principal en el slot del peto. (No funcionará si el ítem tiene "Curse of Binding")
- Sin ajustes del comando
- Ejemplo:
activators:
  activator0: # Activator ID, you can create as many activator on the activators list
    option: # Here goes an activator that is at least instance of player
    playerCommands:
    - CHESTPLATE
CLOSE_INVENTORY
- Info: Cierra el inventario al jugador
- Sin ajustes del comando
- Ejemplo:
activators:
  activator0: # Activator ID, you can create as many activator on the activators list
    option: # Here goes an activator that is at least instance of player
    playerCommands:
    - CLOSE_INVENTORY
CROPS_GROWTH_BOOST
- Info: Acelera el crecimiento de los cultivos a tu alrededor
- Ajustes del comando:
{radius}: El radio del boost (por defecto 5){delay}: El retraso en ticks entre cada boost de crecimiento{duration}: La duración total del boost en ticks{chance}: La probabilidad de crecimiento que tienen los bloques cuando se aplica el boost
- Ejemplo:
El siguiente comando generará 20 boosts de crecimiento cada 10 ticks.
Todos los bloques dentro del radio tendrán un 50% de probabilidad de crecer cada vez que se aplique un boost.
activators:
  activator0: # Activator ID, you can create as many activator on the activators list
    option: # Here goes an activator that is at least instance of player
    playerCommands:
    - CROPS_GROWTH_BOOST radius:5 delay:10 durations:200 chance:50
DISABLE_FLY_ACTIVATION
- Info: Niega el uso del vuelo a un jugador (planear con Elytra no se considera volar)
- Ajuste del comando:
{time}: La duración del efecto en segundos
- Ejemplo: (el comando de abajo desactiva la activación del vuelo durante 1 minuto)
activators:
  activator0: # Activator ID, you can create as many activator on the activators list
    option: # Here goes an activator that is at least instance of player
    playerCommands:
    - DISABLE_FLY_ACTIVATION time:60
DISABLE_GLIDE_ACTIVATION
- Info: Niega el uso de la elytra durante un periodo de tiempo
- Ajustes del comando:
{time}: La duración del efecto en segundos
- Ejemplo: (el comando de abajo desactiva el uso de la elytra durante 20 segundos)
activators:
  activator0: # Activator ID, you can create as many activator on the activators list
    option: # Here goes an activator that is at least instance of player
    playerCommands:
    - DISABLE_GLIDE_ACTIVATION time:20
EICOOLDOWN
- Info: Aplica un cooldown a un ExecutableItems específico
- Ajustes del comando:
{PLAYER}: El jugador al que se dirige el comando{ID}: El id del ExecutableItem o "all" para todos los ExecutableItems{DURATION}: La cantidad de tiempo{boolean TICKS}: (Por defecto: false) Si es false, el valor del argumento de duración se interpreta en segundos. Si es true, se interpreta en ticks.[optional activator id]: (Opcional) Puedes aplicarlo a un id de activador específico
- Ejemplo:
activators:
  activator0: # Activator ID, you can create as many activator on the activators list
    option: # Here goes an activator that is at least instance of player
    playerCommands:
    - EICOOLDOWN %player% thisismyid 10 true # For the ExecutableItem thisismyid
    - EICOOLDOWN %player% all 10 true # For all ExecutableItems
EICOOLDOWN solo puede añadir un cooldown: cuando varios cooldowns se ejecutan sobre el mismo activador, gana el más largo. Para acortar o quitar un cooldown, usa EICOOLDOWN_RESET.
EICOOLDOWN_RESET
- Info: Quita el cooldown de un ExecutableItem para un jugador (todos sus activadores, o solo uno). El cooldown visual vanilla (
enableVisualCooldown) también se resetea. - Ajustes del comando:
{PLAYER}: El jugador al que se dirige el comando{ID}: El id del ExecutableItem o "all" para todos los ExecutableItems[optional activator id]: (Opcional) Solo quita el cooldown de este activador; los demás activadores conservan el suyo
- Ejemplo:
activators:
  activator0: # Activator ID, you can create as many activator on the activators list
    option: # Here goes an activator that is at least instance of player
    playerCommands:
    - EICOOLDOWN_RESET %player% thisismyid activator1 # Only activator1 of the ExecutableItem thisismyid
    - EICOOLDOWN_RESET %player% thisismyid # All the activators of thisismyid
    - EICOOLDOWN_RESET %player% all # All ExecutableItems
Desde la consola, /score cooldowns clear EI:{ID}:{activator id} {player} hace lo mismo para un activador.
EBCOOLDOWN
- Info: Aplica un cooldown a un ExecutableBlocks específico
- Ajustes del comando:
{PLAYER}: El jugador al que se dirige el comando{ID}: El id del ExecutableBlocks o "all" para todos los ExecutableBlocks{DURATION}: La cantidad de tiempo{boolean TICKS}: (Por defecto: false) Si es false, el valor del argumento de duración se interpreta en segundos. Si es true, se interpreta en ticks.[optional activator id]: (Opcional) Puedes aplicarlo a un id de activador específico
- Ejemplo:
activators:**
  activator0: # Activator ID, you can create as many activator on the activators list
    option: # Here goes an activator that is at least instance of player
    playerCommands:
    - EBCOOLDOWN %player% thisismyid 10 true # For the ExecutableBlock thisismyid
    - EBCOOLDOWN %player% all 10 true # For all ExecutableBlocks
EECOOLDOWN
- Info: Aplica un cooldown a un ExecutableItems específico
- Ajustes del comando:
{PLAYER}: El jugador al que se dirige el comando{ID}: El id del ExecutableEvent o "all" para todos los ExecutableEvents{DURATION}: La cantidad de tiempo{boolean TICKS}: (Por defecto: false) Si es false, el valor del argumento de duración se interpreta en segundos. Si es true, se interpreta en ticks.[optional activator id]: (Opcional) Puedes aplicarlo a un id de activador específico
- Ejemplo:
activators:
  activator0: # Activator ID, you can create as many activator on the activators list
    option: # Here goes an activator that is at least instance of player
    playerCommands:
    - EECOOLDOWN %player% thisismyid 10 true # For the ExecutableEvent thisismyid
    - EECOOLDOWN %player% all 10 true # For all ExecutableEvents
FIREWORK_BOOST
- Info: Si este comando se ejecuta mientras el lanzador planea con la elytra, generará un cohete de fuegos artificiales de forma similar a cuando los jugadores hacen clic derecho con un cohete en la mano mientras planean para ganar distancia.
- Ajustes del comando:
{duration}: La duración de vida del cohete en segundos
- Ejemplo:
activators:
  activator0: # Activator ID, you can create as many activator on the activators list
    option: # Here goes an activator that is at least instance of player
    playerCommands:
    - FIREWORK_BOOST 20
FLY OFF
- Info: Desactiva el vuelo creativo del jugador y, si el vuelo del jugador se desactiva en pleno aire, el jugador será teletransportado al posible bloque que tenga debajo.
- Ajuste del comando:
[teleportOnTheGround]: (Opcional) (por defecto = true) Indica si el jugador será teletransportado al suelo o no
- Ejemplo:
activators:
  activator0: # Activator ID, you can create as many activator on the activators list
    option: # Here goes an activator that is at least instance of player
    playerCommands:
    - FLY_OFF teleportOnTheGround:true
FLY_ON
- Info: Da vuelo creativo al jugador
- Sin ajustes del comando
- Ejemplo:
activators:
  activator0: # Activator ID, you can create as many activator on the activators list
    option: # Here goes an activator that is at least instance of player
    playerCommands:
    - FLY_ON
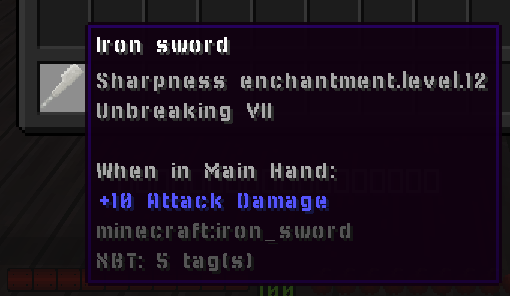
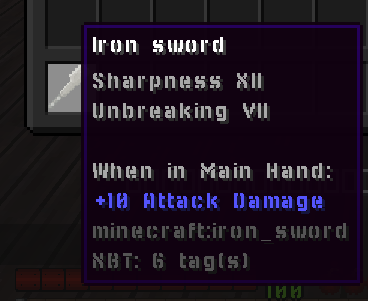
FORMAT_ENCHANTMENTS
- Info: Da formato a todos los encantamientos de tu lore
- Ajustes del comando:
{slot}: El slot objetivo (-1 para la mano principal)
- Ejemplo:
activators:
  activator0: # Activator ID, you can create as many activator on the activators list
    option: # Here goes an activator that is at least instance of player
    playerCommands:
    - FORMAT_ENCHANTMENTS %slot%
 ->
GIVE_MONEY
- Info: Da dinero a un jugador
- Requiere el plugin Vault
- Ajustes del comando:
- amount: la cantidad a dar
- Ejemplo:
activators:
  activator0: # Activator ID, you can create as many activator on the activators list
    option: # Here goes an activator that is at least instance of player
    playerCommands:
    - GIVE_MONEY amount:50.0
GRAVITY_DISABLE
- Info: Detiene la gravedad del jugador, impidiendo que "caiga" o suba.
- Sin ajustes del comando
- Ejemplo:
activators:
  activator0: # Activator ID, you can create as many activator on the activators list
    option: # Here goes an activator that is at least instance of player
    playerCommands:
    - GRAVITY_DISABLE
    - DELAY 5
    - GRAVITY_ENABLE
GRAVITY_ENABLE
- Info: Vuelve a activar la gravedad del jugador, de modo que caerá con normalidad.
- Sin ajustes del comando
- Ejemplo:
activators:
  activator0: # Activator ID, you can create as many activator on the activators list
    option: # Here goes an activator that is at least instance of player
    playerCommands:
    - GRAVITY_DISABLE
    - DELAY 5
    - GRAVITY_ENABLE
HEAD
- Info: Coloca el ítem de tu mano principal en el slot de la cabeza. (No funcionará si el ítem tiene "Curse of Binding")
- Sin ajustes del comando
- Ejemplo:
activators:
  activator0: # Activator ID, you can create as many activator on the activators list
    option: # Here goes an activator that is at least instance of player
    playerCommands:
    - HEAD
JOBS_MONEY_BOOST
- Info: Aumenta temporalmente el dinero ganado. Para Jobs reborn
- Ajustes del comando:
{multiplier}: Valor del multiplicador{time}: Duración del boost en segundos
- Ejemplo:
activators:
  activator0: # Activator ID, you can create as many activator on the activators list
    option: # Here goes an activator that is at least instance of player
    playerCommands:
    - JOBS_MONEY_BOOST multiplier:2.0 time:10
El multiplicador no afecta a los valores de la actionbar de Jobs. El multiplicador de este comando solo se aplica cuando el plugin Jobs decide incrementar el dinero, la xp y los puntos obtenidos.
Si se ejecuta varias veces con suficiente duración en cada boost, todos los boosts en curso pueden acumularse.
JOBS_XP_BOOST
- Info: Multiplica temporalmente la ganancia de XP del plugin Jobs. Para Jobs reborn
- Ajustes del comando:
{multiplier}: Valor del multiplicador de XP (por ejemplo, 2.0 para doble XP){time}: Duración en segundos antes de que expire el boost
- Ejemplo:
activators:
  activator0: # Activator ID, you can create as many activator on the activators list
    option: # Here goes an activator that is at least instance of player
    playerCommands:
    - JOBS_XP_BOOST multiplier:2.0 time:10
El multiplicador no afecta a los valores de la actionbar de Jobs. El multiplicador de este comando solo se aplica cuando el plugin Jobs decide incrementar el dinero, la xp y los puntos obtenidos.
Si se ejecuta varias veces con suficiente duración en cada boost, todos los boosts en curso pueden acumularse.
Este comando admite acumular varios boosts de forma multiplicativa.
LAUNCH
- Info: Lanza un proyectil personalizado. Referencia
- Lista:
Projectile Types
* ARROW * DRAGONFIREBALL * EGG * ENDERPEARL * FIREBALL * LARGEFIREBALL * LINGENRINGPOTION * LLAMASPIT * SHULKERBULLET (Solo disponible en 1.12+) * SIZEDFIREBALL * SNOWBALL * TRIDENT * WITHERSKULL- Ajustes del comando:
{projectile}: el tipo de proyectil o el ID del proyectil personalizado de SCore ( Referencia )[angleRotationVertical]: (Opcional) (por defecto = 0) (en grados) Define la dirección en la que se lanzará la entidad[angleRotationHorizontal]: (Opcional) (por defecto = 0) (en grados) Define la dirección en la que se lanzará la entidad[velocity]: (Opcional) (por defecto = 1) Para personalizar la velocidad del proyectil (también funciona de 1.8 a 1.12)[name]: (Opcional) Nombre personalizado dado al proyectil lanzado, por ejemplo para reconocerlo más tarde en una condición (name:&cFire_ball).[strictYaw]: (Opcional) (en grados) Dirección horizontal del lanzamiento, usada en lugar de la dirección en la que mira el jugador (0= sur,90= oeste,180= norte,-90= este). Los ajustesangleRotation...se suman a ella.[strictPitch]: (Opcional) (en grados) Dirección vertical del lanzamiento, usada en lugar de la dirección en la que mira el jugador (0= recto hacia delante,-90= arriba,90= abajo). Los ajustesangleRotation...se suman a ella.- VERSION También cambia la velocidad de las bolas de fuego (FIREBALL, SIZEDFIREBALL, LARGEFIREBALL, DRAGONFIREBALL, WITHERSKULL):
velocity:2vuela al doble de velocidad,velocity:1mantiene la velocidad vanilla. Antes de 1.20.5 mantienen su velocidad vanilla.
- VERSION También cambia la velocidad de las bolas de fuego (FIREBALL, SIZEDFIREBALL, LARGEFIREBALL, DRAGONFIREBALL, WITHERSKULL):
- Ejemplo:
activators:
  activator0: # Activator ID, you can create as many activator on the activators list
    option: # Here goes an activator that is at least instance of player
    playerCommands:
    - LAUNCH projectile:My_Custom_Proj velocity:5
- Ejemplo de disparos múltiples:
activators:
  activator0: # Activator ID, you can create as many activator on the activators list
    option: # Here goes an activator that is at least instance of player
    playerCommands:
    - LAUNCH projectile:WITHERSKULL
    - LAUNCH projectile:WITHERSKULL angleRotationVertical:20
    - LAUNCH projectile:WITHERSKULL angleRotationVertical:-20
- Ejemplo: lanzar siempre recto hacia delante (en horizontal), sin importar si el jugador mira hacia arriba o hacia abajo, con un proyectil con nombre:
activators:
  activator0:
    option: PLAYER_RIGHT_CLICK
    playerCommands:
    - LAUNCH projectile:SNOWBALL strictPitch:0 name:Frost_Ball
Si usas el LAUNCH COMMAND en el activador PLAYER_LAUNCH_PROJECTILE, y el proyectil ha sido lanzado por un arco, el proyectil lanzado con el comando LAUNCH personalizado mantendrá la misma velocidad.
Si usas SHULKERBULLET como tipo de proyectil, tomará el cursor del lanzador como objetivo. De lo contrario, apuntará a la entidad más cercana al lanzador.
Problemas actuales:
- Los Shulker Bullets no se pueden usar en 1.9.4, 1.10.2, 1.11.2. De 1.12 en adelante no debería haber complicaciones, salvo que hay que crear un proyectil de SCore para darle a un Shulker Bullet una velocidad de vuelo adecuada.
LEGGINGS
- Info: Coloca el ítem de tu mano principal en el slot de los pantalones. (No funcionará si el ítem tiene "Curse of Binding")
- Sin ajustes del comando
- Ejemplo:
activators:
  activator0: # Activator ID, you can create as many activator on the activators list
    option: # Here goes an activator that is at least instance of player
    playerCommands:
    - LEGGINGS
LOCATED_LAUNCH
- Info: Lanza un proyectil en una ubicación específica
- Ajustes del comando:
{projectileType}: el tipo de proyectil o el ID del proyectil personalizado de SCore ( Referencia )[frontValue]: (Opcional) (por defecto = 0) positivo = delante, negativo = detrás - Posición delante/detrás. Por ejemplo, si quieres generar el proyectil a 5 bloques de distancia hacia donde miras, usa un valor positivo más alto[rightValue]: (Opcional) (por defecto = 0) derecha = positivo, negativo = izquierda - Posición derecha/izquierda. Por ejemplo, si quieres que el proyectil aparezca a tu izquierda, usa un valor negativo más alto[yValue]: (Opcional) (por defecto = 0) A qué altura sobre tu posición Y aparecerá el proyectil.[velocity]: (Opcional) (por defecto = 1) La velocidad a la que volará el proyectil. Pon el valor en 0 para que el proyectil caiga hacia abajo al generarse.[angleRotationVertical]: (Opcional) (por defecto = 0) VERSION puedes añadir una rotación vertical a tu proyectil (en grados)[angleRotationHorizontal]: (Opcional) (por defecto = 0) VERSION puedes añadir una rotación horizontal a tu proyectil (en grados)
- Ejemplo:
activators:
  activator0: # Activator ID, you can create as many activator on the activators list
    option: # Here goes an activator that is at least instance of player
    playerCommands:
    - LOCATED_LAUNCH projectile:ARROW frontValue:0 rightValue:0 yValue:0 velocity:1 angleRotationVertical:0 angleRotationHorizontal:0
MINECART_BOOST
- Info: Te da un boost cuando vas montado en una vagoneta (efecto cercano al de subir a un raíl propulsor)
- Ajuste del comando:
{boost}: La velocidad del boost
- Ejemplo:
activators:
  activator0: # Activator ID, you can create as many activator on the activators list
    option: # Here goes an activator that is at least instance of player
    playerCommands:
    - MINECART_BOOST boost:10
MIX_HOTBAR
- Info: mezcla la hotbar del jugador
- Sin ajustes del comando
- Ejemplo:
activators:
  activator0: # Activator ID, you can create as many activator on the activators list
    option: # Here goes an activator that is at least instance of player
    playerCommands:
    - MIX_HOTBAR
MODIFY_DURABILITY
- Modifica la durabilidad de un ítem específico en un slot específico
- Ajustes del comando:
{modification}: Valor positivo para aumentar la durabilidad. Valor negativo para disminuirla{slot}: El número de slot del ítem (-1 para el slot en mano)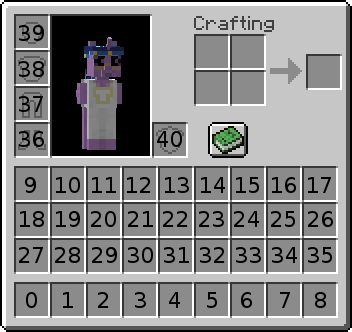
{supportUnbreaking}: (true o false) Indica si admite el encantamiento unbreaking o no
- Ejemplo:
activators:
  activator0: # Activator ID, you can create as many activator on the activators list
    option: # Here goes an activator that is at least instance of player
    playerCommands:
    - MODIFY_DURABILITY modification:-1 slot:%slot% supportUnbreaking:true
OPEN_CHEST
- Info: Abre un cofre o barril en la ubicación seleccionada
- Ajustes del comando:
{world}: Nombre del mundo{x}: Coordenada X{y}: Coordenada Y{z}: Coordenada Z[bypassProtections]: (Opcional) (por defecto = false) Indica si abrirá el cofre de todos modos aunque esté protegido
- Ejemplo:
activators:
  activator0: # Activator ID, you can create as many activator on the activators list
    option: # Here goes an activator that is at least instance of player
    playerCommands:
    - OPENCHEST VanillaWorld 100 100 100
OPEN_ENDERCHEST
- Info: Abre el cofre del End al jugador que ejecuta el activador
- Sin ajustes del comando
- Ejemplo:
activators:
  activator0: # Activator ID, you can create as many activator on the activators list
    option: # Here goes an activator that is at least instance of player
    playerCommands:
    - OPEN_ENDERCHEST
OPEN_WORKBENCH
- Info: Abre una mesa de crafteo al jugador que ejecuta el activador
- Sin ajustes del comando
- Ejemplo:
activators:
  activator0: # Activator ID, you can create as many activator on the activators list
    option: # Here goes an activator that is at least instance of player
    playerCommands:
    - OPEN_WORKBENCH
OXYGEN
- Info: Da oxígeno al objetivo
- Ajuste del comando:
{time}: La duración en ticks del oxígeno que quieres dar
- Ejemplo:
activators:
  activator0: # Activator ID, you can create as many activator on the activators list
    option: # Here goes an activator that is at least instance of player
    playerCommands:
    - OXYGEN time:200
PROJECTILE_CUSTOMDASH1
- Info: Similar a CUSTOMDASH1, pero las xyz se sustituirán por las coordenadas xyz del proyectil más cercano a ti.
- Ajustes del comando:
{fallDamage}: Indica si recibirás daño por caída o no (si olvidas indicar true o false, por defecto será false. Para recibir daño por caída, pon true)
- Ejemplo:
activators:
  activator0: # Activator ID, you can create as many activator on the activators list
    option: # Here goes an activator that is at least instance of player
    playerCommands:
    - PROJECTILE_CUSTOMDASH1 fallDamage:false
REGAIN_FOOD
- Info: Te da una cantidad específica de comida/saturación
- Ajustes del comando:
{amount}: La cantidad de puntos de saturación que quieres ganar. Usa valores negativos para reducir los puntos de hambre
- Ejemplo:
activators:
  activator0: # Activator ID, you can create as many activator on the activators list
    option: # Here goes an activator that is at least instance of player
    playerCommands:
    - REGAIN_FOOD amount:5
REGAIN_MAGIC
- Info: Da al jugador valores específicos de la magia de Ecoskills indicada.
- Ajustes del comando:
{ecoSkillsMagicID}: El ID de la magia de Ecoskills.{amount}: La cantidad a obtener.
- Ejemplo:
activators:
  activator0: # Activator ID, you can create as many activator on the activators list
    option: # Here goes an activator that is at least instance of player
    playerCommands:
    - REGAIN_MAGIC ecoSkillsMagicID:mana amount:15
Admite valores negativos.
REGAIN_SATURATION
- Info: Te da una cantidad específica de saturación
- Ajustes del comando:
{amount}: La cantidad de saturación que quieres dar
- Ejemplo:
activators:
  activator0: # Activator ID, you can create as many activator on the activators list
    option: # Here goes an activator that is at least instance of player
    playerCommands:
    - REGAIN_SATURATION amount:10
REMOVE_ENCHANTMENT
- Info: Quita un encantamiento de un slot
- Ajustes del comando:
{slot}: Slot del que quitar el encantamiento (-1 para el slot en mano){enchantment}: Encantamiento a quitar (ALL para todos los encantamientos)
- Ejemplo:
activators:
  activator0: # Activator ID, you can create as many activator on the activators list
    option: # Here goes an activator that is at least instance of player
    playerCommands:
    - REMOVE_ENCHANTMENT slot:-1 enchantment:ALL
REMOVE_LORE
- Info: Quita una línea de lore
- Ajustes del comando:
{slot}: Slot del que quitar el lore (-1 para el slot en mano){line}: La línea que quieres quitar
- Ejemplo:
activators:
  activator0: # Activator ID, you can create as many activator on the activators list
    option: # Here goes an activator that is at least instance of player
    playerCommands:
    - REMOVE_LORE slot:1 line:5
REPLACE_BLOCK
- Info: Reemplaza el bloque al que mira el jugador por uno diferente
- Ajustes del comando:
{material}: ID del bloque (se admiten los estados de bloque)
- Ejemplo:
activators:
  activator0: # Activator ID, you can create as many activator on the activators list
    option: # Here goes an activator that is at least instance of player
    playerCommands:
    - REPLACE_BLOCK STONE_BRICKS
    - REPLACE_BLOCK WATER[LEVEL=0]
SEND_BLANK_MESSAGE
- Info: Te envía un mensaje en blanco
- Sin ajustes del comando
- Ejemplo:
activators:
  activator0: # Activator ID, you can create as many activator on the activators list
    option: # Here goes an activator that is at least instance of player
    playerCommands:
    - SEND_BLANK_MESSAGE
SEND_MESSAGE
- Info: Te envía un mensaje
- Compatible con MiniMessage
- Ajustes del comando:
{message}: el mensaje que quieres enviar
- Ejemplo:
activators:
  activator0: # Activator ID, you can create as many activator on the activators list
    playerCommands:
    - SEND_MESSAGE text:&fThis is a somewhat random text.
    - SEND_MESSAGE text:<yellow>Hello </yellow><blue>World</blue><yellow>!</yellow> # MiniMessage Suported, but dont use MiniMessage + vanilla at the same time
SEND_CENTERED_MESSAGE
- Info: Te envía un mensaje centrado en el chat
- Compatible con MiniMessage
- Ajustes del comando:
{message}: el mensaje que quieres enviar
- Ejemplo:
activators:
  activator0: # Activator ID, you can create as many activator on the activators list
    option: # Here goes an activator that is at least instance of player
    playerCommands:
    - SEND_CENTERED_MESSAGE text:&fThis is a somewhat random text.
    - SEND_CENTERED_MESSAGE text:<yellow>Hello </yellow><blue>World</blue><yellow>!</yellow> # MiniMessage Suported, but dont use MiniMessage + vanilla at the same time
SET_ARMOR_TRIM
- Info: Define el armor trim específico con el patrón específico para el slot indicado
- Ajustes del comando:
{slot}: El slot al que aplicar el comando (slot -1 para la mano principal){pattern}: El patrón del trim (si es 'null' o 'remove', quitará el patrón actual). Lista de TrimPattern{patternMaterial}: El material del patrón. Lista de TrimMaterial
- Ejemplo:
activators:
  activator0: # Activator ID, you can create as many activator on the activators list
    option: # Here goes an activator that is at least instance of player
    playerCommands:
    - SET_ARMOR_TRIM slot:38 pattern:vex patternMaterial:netherite
    - SET_ARMOR_TRIM slot:38 pattern:null #to clear the armor trim
SET_BLOCK
- Info: Coloca un bloque sobre el bloque al que apunta el jugador
- Ajustes del comando:
{blockface}: Puedes especificar o no un blockFace para forzar la colocación, por ejemplo, encima. BlockFaces{material}: ID del bloque (se admiten los estados de bloque){bypassProtection}: Indica si colocará el bloque incluso si el jugador no tiene el permiso[whitelistCurrentBlock]: (Opcional) (por defecto = se puede colocar sobre cualquier tipo de bloque) Lista de bloques con los que debe coincidir el bloque actual para ser reemplazado- Ejemplos:
- AIR, WATER
- !STONE, !COBBLESTONE
- Ejemplo:
activators:
  activator0: # Activator ID, you can create as many activator on the activators list
    option: # Here goes an activator that is at least instance of player
    playerCommands:
    - SET_BLOCK blockface:UP material:OAK_WOOD
    - SET_BLOCK material:FURNACE[LIT=TRUE]
    - SET_BLOCK material:GOLD_BLOCK whitelistCurrentBlock:SAND,DIRT
SET_BLOCK_POS
- Info: Coloca un bloque en una posición específica
- Ajustes del comando:
{x}: Coordenada X{y}: Coordenada Y{z}: Coordenada Z{material}: el material del bloque[bypassProtection]: (Opcional) (por defecto = false), indica si ignora las protecciones de región, claim e isla[replace]: (Opcional) (por defecto = true), indica si reemplaza el bloque cuando ya existe uno[whitelistCurrentBlock]: (Opcional) (por defecto = se puede colocar sobre cualquier tipo de bloque) Lista de bloques con los que debe coincidir el bloque actual para ser reemplazado- Ejemplos:
- AIR, WATER
- !STONE, !COBBLESTONE
- Ejemplo:
activators:
  activator0: # Activator ID, you can create as many activator on the activators list
    option: # Here goes an activator that is at least instance of player
    playerCommands:
    - SET_BLOCK_POS x:0 y:0 z:0 material:STONE bypassProtection:false replace:true
    - SET_BLOCK_POS x:0 y:0 z:0 material:GOLD_BLOCK whitelistCurrentBlock:SAND,DIRT
SET_EQUIPPABLE_MODEL
- Info: Define los datos del modelo equipable de un ítem en un slot específico
- Ajustes del comando:
{slot}: El número de slot donde está el ítem objetivo{model}: El nombre del modelo de equipamiento que quieres asignar al ítem
- Ejemplo:
activators:
  activator0: # Activator ID, you can create as many activator on the activators list
    option: # Here goes an activator that is at least instance of player
    playerCommands:
    - SET_EQUIPPABLE_MODEL slot:-1 model:minecraft:diamond
SET_EXECUTABLE_BLOCK
- Info: Setblock, pero para Executable Blocks. (EXECUTABLE BLOCKS DEBE ESTAR INSTALADO)
- Ajustes del comando:
{id}: ID del executable block que intentas colocar{x}: Coordenada X{y}: Coordenada Y{z}: Coordenada Z{world}: Nombre del mundo[replace]: (Opcional) (por defecto = true). Indica si reemplazará el bloque existente en las coordenadas indicadas o no[bypassProtection]: (Opcional) (por defecto = false) si quieres ignorar las protecciones como WorldGuard[ownerUUID]: (Opcional) (por defecto = sin propietario) El uuid del supuesto propietario del executable block
- Ejemplo:
activators:
  activator0: # Activator ID, you can create as many activator on the activators list
    option: # Here goes an activator that is at least instance of player
    playerCommands:
    - SET_EXECUTABLE_BLOCK id:Mithril_Ore x:%block_x_int% y:%block_y_int% z:%block_z_int% world:%block_world% replace:false bypassProtection:true ownerUUID:%player_uuid%
SET_ITEM_COLOR
- Info: Define un color específico para el ítem (ítems coloreables como la armadura de cuero / la estrella de fuegos artificiales)
- Ajustes del comando:
{slot}: El slot donde se aplicará. (-1 para la mano principal)
{color}: valor numérico del color. Sitio web de selector de color- Ejemplo:
activators:
  activator0: # Activator ID, you can create as many activator on the activators list
    option: # Here goes an activator that is at least instance of player
    playerCommands:
    - SET_ITEM_COLOR slot:1 color:0
SET_ITEM_ATTRIBUTE
- Info: Define un atributo en un ítem.
- Ajustes del comando:
{slot}: El slot donde se aplicará. (-1 para la mano principal){attribute}: El atributo que quieres añadir. Attributes{value}: El valor de la operación{equipmentSlot}: El slot para el atributo EquipmentSlots
- Ejemplo:
activators:
  activator0: # Activator ID, you can create as many activator on the activators list
    option: # Here goes an activator that is at least instance of player
    playerCommands:
    - SET_ITEM_ATTRIBUTE slot:%slot% attribute:GENERIC_ARMOR value:10 equipmentSlot:CHEST
SET_ITEM_COOLDOWN
- Da al jugador/objetivo un cooldown sobre un ítem
- Ajustes del comando:
{material or group}: El tipo de material o el grupo. Más información sobre el grupo{cooldown}: cooldown en segundos
- Ejemplo:
activators:
  activator0: # Activator ID, you can create as many activator on the activators list
    option: # Here goes an activator that is at least instance of player
    playerCommands:
    - SET_ITEM_COOLDOWN material:ENDER_PEARL cooldown:10
activators:
  activator0: # Activator ID, you can create as many activator on the activators list
    option: # Here goes an activator that is at least instance of player
    playerCommands:
    - SET_ITEM_COOLDOWN group:my_cooldown_group cooldown:10
SET_ITEM_CUSTOM_MODEL_DATA
- Info: Define un custom model data específico para el ítem indicado
- Ajustes del comando:
{slot}: El slot donde se aplicará. (-1 para la mano principal){customModelData}: valor del customModelData
- Ejemplo:
activators:
  activator0: # Activator ID, you can create as many activator on the activators list
    option: # Here goes an activator that is at least instance of player
    playerCommands:
    - SET_ITEM_CUSTOM_MODEL_DATA slot:10 customModelData:10
SET_ITEM_LORE
- Info: Define una línea de lore
- Ajustes del comando:
{slot}: Número de slot (-1 para la mano principal)
{line}: Si quieres definir la primera línea de lore, pon 1{text}: El texto de la nueva línea- Ejemplo:
activators:
  activator0: # Activator ID, you can create as many activator on the activators list
    option: # Here goes an activator that is at least instance of player
    playerCommands:
    - SET_ITEM_LORE slot:%slot% line:3 text:&6LEGENDARY SWORD
SET_ITEM_MATERIAL
VERSION
- Reemplaza el material del ítem por un material diferente conservando el nbt del ítem objetivo
- Ajustes del comando:
{slot}: Número de slot (-1 para la mano principal)
{material}: El material en el que quieres que se convierta el ítem- Ejemplo:
activators:
  activator0: # Activator ID, you can create as many activator on the activators list
    option: # Here goes an activator that is at least instance of player
    playerCommands:
    - SET_ITEM_MATERIAL slot:10 material:DIAMOND_HOE
SET_ITEM_MODEL
- Info: Define un modelo personalizado para tu ítem en un slot específico
- Ajustes del comando:
{slot}: El slot donde se aplicará. (-1 para la mano principal){model}: el valor del modelo que quieres aplicar al ítem objetivo
- Ejemplo:
activators:
  activator0: # Activator ID, you can create as many activator on the activators list
    option: # Here goes an activator that is at least instance of player
    playerCommands:
    - SET_ITEM_MODEL slot:-1 model:minecraft:stone
SET_ITEM_NAME
- Info: Define un nombre personalizado para tu ítem en un slot específico
- Ajustes del comando:
{slot}: El slot donde se aplicará. (-1 para la mano principal){name}: el nuevo nombre del ítem
- Ejemplo:
activators:
  activator0: # Activator ID, you can create as many activator on the activators list
    option: # Here goes an activator that is at least instance of player
    playerCommands:
    - SET_ITEM_NAME slot:%slot% name:&eThis is the new name of the item
SET_ITEM_POTIONCOLOR
- Info: Define un color personalizado para la poción de un ítem en un slot específico
- Ajustes del comando:
{slot}: El slot donde se aplicará. (-1 para la mano principal){color}: El color que quieres aplicar. Para el color, ve ahttps://www.tydac.ch/color/y obtén el valorMapInfo Colordel color que elijas.
- Ejemplo:
activators:
  activator0: # Activator ID, you can create as many activator on the activators list
    option: # Here goes an activator that is at least instance of player
    playerCommands:
    - SET_ITEM_POTIONCOLOR slot:%slot% color:10944256
SET_ITEM_TOOLTIPSTYLE
- Info: Define el estilo de tooltip personalizado del ítem en el slot.
- Ajustes del comando:
{slot}: El slot donde se aplicará. (-1 para la mano principal){tooltipModel}: (Valor por defecto:namespace:id) El id del tooltip.
- Ejemplo:
activators:
  activator0: # Activator ID, you can create as many activator on the activators list
    option: # Here goes an activator that is at least instance of player
    playerCommands:
    - SET_ITEM_TOOLTIPSTYLE slot:-1 tooltipModel:namespace:id
SET_PLAYER_TIME
- Info: Define la hora del jugador sin afectar a la hora del lado del servidor.
- Ajustes del comando:
{time}: El valor de la hora. Introduce-1para que la hora del jugador vuelva a depender de la hora del servidor.{relative}: (Valor por defecto: false) Si no es true, definirá la hora del punto de vista del usuario literalmente con ese valor. Pero si es true, tomará la hora actual del mundo y le sumará el valor proporcionado para definir la hora actual de tu punto de vista.
- Ejemplo:
activators:
  activator0: # Activator ID, you can create as many activator on the activators list
    option: # Here goes an activator that is at least instance of player
    playerCommands:
    - SET_PLAYER_TIME time:6000 relative:false
SET_PLAYER_WEATHER
- Info: Define el clima del jugador sin afectar al clima del lado del servidor.
- Ajustes del comando:
{weather The time value}: Define el clima del jugador desde su punto de vista- Opciones:
- RESET : Lo restaura al clima del lado del servidor
- DOWNFALL : Lluvia o nieve según el bioma
- CLEAR : Clima despejado, nubes pero sin lluvia.
- Opciones:
- Ejemplo:
activators:
  activator0: # Activator ID, you can create as many activator on the activators list
    option: # Here goes an activator that is at least instance of player
    playerCommands:
    - SET_PLAYER_WEATHER weather:CLEAR
SET_TEMP_BLOCK_POS
- Info : Coloca un bloque temporal
- Ajustes del comando:
{x}: Coordenada X{y}: Coordenada Y{z}: Coordenada Z{world}: Nombre del mundo{material}: ID del bloque{time}: Tiempo en ticks[bypassProtection]: (Opcional) (por defecto = false) Indica si se ignora o no la intervención de terceros[whitelistCurrentBlock]: (Opcional) (por defecto = se puede colocar sobre cualquier tipo de bloque) Lista de bloques a tener en cuenta- Ejemplos:
- AIR, WATER
- !STONE, !COBBLESTONE
activators:
  activator0: # Activator ID, you can create as many activator on the activators list
    option: # Here goes an activator that is at least instance of player
    playerCommands:
    - SET_TEMP_BLOCK_POS x:%entity_x% y:%entity_y% z:%entity_z% world:%entity_world% material:BEDROCK time:40 bypassProtection:true whitelistCurrentBlock:!AIR,!WATER
No reemplaza los bloques que tienen datos extra (inventario, rotación, etc.)
SPAWN_ENTITY_ON_CURSOR
- Info: Genera entidades en tu cursor
- Puedes especificar un EntityType
- O una definición de entidad, por ejemplo:
{HasVisualFire:1b,id:"minecraft:bee"}(1.21.+) - O un ID de MythicMob
- Ajustes del comando:
{entity}: La especificación de la entidad{amount}: La cantidad de mobs que aparecerán en ese punto[maxRange]: (Opcional) (por defecto = 200) El alcance máximo de la aparición
- Ejemplo:
activators:
  activator0: # Activator ID, you can create as many activator on the activators list
    option: # Here goes an activator that is at least instance of player
    playerCommands:
    - SPAWN_ENTITY_ON_CURSOR entity:CREEPER amount:1
# With EntitySnapshot
- SPAWN_ENTITY_ON_CURSOR entity:{HasVisualFire:1b,id:"minecraft:bee"} amount:1

# With MythicMob ID
- SPAWN_ENTITY_ON_CURSOR entity:MyCustomBossID amount:1
SUDO
- Info: Te obliga a ejecutar un comando
- Ajuste del comando:
{command}: El comando a ejecutar
- Ejemplo:
activators:
  activator0: # Activator ID, you can create as many activator on the activators list
    option: # Here goes an activator that is at least instance of player
    playerCommands:
    - SUDO sit
    - SUDO say hi
SUDO_OP
- Info: Da OP al jugador, le hace ejecutar el comando con SUDO y le quita el OP (DEOP)
- Info adicional: Durante el OP, el jugador solo puede ejecutar el comando especificado tras SUDOOP; todos los demás comandos están bloqueados mientras el jugador es OP, y si el servidor se cae, no hay problema. Al volver a conectarse, el jugador perderá el OP.
- Ajustes del comando:
{command}: El comando a ejecutar con OP
- Ejemplo:
activators:
  activator0: # Activator ID, you can create as many activator on the activators list
    option: # Here goes an activator that is at least instance of player
    playerCommands:
    - SUDO_OP summon zombie
    - SUDO_OP fly
    - SUDO_OP god
    - SUDO_OP /replacenear 20 tnt
No se recomienda usar esto mucho. Como se explica al principio de esta página, si quieres ejecutar comandos vanilla, usa el comando execute (explicado en la FAQ Cómo usar los comandos vanilla).
Usa SUDOOP solo si no hay absolutamente ninguna otra opción: debería ser tu último recurso, no tu primera elección.
SWAP_HAND
- Info: Intercambia el ítem actual con el ítem de tu mano secundaria
- Sin ajustes del comando
- Ejemplo:
activators:
  activator0: # Activator ID, you can create as many activator on the activators list
    option: # Here goes an activator that is at least instance of player
    playerCommands:
    - SWAP_HAND
TRANSFER_ITEM
- Info: Intercambia 2 ítems del inventario por slot
- Ajustes del comando:
{slot of launcher}: Slot objetivo para el slot n.º 1{slot of receiver}: Slot objetivo para el slot n.º 2
[boolean drop]: (Opcional) (por defecto = false) Indica si el slot del lanzador se suelta o no durante el intercambio
XP_BOOST
- Info: Aumenta la ganancia de xp durante un tiempo.
- Ajustes del comando:
{multiplier}: Valor del multiplicador de XP{timeinsecs}: Duración en segundos
- Ejemplo:
activators:
  activator0: # Activator ID, you can create as many activator on the activators list
    option: # Here goes an activator that is at least instance of player
    playerCommands:
    - XP_BOOST 2 10
¡Ten cuidado! Este comando puede acumularse, así que si lo ejecutas varias veces obtendrás multiplicadores cada vez mayores si el tiempo entre ellos no basta para que el último boost desaparezca.\
- XP_BOOST 2 5
- DELAY 1
- XP_BOOST 2 5
Esto significa que la XP se aumentará en este orden:
- 1 segundo: x2
- 4 segundos: x4
- 1 segundo: x2
Pruébalo ahora
Copia esto en ExecutableItems y recarga
Tomado de esta página. Pégalo en una configuración, ejecuta el comando de reload del plugin y tendrás un punto de partida funcional para editar.
activators:
  activator0: # Activator ID, you can create as many activator on the activators list
    option: # Here goes an activator that is at least instance of player
    playerCommands:
    - ABSORPTION amount:5 time:200 # Gives the player absorption
  activator1: # Activator ID, you can create as many activator on the activators list
    option: # Here goes an activator that is at least instance of target
    targetCommands:
- ABSORPTION amount:5 time:200 # Gives the target absorptionPlugin usado en esta página
ExecutableItemsÍtems personalizados con habilidades, activadores y comandos, sin código.