
Esta página se tradujo del inglés con ayuda de IA. Mejora esta traducción o lee el original.
Comandos Mixtos (Jugador y Entidad)
Estos comandos personalizados funcionan tanto para Player como para Entity
Así que en:
- playerCommands
- targetCommands
- entityCommands
- ownerCommands
- ...
Ordenados alfabéticamente
ADD_TEMPORARY_ATTRIBUTE
- Info: Añade atributos temporales a un jugador/entidad
- Ajustes del comando:
{attribute}: Lista de atributos{amount}: Valor Double que tendrá el atributo temporal{operation}: Lista de operaciones{time in ticks}: Cantidad de tiempo antes de que el atributo expire
- Ejemplo:
ADD_TEMPORARY_ATTRIBUTE GRAVITY 2 ADD_NUMBER 5ADD_TEMPORARY_ATTRIBUTE attribute:SCALE amount:1.2 operation:ADD_NUMBER timeinticks:120
ALL_PLAYERS
- Info: Selecciona a todos los jugadores.
- Ajuste del comando:
{command}: El comando que se ejecutará
- Ejemplo:
activators:
  activator0: # Activator ID, you can create as many activators on the activators list
    option: # Here goes an activator that is at least instance of player
    playerCommands:
    - ALL_PLAYERS SEND_MESSAGE Hello %parseother_`{%around_target%}`_`{player_name}`%
  activator1: # Activator ID, you can create as many activators on the activators list
    option: # Here goes an activator that is at least instance of target
    targetCommands:
    - ALL_PLAYERS SEND_MESSAGE %target% has been hit by %player%
  activator2: # Activator ID, you can create as many activators on the activators list
    option: # Here goes an activator that is at least instance of entity
    entityCommands:
    - ALL_PLAYERS SEND_MESSAGE %entity% has been hit by %player%
Ejecutar múltiples comandos: Dar un ítem aleatorio a todos los jugadores, no todos los jugadores tendrán el mismo.
activators:
  activator0: # Activator ID, you can create as many activators on the activators list
    option: # Here goes an activator that is at least instance of player
    playerCommands:
    - ALL_PLAYERS RANDOM_RUN selectionCount:1 <+> ei give %around_target% candy1 1 <+> ei give %around_target% candy2 1 <+> ei give %around_target% candy3 1 <+> RANDOM_END
  activator1: # Activator ID, you can create as many activators on the activators list
    option: # Here goes an activator that is at least instance of target
    targetCommands:
    - ALL_PLAYERS RANDOM_RUN selectionCount:1 <+> ei give %around_target% candy1 1 <+> ei give %around_target% candy2 1 <+> ei give %around_target% candy3 1 <+> RANDOM_END
  activator2: # Activator ID, you can create as many activators on the activators list
    option: # Here goes an activator that is at least instance of entity
    entityCommands:
    - ALL_PLAYERS RANDOM_RUN selectionCount:1 <+> ei give %around_target% candy1 1 <+> ei give %around_target% candy2 1 <+> ei give %around_target% candy3 1 <+> RANDOM_END
ALL_MOBS
- Info: Selecciona a todos los jugadores.
- Ajuste del comando:
{command(s)}: El comando que se ejecutará
- Ejemplo:
activators:
  activator0: # Activator ID, you can create as many activators on the activators list
    option: # Here goes an activator that is at least instance of player
    playerCommands:
    - ALL_MOBS DAMAGE 5
    - ALL_MOBS BLACKLIST(ZOMBIE,ARMORSTAND) DAMAGE 20
    - ALL_MOBS WHITELIST(ZOMBIE) DAMAGE 20
  activator1: # Activator ID, you can create as many activators on the activators list
    option: # Here goes an activator that is at least instance of target
    targetCommands:
    - ALL_MOBS DAMAGE 5
    - ALL_MOBS BLACKLIST(ZOMBIE,ARMORSTAND) DAMAGE 20
    - ALL_MOBS WHITELIST(ZOMBIE) DAMAGE 20
  activator2: # Activator ID, you can create as many activators on the activators list
    option: # Here goes an activator that is at least instance of entity
    entityCommands:
    - ALL_MOBS DAMAGE 5
    - ALL_MOBS BLACKLIST(ZOMBIE,ARMORSTAND) DAMAGE 20
    - ALL_MOBS WHITELIST(ZOMBIE) DAMAGE 20
Ejecutar múltiples playerCommands:
activators:
  activator0: # Activator ID, you can create as many activators on the activators list
    option: # Here goes an activator that is at least instance of player
    playerCommands:
    - ALL_MOBS DAMAGE 5 <+> effect give %around_target_uuid% strength 10 1
  activator1: # Activator ID, you can create as many activators on the activators list
    option: # Here goes an activator that is at least instance of target
    targetCommands:
    - ALL_MOBS DAMAGE 5 <+> effect give %around_target_uuid% strength 10 1
  activator2: # Activator ID, you can create as many activators on the activators list
    option: # Here goes an activator that is at least instance of entity
    entityCommands:
    - ALL_MOBS DAMAGE 5 <+> effect give %around_target_uuid% strength 10 1
Admite blacklist y whitelist
AROUND
- Info: Selecciona a los jugadores en un radio específico y hace que ejecuten comandos
- Ajustes del comando:
{distance}: A qué distancia de radio el comando seleccionará jugadores (Por defecto 3){displayMsgIfNoPlayer}: (true o false) Para notificar al usuario del ítem si logró o no seleccionar jugadores (Por defecto true){throughBlocks}: Afectará o no a los jugadores que estén detrás de bloques (Por defecto true){safeDistance}: Si la distancia entre el objetivo y quien lanza el comando es menor o igual al valor de safeDistance, el objetivo no se verá afectado. (Por defecto 0){offsetYaw}: La dirección de yaw que quieres que tenga tu offset (Independiente del valor de yaw del origen){offsetPitch}: La dirección de pitch que quieres que tenga tu offset (Independiente del valor de yaw del origen){offsetDistance}: Tras calcular offsetYaw y offsetPitch, usando el valor de esto, moverá la posición/punto central del comando AROUND desde la ubicación xyz del origen.{limit}: La cantidad de objetivos que pueden verse afectados{sort}: Útil para la opción de límite.- NEAREST: Selecciona las entidades más cercanas al origen.
- RANDOM: Selecciona aleatoriamente cualquier entidad dentro del rango del comando.
{regionCheck}: true/false. Si es true, el comando AROUND comprobará si el objetivo está en tierra salvaje o en el claim de quien lanza el comando (Contexto del plugin GriefPrevention) (Se actualizará próximamente para comprobarse con otros plugins de claims){commands}: Los comandos que se ejecutarán para los jugadores objetivo.
¡Puedes añadir múltiples comandos! Usa el separador <+>
Ejemplo: SEND_MESSAGE &cYou will be damaged in 5 seconds <+> DELAY 5 <+> DAMAGE 5
Placeholders: Los placeholders son los mismos que los Player Placeholders pero necesitas reemplazar "player" por "around_target"
Ejemplo: %around_target%, %around_target_uuid%
- Ejemplos:
Esto invoca un rayo en los jugadores dentro de un radio de 20 bloques
activators:
  activator0: # Activator ID, you can create as many activator on the activators list
    option: # Here goes an activator that is at least instance of player
    playerCommands:
    - AROUND distance:20 displayMsgIfNoPlayer:false execute at %around_target% run summon lightning_bolt
Enviar un mensaje a jugadores entre 5 y 10 bloques
activators:
  activator0: # Activator ID, you can create as many activator on the activators list
    option: # Here goes an activator that is at least instance of player
    playerCommands:
    - AROUND distance:10 displayMsgIfNoPlayer:true throughBlocks:true safeDistance:5 SENDMESSAGE &eIt is a test !
Puedes anidar AROUND con los comandos: AROUND, IF, NEAREST, ALL_PLAYERS
Si haces eso, el separador y los placeholders evolucionarán dependiendo del paso anidado.
separador del comando base: <+>
primer comando anidado: <+::step1>
...: <+::step2>; , <+::step3>, ...
placeholder base: %around_target%
primer comando anidado: %around_target::step1%
...: %around_target::step2%, %around_target::step3%, ...
Ejemplos:
activators:
  activator0: # Activator ID, you can create as many activator on the activators list
    option: # Here goes an activator that is at least instance of player
    playerCommands:
    - AROUND distance:5 displayMsgIfNoPlayer:false say &a(0)&e%around_target% <+> DELAY 3 <+> AROUND distance:5 displayMsgIfNoPlayer:false say &a(1)&e%around_target::step1% <+::step1> DELAY 3 <+::step1> AROUND distance:5 displayMsgIfNoPlayer:false say &a(2)&e%around_target::step2%
activators:
  activator0: # Activator ID, you can create as many activator on the activators list
    option: # Here goes an activator that is at least instance of player
    playerCommands:
    - AROUND say &a(0)&e%around_target% <+> DELAY 3 <+> NEAREST 10 say &a(1)&e%around_target::step1%
activators:
  activator0: # Activator ID, you can create as many activator on the activators list
    option: # Here goes an activator that is at least instance of player
    playerCommands:
    - AROUND distance:10 throughBlocks:false displayMsgIfNoPlayer:false say &a(0)&e%around_target% <+> DELAY 3 <+> AROUND distance:5 displayMsgIfNoPlayer:false say &a(1)&e%around_target::step1% and x &c%around_target_x::step1% <+::step1> IF %around_target_x::step1%>10 say &aThe target &e%around_target_x::step2% <+::step2> effect give %around_target::step2% slowness 20
Puedes añadir condiciones con placeholders personalizados para ajustar los jugadores seleccionados
Formato: AROUND <settings> CONDITIONS(<conditions>) <command>
 \<settings> son los ajustes del comando

 \<conditions> son las condiciones
Formato de las condiciones: CONDITIONS(%::<my_placeholder_name>::%<comparator><value>)
  \<my\_placeholder\_name> es el nombre del placeholder

  \<comparator> El comparador: "`<`", "`<=`", "`=`", "`>`", "`>=`"

  \<value> el valor
Puedes añadir múltiples condiciones usando el separador "&&"
- Ejemplos:
activators:
  activator0: # Activator ID, you can create as many activator on the activators list
    option: # Here goes an activator that is at least instance of player
    playerCommands:
    - 'AROUND distance:10 CONDITIONS(%::player_health::%>10&&%::player_name::%=2Ssomar) SEND_MESSAGE &eclick'
Ten en cuenta que la parte CONDITIONS() procesa los placeholders que contiene con el jugador seleccionado por el comando AROUND. Así que lo que realmente ocurre en los placeholders de arriba es que se comprueba si la salud del objetivo es mayor que 10 y si ese jugador seleccionado por el comando AROUND se llama "2Ssomar"
activators:
  activator0: # Activator ID, you can create as many activator on the activators list
    option: # Here goes an activator that is at least instance of player
    playerCommands:
    - AROUND distance:10 displayMsgIfNoPlayer:false CONDITIONS(%::parseother_`{%player%}`_`{betterteams_name}`::%!=%::betterteams_name::%) effect give %around_target% weakness 10 10 true
activators:
  activator0: # Activator ID, you can create as many activator on the activators list
    option: # Here goes an activator that is at least instance of player
    playerCommands:
    - 'AROUND distance:2 CONDITIONS(%::player_name::%!=%player%) DAMAGE 15'
Los placeholders que provienen de plugins como ExecutableItems, ExecutableBlocks no serán procesados por el jugador afectado por el comando AROUND.
Por ejemplo, con ExecutableBlocks, CONDITIONS(%var_faction%=%::factionsuuid_faction_name::%) funciona comprobando si el valor de la variable de facción del bloque es igual a la facción del jugador seleccionado
Fuente del placeholder: PlaceholderAPI)
BACK_DASH
- Info: Lanza al jugador/objetivo en la dirección opuesta a la que está mirando (NO PUEDES SER LANZADO EN EL AIRE)
- Ajuste del comando:
{amount}: El valor de lo fuerte que será el lanzamiento
- Ejemplo:
activators:
  activator0: # Activator ID, you can create as many activators on the activators list
    option: # Here goes an activator that is at least instance of player
    playerCommands:
    - BACK_DASH 5
  activator1: # Activator ID, you can create as many activators on the activators list
    option: # Here goes an activator that is at least instance of target
    targetCommands:
    - BACK_DASH 5
  activator2: # Activator ID, you can create as many activators on the activators list
    option: # Here goes an activator that is at least instance of entity
    entityCommands:
    - BACK_DASH 5
BURN
- Info: Quema al jugador/objetivo
- Ajuste del comando:
{timeinsecs}: Tiempo de quemadura en segundos- Ejemplo:
activators:
  activator0: # Activator ID, you can create as many activators on the activators list
    option: # Here goes an activator that is at least instance of player
    playerCommands:
    - BURN 200
  activator1: # Activator ID, you can create as many activators on the activators list
    option: # Here goes an activator that is at least instance of target
    targetCommands:
    - BURN 200
  activator2: # Activator ID, you can create as many activators on the activators list
    option: # Here goes an activator that is at least instance of entity
    entityCommands:
    - BURN 200
CONSOLE_MESSAGE
- Info: Envía un mensaje a la consola
- Ajuste del comando:
{text}: Texto para enviar a la consola
- Ejemplo:
activators:
  activator0: # Activator ID, you can create as many activators on the activators list
    option: # Here goes an activator that is at least instance of player
    playerCommands:
    - CONSOLE_MESSAGE This is a debug message sent to the %player%
  activator1: # Activator ID, you can create as many activators on the activators list
    option: # Here goes an activator that is at least instance of target
    targetCommands:
    - CONSOLE_MESSAGE This is a debug message sent to the %player% triggered by %target%
  activator2: # Activator ID, you can create as many activators on the activators list
    option: # Here goes an activator that is at least instance of entity
    entityCommands:
    - CONSOLE_MESSAGE This is a debug message sent to the %player% triggered by %entity%
COPY_EFFECTS
- Info: Copia los efectos del objetivo
- Ajuste del comando:
[limitDuration]: (Opcional) (por defecto = sin límite) significa que si el objetivo tiene por ejemplo 3 minutos de efecto de veneno, si lo limitas a 5 segundos, solo recibirás un efecto de veneno de 5 segundos
- Ejemplo:
activators:
  activator0: # Activator ID, you can create as many activators on the activators list
    option: # Here goes an activator that is at least instance of player
    playerCommands:
    - COPY_EFFECTS 5 # Using this will copy the player's own effects
  activator1: # Activator ID, you can create as many activators on the activators list
    option: # Here goes an activator that is at least instance of target
    targetCommands:
    - COPY_EFFECTS 5 # Using this will copy the target effects into the player
  activator2: # Activator ID, you can create as many activators on the activators list
    option: # Here goes an activator that is at least instance of entity
    entityCommands:
    - COPY_EFFECTS 5 # Using this will copy the entity effects into the player
CUSTOMDASH1
- Info: Te lanza hacia una ubicación específica
- Ajustes del comando:
{x}: Coordenada X{y}: Coordenada Y{z}: Coordenada Z{fallDamage}: true o false. Si el jugador recibirá o no daño de caída tras ser lanzado por este comando.
- Ejemplo:
activators:
  activator0: # Activator ID, you can create as many activators on the activators list
    option: # Here goes an activator that is at least instance of player
    playerCommands:
    - CUSTOMDASH1 %player_x% %player_y%+5 %player_z% true # This will dash up the player
  activator1: # Activator ID, you can create as many activators on the activators list
    option: # Here goes an activator that is at least instance of target
    targetCommands:
    - CUSTOMDASH1 %target_x% %target_y%+5 %target_z% true # This will dash up the target
  activator2: # Activator ID, you can create as many activators on the activators list
    option: # Here goes an activator that is at least instance of entity
    entityCommands:
    - CUSTOMDASH1 %entity_x% %entity_y% %entity_z% true # This will dash up the entity
Si tienes activadores relacionados entre dos tipos de objetivos, entonces puedes hacer
- Ejemplo 1 | Instancia de player - entity | Lanza al jugador hacia la entidad
activators:
  activator0: # Activator ID, you can create as many activators on the activators list
    option: # Activator instance of player and entity
    playerCommands:
    - CUSTOMDASH1 %entity_x% %entity_y% %entity_z% true
    entityCommands: []
- Ejemplo 2 | Instancia de player - entity | Lanza a la entidad hacia el jugador
activators:
  activator0: # Activator ID, you can create as many activators on the activators list
    option: # Activator instance of player and entity
    playerCommands: []
    entityCommands:
    - CUSTOMDASH1 %player_x% %player_y% %player_z% true
- Ejemplo 3 | Instancia de player - block | Lanza al jugador hacia el bloque
activators:
  activator0: # Activator ID, you can create as many activators on the activators list
    option: # Activator instance of player and block
    playerCommands:
    - CUSTOMDASH1 %block_x% %block_y% %block_z% true
    blockCommands: []
Puedes aumentar la fuerza del comando ejecutándolo varias veces (pero no en el mismo tick, deben estar diferenciados en el tiempo, de otro modo no tendría sentido ya que harías que el jugador se lance desde la misma posición contra la ubicación), ejemplos:
- Ejecutándolo varias veces manualmente
activators:
  activator0: # Activator ID, you can create as many activators on the activators list
    option: # Here goes an activator that is at least instance of player
    playerCommands:
    - CUSTOMDASH1 %player_x% %player_y%+5 %player_z% true # This will dash up the player
    - DELAYTICK 1
    - CUSTOMDASH1 %player_x% %player_y%+5 %player_z% true # This will dash up the player
    - DELAYTICK 1
    - CUSTOMDASH1 %player_x% %player_y%+5 %player_z% true # This will dash up the player
- Usando el comando de utilidad LOOP START
activators:
  activator0: # Activator ID, you can create as many activators on the activators list
    option: # Here goes an activator that is at least instance of player
    playerCommands:
    - 'LOOP START: 3'
    - CUSTOMDASH1 %player_x% %player_y%+5 %player_z% true # This will dash up the player
    - DELAYTICK 1
    - LOOP END
CUSTOMDASH2
- Info: Te lanza alejándote de una ubicación específica
- Ajustes del comando:
{x}: Coordenada X{y}: Coordenada Y{z}: Coordenada Z{strength}: Fuerza del lanzamiento
- Ejemplo:
activators:
  activator0: # Activator ID, you can create as many activators on the activators list
    option: # Here goes an activator that is at least instance of player
    playerCommands:
    - CUSTOMDASH2 %player_x% %player_y%+5 %player_z% 5 # This will dash down the player with strength 5
  activator1: # Activator ID, you can create as many activators on the activators list
    option: # Here goes an activator that is at least instance of target
    targetCommands:
    - CUSTOMDASH2 %target_x% %target_y%+5 %target_z% 5 # This will dash down the target with strength 5
  activator2: # Activator ID, you can create as many activators on the activators list
    option: # Here goes an activator that is at least instance of entity
    entityCommands:
    - CUSTOMDASH2 %entity_x% %entity_y% %entity_z% 5 # This will dash down the entity with strength 5
Si tienes activadores relacionados entre dos tipos de objetivos, entonces puedes hacer
- Ejemplo 1 | Instancia de player - entity | Lanza al jugador lejos de la entidad
activators:
  activator0: # Activator ID, you can create as many activators on the activators list
    option: # Activator instance of player and entity
    playerCommands:
    - CUSTOMDASH1 %entity_x% %entity_y% %entity_z% 5
    entityCommands: []
- Ejemplo 2 | Instancia de player - entity | Lanza a la entidad lejos del jugador
activators:
  activator0: # Activator ID, you can create as many activators on the activators list
    option: # Activator instance of player and entity
    playerCommands: []
    entityCommands:
    - CUSTOMDASH1 %player_x% %player_y% %player_z% 5
- Ejemplo 3 | Instancia de player - block | Lanza al jugador lejos del bloque
activators:
  activator0: # Activator ID, you can create as many activators on the activators list
    option: # Activator instance of player and block
    playerCommands:
    - CUSTOMDASH1 %block_x% %block_y% %block_z% 5
    blockCommands: []
CUSTOMDASH3
- Info: Lanza al objetivo siguiendo una función matemática específica
- Ajustes del comando:
{function}: La función matemática a seguir. Sitio web de calculadora de funciones{max x value}: Valor máximo de x de la función{front z}: Si el lanzamiento es hacia adelante o hacia atrás
- Ejemplo:
activators:
  activator0: # Activator ID, you can create as many activators on the activators list
    option: # Here goes an activator that is at least instance of player
    playerCommands:
    - CUSTOMDASH3 cosx 10 true
  activator1: # Activator ID, you can create as many activators on the activators list
    option: # Here goes an activator that is at least instance of target
    targetCommands:
    - CUSTOMDASH3 cosx 10 true
  activator2: # Activator ID, you can create as many activators on the activators list
    option: # Here goes an activator that is at least instance of entity
    entityCommands:
    - CUSTOMDASH3 cosx 10 true
DAMAGE
- Info: Daña al jugador con una cantidad específica. (El daño infligido con la ayuda de este comando se cuenta como daño de jugador)
-
Este comando dispara los activadores relacionados con el daño de ExecutableItems y ExecutableEvents
-
El tipo de daño de Spigot es ENTITY_ATTACK si hay un jugador implicado en el activador.
De lo contrario, el tipo de daño de Spigot es CUSTOM
-
- Ajustes del comando:
{amount}: Cantidad de daño en puntos de vida (No en corazones){amplified If Strength Effect}: true o false, Strength 1 -> + 1.5 de daño, ....{amplified with attack attribute}: true o false, obtendrá la suma de todos tus atributos ATTACK_DAMAGE existentes que tengan el operadorMULTIPLY_SCALAR_1, lo multiplicará en base a tu daño de ataque actual (incluyendo el efecto strength si está activado)
InformaciónFórmula:
total damage= (amount*strength effect) * (sum of all of your attack damage attributes with the operator (add_multiplied_total/MULTIPLY_SCALAR_1)+1){damageType}: El tipo de daño -> Lista de DamageType
- Ejemplo:
activators:
  activator0: # Activator ID, you can create as many activators on the activators list
    option: # Here goes an activator that is at least instance of player
    playerCommands:
    - DAMAGE 20 true true # Apply 20 of damage to the player
  activator1: # Activator ID, you can create as many activators on the activators list
    option: # Here goes an activator that is at least instance of target
    targetCommands:
    - DAMAGE 20 true true # Apply 20 of damage to the target
  activator2: # Activator ID, you can create as many activators on the activators list
    option: # Here goes an activator that is at least instance of entity
    entityCommands:
    - DAMAGE 20 true true # Apply 20 of damage to the entity
activators:
  activator0: # Activator ID, you can create as many activators on the activators list
    option: # Here goes an activator that is at least instance of player
    playerCommands:
    - DAMAGE 25% # Will apply 25% of the max health of the player as damage
  activator1: # Activator ID, you can create as many activators on the activators list
    option: # Here goes an activator that is at least instance of target
    targetCommands:
    - DAMAGE 25% # Will apply 25% of the max health of the target as damage
  activator2: # Activator ID, you can create as many activators on the activators list
    option: # Here goes an activator that is at least instance of entity
    entityCommands:
    - DAMAGE 25% # Will apply 25% of the max health of the entity as damage
Para aplicar daño real puedes usar:
- 1.20.5++ usa el comando /minecraft:damage, por ejemplo
minecraft:damage %target% 10 by %player%
- 1.20.5-- usa el comando REGAIN HEALTH, no es lo mejor pero es una solución alternativa.
DAMAGE_NO_KNOCKBACK
- Info: Daña al jugador con una cantidad específica sin aplicar knockback. (El daño infligido con la ayuda de este comando no se cuenta como daño de jugador y es más bien un daño indirecto)
-
Este comando dispara los activadores relacionados con el daño de ExecutableItems y ExecutableEvents
-
El tipo de daño de Spigot es ENTITY_ATTACK si hay un jugador implicado en el activador.
De lo contrario, el tipo de daño de Spigot es CUSTOM
-
- Ajustes del comando:
{amount}: Cantidad de daño en puntos de vida (No en corazones){amplified If Strength Effect}: true o false, Strength 1 -> + 1.5 de daño, ....{amplified with attack attribute}: true o false, jugador con 500% de daño bonus, el comando hará 5 x "<damage>".
- Ejemplo:
activators:
  activator0: # Activator ID, you can create as many activators on the activators list
    option: # Here goes an activator that is at least instance of player
    playerCommands:
    - DAMAGE_NO_KNOCKBACK 20 true true # Apply 20 of damage to the player
  activator1: # Activator ID, you can create as many activators on the activators list
    option: # Here goes an activator that is at least instance of target
    targetCommands:
    - DAMAGE_NO_KNOCKBACK 20 true true # Apply 20 of damage to the target
  activator2: # Activator ID, you can create as many activators on the activators list
    option: # Here goes an activator that is at least instance of entity
    entityCommands:
    - DAMAGE_NO_KNOCKBACK 20 true true # Apply 20 of damage to the entity
activators:
  activator0: # Activator ID, you can create as many activators on the activators list
    option: # Here goes an activator that is at least instance of player
    playerCommands:
    - DAMAGE_NO_KNOCKBACK 25% # Will apply 25% of the max health of the player as damage
  activator1: # Activator ID, you can create as many activators on the activators list
    option: # Here goes an activator that is at least instance of target
    targetCommands:
    - DAMAGE_NO_KNOCKBACK 25% # Will apply 25% of the max health of the target as damage
  activator2: # Activator ID, you can create as many activators on the activators list
    option: # Here goes an activator that is at least instance of entity
    entityCommands:
    - DAMAGE_NO_KNOCKBACK 25% # Will apply 25% of the max health of the entity as damage
DAMAGE_BOOST
- Info: Te permite darte a ti mismo un aumento de daño personalizado
- Este comando también aumenta el daño de los comandos personalizados, por ejemplo (DAMAGE, DAMAGE_NO_KNOCKBACK)
- Este comando no aumenta el daño de los proyectiles
- Ajustes del comando:
{modification in percentage example 100}: Cantidad del aumento. Ejemplo a continuación:- 50 = Hace que inflijas +50% de daño
- -80 = Hace que inflijas -80% de daño
{timeinticks}: La duración del aumento de daño personalizado
- Ejemplo: (El comando de abajo te da +50% de daño infligido durante 10s)
activators:
  activator0: # Activator ID, you can create as many activators on the activators list
    option: # Here goes an activator that is at least instance of player
    playerCommands:
    - DAMAGE_BOOST 50 200 # This will boost the damage of the player
  activator1: # Activator ID, you can create as many activators on the activators list
    option: # Here goes an activator that is at least instance of target
    targetCommands:
    - DAMAGE_BOOST 50 200 # This will boost the damage of the target
  activator2: # Activator ID, you can create as many activators on the activators list
    option: # Here goes an activator that is at least instance of entity
    entityCommands:
    - DAMAGE_BOOST 50 200 # This will boost the damage of the entity
Este comando se puede usar varias veces y el aumento se irá acumulando, en este ejemplo verás que en [0-10] segundos el jugador aplicará 50% más de daño, luego en [10-20] segundos aplicará 100% más de daño y luego en [20-30] segundos de 50% más de daño, debido a que en [10-20] se acumularon dos comandos de DAMAGE_BOOST.
activators:
  activator0: # Activator ID, you can create as many activators on the activators list
    option: # Here goes an activator that is at least instance of player
    playerCommands:
    - DAMAGE_BOOST 50 200 # This will boost the damage of the player by 50% for 200 ticks (10 seconds)
    - DELAY 10 # Delay of 10 seconds
    - DAMAGE_BOOST 50 200 # This will boost the damage of the player by 50% for 200 ticks (10 seconds)
DAMAGE_RESISTANCE
- Info: Te permite darte a ti mismo una resistencia al daño personalizada aplicándote magnificaciones personalizadas de daño recibido
- Ajustes del comando:
{modification in percentage example 100}: Cantidad de la magnificación. Ejemplo a continuación:- 50 = Hace que recibas +50% de daño
-80 = Hace que recibas -80% de daño
- 50 = Hace que recibas +50% de daño
{timeinticks}: La duración de la resistencia al daño personalizada
- Ejemplo: (El comando de abajo te da +50% de daño recibido durante 10s)
- DAMAGE_RESISTANCE 50 200
EQUIPMENT_VISUAL_REPLACE
- Info: Reemplaza VISUALMENTE (no hay riesgo de perder ítems) un slot de equipamiento con cierto material
- Ajustes del comando:
{EquipmentSlot}: El slot- Opciones:
- -1
- 40
- 36
- 37
- 38
- 39
- Opciones:
{material}: El id del ítem del material con el que quieres reemplazar, o el id de EI{amount}: La cantidad del stack{timeinticks}: Cuánto durará el disfraz. (20 ticks = 1 seg)
- Ejemplo:
- EQUIPMENT_VISUAL_REPLACE 39 CARVED_PUMPKIN 1 100
- EQUIPMENT_VISUAL_REPLACE 39 EI:test 1 100
EQUIPMENT_VISUAL_CANCEL
- Info: Cancela el comando EQUIPMENT_VISUAL_REPLACE
- Ajuste del comando:
{EquipmentSlot}: El slot- Opciones:
- -1
- 40
- 36
- 37
- 38
- 39
- Opciones:
- Ejemplo:
- EQUIPMENT_VISUAL_CANCEL 39
FORCE_DROP
- Alias:
FORCEDROP,DROPSPECIFICEI - Info: Fuerza al jugador/entidad a soltar un ítem. Admite dos modos:
- Modo slot: suelta el ítem en el slot de inventario especificado
- Modo EI ID: suelta todos los ítems que coincidan con el ID de ExecutableItem indicado desde el inventario (solo jugador)
- Ajustes del comando:
slot:: número, -1 para la mano principal (por defecto: -1). Consulta la imagen de referencia de slots a continuación.ei_id:: el ID del ExecutableItem a soltar (anula el modo slot cuando se proporciona)
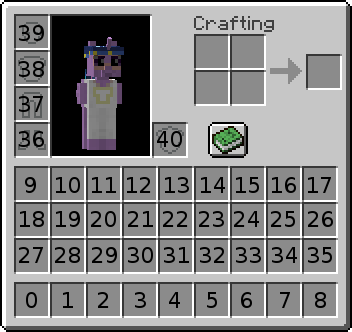
- Ejemplos:
# Drop the item in main hand
- FORCE_DROP slot:-1

# Drop the item in slot 5
- FORCE_DROP slot:5

# Drop all items with the EI id "excalibursword" from the player's inventory
- FORCE_DROP ei_id:excalibursword
FRONTDASH
- Info: Lanza al jugador/objetivo en la dirección a la que está mirando
- Ajustes del comando:
{number}: El valor de lo fuerte que será el lanzamiento{custom_y}: Para establecer un impulso vertical (te recomiendo poner un valor pequeño como 0.5 - 1 si no quieres un salto grande.){falldamage}: para activar o desactivar el daño de caída
- Ejemplo:
- FRONTDASH 5 0.5 false
GLACIAL_FREEZE
- Info: Aplica el congelamiento de la nieve de Minecraft 1.18
- Ajuste del comando:
{time in ticks}: Tiempo del congelamiento en ticks. (20 ticks = 1 seg)- Ejemplo:
- GLACIAL_FREEZE 160
GLOWING
- Info: Aplica glowing al jugador
- Ajustes del comando:
{time in ticks}: Duración del glow en ticks{color}: De qué color será el glow. Referencia de colores
- Ejemplo:
- GLOWING 100 BLUE
HITSCAN_ENTITIES
- Info: Permite ejecutar un comando en cierta dirección hacia entidades
- Ajustes del comando:
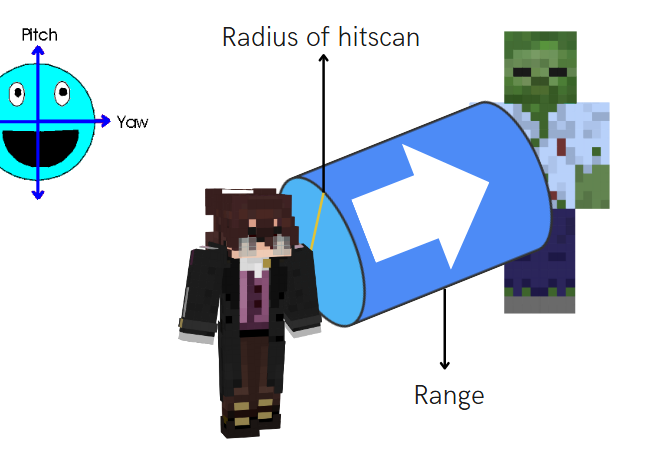
{range}: a qué distancia puede estar una entidad para ser seleccionada por el comando HITSCAN{radiusOfHitscan}: Qué tan ANCHO es el cilindro. Es básicamente la diferencia entre disparar una bala y disparar una bala de cañón.{pitch}: En qué dirección dispararlo, relativo al pitch del jugador{yaw}: Lo mismo que Pitch pero con yaw{leftRightShift}:- -5 = el hitscan EMPIEZA a 5 bloques a la izquierda.
- 0 = El hitscan está centrado donde está el jugador.
- 5 = el hitscan EMPIEZA a 5 bloques a la derecha del jugador.
{yShift}: Igual que left,right, excepto con un eje diferente.{throughEntities}: Booleano: Si el HITSCAN puede atravesar entidades o no.{throughBlocks}: Booleano: Si el HITSCAN puede atravesar bloques o no.{limit}: La cantidad de objetivos que pueden verse afectados{sort}: Útil para la opción de límite.- NEAREST: Selecciona las entidades más cercanas al origen.
- RANDOM: Selecciona aleatoriamente cualquier entidad dentro del rango del comando.
{regionCheck}: true/false. Si es true, el comando AROUND comprobará si el objetivo está en tierra salvaje o en el claim de quien lanza el comando (Contexto del plugin GriefPrevention) (Se actualizará próximamente para comprobarse con otros plugins de claims){command(s)}: Igual que los comandos AROUND, puedes escribircommand1 <+> command2... y usar el placeholder %around_target%
- Ejemplo:
HITSCAN_ENTITIES range:5 radius:0 pitch:0 yaw:0 leftRightShift:0 yShift:0 throughBlocks:true throughEntities:true HEAL 10 <+> BACKDASH 5
Los comandos después de HITSCAN_ENTITIES (y después de cada <+>) se ejecutan en cada entidad golpeada, como entity commands: REGAIN_HEALTH 4 cura a la entidad golpeada, no a quien lanzó el comando. Para actuar sobre quien lanzó el comando, usa un comando vanilla con %player%, por ejemplo HITSCAN_ENTITIES range:8 DAMAGE 4 <+> effect give %player% instant_health 1 0 true.
- Imagen para entender:
HITSCAN_PLAYERS
- Info: Permite ejecutar un comando en cierta dirección hacia jugadores
- Ajustes del comando:
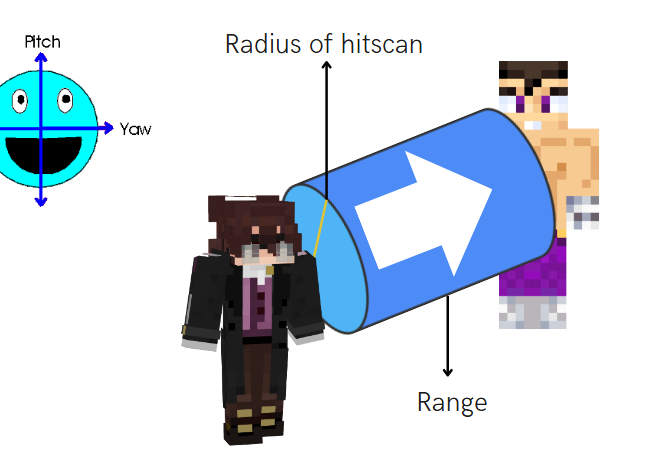
{range}: a qué distancia puede estar una entidad para ser seleccionada por el comando HITSCAN{radiusOfHitscan}: Qué tan ANCHO es el cilindro. Es básicamente la diferencia entre disparar una bala y disparar una bala de cañón.{pitch}: En qué dirección dispararlo, relativo al pitch del jugador{yaw}: Lo mismo que Pitch pero con yaw{leftRightShift}:- -5 = el hitscan EMPIEZA a 5 bloques a la izquierda.
- 0 = El hitscan está centrado donde está el jugador.
- 5 = el hitscan EMPIEZA a 5 bloques a la derecha del jugador.
{yShift}: Igual que left,right, excepto con un eje diferente.{throughEntities}: Booleano: Si el HITSCAN puede atravesar entidades o no.{throughBlocks}: Booleano: Si el HITSCAN puede atravesar bloques o no.{limit}: La cantidad de objetivos que pueden verse afectados{sort}: Útil para la opción de límite.- NEAREST: Selecciona las entidades más cercanas al origen.
- RANDOM: Selecciona aleatoriamente cualquier entidad dentro del rango del comando.
{regionCheck}: true/false. Si es true, el comando AROUND comprobará si el objetivo está en tierra salvaje o en el claim de quien lanza el comando (Contexto del plugin GriefPrevention) (Se actualizará próximamente para comprobarse con otros plugins de claims){command(s)}: Igual que los comandos AROUND, puedes escribircommand1 <+> command2... y usar el placeholder %around_target%
- Ejemplo:
- HITSCAN_PLAYERS range:5 radius:0 pitch:0 yaw:0 leftRightShift:0 yShift:0 throughBlocks:true throughEntities:true DAMAGE 5 <+> JUMP 5
- Imagen para entender:
INVULNERABILITY
- Info: Hace invulnerable al jugador durante cierta cantidad de tiempo
- Ajuste del comando:
{ticks}: Tiempo de la invulnerabilidad en ticks. (20 ticks = 1 seg)- Admite valores negativos para reducir el tiempo de invulnerabilidad, como el que hay tras ser golpeado.
- Ejemplo:
- INVULNERABILITY 60
JUMP
- Info: Lanza al jugador por el aire
- Ajuste del comando:
{number}: Lo fuerte que será el lanzamiento{fall damage}: (Opcional) (por defecto = false) Selecciona si quieres que el comando tenga daño de caída.
- Ejemplo:
- JUMP 20
LAUNCH_ENTITY
- Info: Lanza una entidad en tu dirección
- Ajustes del comando:
{entityType}: ID del mob de la entidad lanzada (TODO EN MAYÚSCULAS) Lista de EntityType{speed}: (número, Double) Define la velocidad de la entidad[angle rotation y]: (solo para 1.14 y superiores) (Opcional) (por defecto = 0) (en grados) Define la dirección en la que se lanzará la entidad
- Ejemplo:
- LAUNCH_ENTITY PIG 2
- Ejemplo para hacer un tri-disparo:
- LAUNCH_ENTITY PIG 2
- LAUNCH_ENTITY PIG 2 15
- LAUNCH_ENTITY PIG 2 -15
MLIB_DAMAGE
- Info: Inflige daño al objetivo pero el tipo de daño es principalmente del plugin MythicLib
- Ajustes del comando:
{number}: Daño infligido a los objetivos (por defecto: 10){damage_type}: Tipo de daño infligido (por defecto: PHYSICAL)- Ejemplo: MAGIC, PHYSICAL, WEAPON, SKILL, PROJECTILE, UNARMED, ON_HIT, MINION, DOT;
{knockback}: true/false si aplica knockback al objetivo o no (por defecto: false){element}: Especifica qué tipo de elemento es el ataque (por defecto: FIRE)- Referencia: Lista de elementos de MythicLib
{crit}: true/false si elCRITICAL_STRIKE_POWERdel atacante se añade o no a la ecuación del daño (por defecto: false)- Ecuación:
number * (number * (total critical_strike_power/100))
- Ecuación:
- Ejemplo:
- MLIB_DAMAGE 10 PHYSICAL false FIRE true
MOB_AROUND
- Info: Selecciona entidades en un radio específico y hace que ejecuten comandos
- Entidades disponibles -> Lista de LivingEntity
- Ajustes del comando:
{distance}: A qué distancia de radio el comando seleccionará entidades{displayMsgIfNoEntity}: (true o false) Para notificar al usuario del ítem si no logró seleccionar ningún mob.- Pon en false para ocultar el mensaje
{throughBlocks}: Afectará o no a los mobs que estén detrás de bloques{safeDistance}: Si la distancia entre el objetivo y quien lanza el comando es menor o igual al valor de safeDistance, el objetivo no se verá afectado.{offsetYaw}: La dirección de yaw que quieres que tenga tu offset (Independiente del valor de yaw del origen){offsetPitch}: La dirección de pitch que quieres que tenga tu offset (Independiente del valor de yaw del origen){offsetDistance}: Tras calcular offsetYaw y offsetPitch, usando el valor de esto, moverá la posición/punto central del comando AROUND desde la ubicación xyz del origen.{limit}: La cantidad de objetivos que pueden verse afectados{sort}: Útil para la opción de límite.- NEAREST: Selecciona las entidades más cercanas al origen.
- RANDOM: Selecciona aleatoriamente cualquier entidad dentro del rango del comando.
{regionCheck}: true/false. Si es true, el comando AROUND comprobará si el objetivo está en tierra salvaje o en el claim de quien lanza el comando (Contexto del plugin GriefPrevention) (Se actualizará próximamente para comprobarse con otros plugins de claims){nonliving}: true/false. Si es true, seleccionará también otras entidades como Arrows y Armor Stands. Cualquier bug que ocurra al ejecutar entity commands con este argumento activado probablemente se ignorará debido al alcance del problema.- Puedes poner en BLACKLIST o WHITELIST entidades añadiendo una de estas en cualquier parte del comando:
- BLACKLIST(ZOMBIE,ARMOR_STAND)
- WHITELIST(CHICKEN)
¡Puedes añadir múltiples comandos! Usa el separador <+>
Ejemplo: minecraft:effect give .. <+> DELAY 5 <+> DAMAGE 5
Placeholders: Los placeholders son los mismos que los Entity Placeholders pero necesitas reemplazar "player" por "around_target"
Ejemplo: %around_target%, %around_target_uuid%
- Ejemplos:
activators:
  activator0: # Activator ID, you can create as many activator on the activators list
    option: # Here goes an activator that is at least instance of player
    playerCommands:
    - MOB_AROUND distance:3 displayMsgIfNoEntity:true throughBlocks:true safeDistance:0 [conditions] COMMAND1 <+> COMMAND2 <+> ...
    - MOB_AROUND distance:3 displayMsgIfNoEntity:false BURN 10
    - MOB_AROUND distance:5 execute at %around_target_uuid% run summon lightning_bolt
    - MOB_AROUND distance:5 BLACKLIST(ZOMBIE,ARMOR_STAND) DAMAGE 20
    - MOB_AROUND distance:5 displayMsgIfNoEntity:false effect give %around_target_uuid% poison 10 10
    - MOB_AROUND distance:10 WHITELIST(ZOMBIE`{CustomName:"*"}`) say HELLO
Para usar nbt de entidad en el campo WHITELIST/BLACKLIST, necesitas instalar el plugin NBT API
Admite NBT Tags así que puedes añadir por ejemplo algo como: ZOMBIE{IsBaby:1}
Ejemplos:
activators:
  activator0: # Activator ID, you can create as many activator on the activators list
    option: # Here goes an activator that is at least instance of player
    playerCommands:
    - MOB_AROUND distance:7 BLACKLIST(ZOMBIE`{CustomName:"Test Test"}`,ZOMBIE`{CustomName:"Miyamoto"}`) false BURN 3
    - MOB_AROUND distance:5 WHITELIST(ZOMBIE`{IsBaby:1}`) DAMAGE 20
    - MOB_AROUND distance:9 WHITELIST(WOLF`{Owner:"%player%"}`) HEAL 5
    - MOB_AROUND distance:9 WHITELIST(WOLF`{Owner:%player_uuid%}`) HEAL 5
Puedes anidar MOB_AROUND con los comandos: MOB_AROUND, IF, MOB_NEAREST, ALL_MOBS
Si haces eso, el separador y los placeholders evolucionarán dependiendo del paso anidado.\
separador del comando base: <+>
primer comando anidado: <+::step1>
...: <+::step2> , <+::step3>, ...
placeholder base: %around_target%
primer comando anidado: %around_target::step1%
...: %around_target::step2%, %around_target::step3%, ...
MOB_NEAREST
- Info: Selecciona al mob más cercano desde el jugador/objetivo.
- Ajustes del comando:
{max accepted distance}: Distancia máxima aceptada que puede tener la "entidad".{command(s)}: Los comandos que se ejecutarán
¡Puedes añadir múltiples comandos! Usa el separador <+>
Ejemplo: minecraft:effect give .. <+> DELAY 5 <+> DAMAGE 5
Placeholders: Los placeholders son los mismos que los Entity Placeholders pero necesitas reemplazar "player" por "around_target"
Ejemplo: %around_target%, %around_target_uuid%
- Ejemplo:
Daña al jugador más cercano
- MOB_NEAREST 10 DAMAGE 5
Puedes anidar MOB_NEAREST con los comandos: MOB_AROUND, IF, MOB_NEAREST, ALL_MOBS
Si haces eso, el separador y los placeholders evolucionarán dependiendo del paso anidado.\
separador del comando base: <+>
primer comando anidado: <+::step1>
...: <+::step2> , <+::step3>, ...
placeholder base: %around_target%
primer comando anidado: %around_target::step1%
...: %around_target::step2%, %around_target::step3%, ...
NEAREST
- Info: Selecciona al jugador más cercano desde el jugador/objetivo.
- Ajustes del comando:
{max accepted distance}: Distancia máxima aceptada que puede tener el "objetivo".{command}: El comando que se ejecutará
¡Puedes añadir múltiples comandos! Usa el separador <+>
Ejemplo: SEND_MESSAGE &cYou will be damaged in 5 seconds <+> DELAY 5 <+> DAMAGE 5
Placeholders: Los placeholders son los mismos que los Player Placeholders pero necesitas reemplazar "player" por "around_target"
Ejemplo: %around_target%, %around_target_uuid%
- Ejemplo:
Daña al jugador más cercano
- NEAREST 8 DAMAGE 5
Puedes anidar NEAREST con los comandos: AROUND, IF, NEAREST, ALL_PLAYERS
Si haces eso, el separador y los placeholders evolucionarán dependiendo del paso anidado.\
separador del comando base: <+>
primer comando anidado: <+::step1>
...: <+::step2> , <+::step3>, ...
placeholder base: %around_target%
primer comando anidado: %around_target::step1%
...: %around_target::step2%, %around_target::step3%, ...
OPMESSAGE
- Info: Envía un mensaje a los jugadores OP conectados y a la consola
- Ajuste del comando:
{text}: Texto a enviar
- Ejemplo:
- OPMESSAGE This is my debug message
PARTICLE
-
Info: Genera partículas en la ubicación del jugador/objetivo. Lista de partículas
-
Ajustes del comando:
{type}: El tipo de partícula (TODO EN MAYÚSCULAS){quantity}: La cantidad de partículas que se generarán{offset}: El radio del área donde pueden generarse las partículas en la ubicación del jugador/objetivo{speed}: Qué tan rápidas o grandes serán las partículas
-
Ejemplo:
- PARTICLE FIREWORKS_SPARK 10 0.1 0.5
REGAIN_HEALTH
- Info: Te da una cantidad específica de HP
- Ajuste del comando:
{amount}: La cantidad de HP que quieres ganar- Admite valores negativos en caso de que quieras hacer "daño verdadero".
- Ejemplo:
- REGAIN_HEALTH 10
- REGAIN_HEALTH -5
REMOVE_BURN
- Info: Te extingue mientras ardes
- Sin ajuste de comando
- Ejemplo:
- REMOVE_BURN
REMOVE_GLOW
- Info: Elimina el efecto de glow de un color específico al jugador | objetivo.
- Ajuste del comando:
[color]: (Opcional) (por defecto = WHITE) El color a eliminar. Referencia de colores- Ejemplo:
- REMOVE_GLOW BLACK
SET_GLOW
- Info: Añade el efecto de glow con un color específico al jugador | objetivo.
- Ajuste del comando:
[color]: (Opcional) (por defecto = WHITE) El color a eliminar. Referencia de colores- Ejemplo:
- SET_GLOW BLACK
Compatible con el plugin TAB usando -> %score_cmd-glow%
SET_HEALTH
- Info: Establece tu salud en una cantidad específica
- Ajuste del comando:
{amount}: La cantidad de salud a la que quieres que se establezca
- Ejemplo:
SET_HEALTH 10
SET_PITCH
- Info: Fuerza al jugador a mirar en una posición de pitch determinada (-90/90 grados, dirección arriba abajo)
- Ajustes del comando:
{pitch_number}: El número que quieres introducir. Los placeholders también funcionan{keepVelocity}: Permite mantener la velocidad del jugador
- Ejemplo:
- SET_PITCH 0 false
- SET_PITCH %target_pitch% false
SET_YAW
- Info: Fuerza al jugador a mirar en una posición de yaw determinada (360 grados, dirección izquierda derecha)
- Ajustes del comando:
{yaw_number}: El número que quieres introducir. Los placeholders también funcionan{keepVelocity}: Permite mantener la velocidad del jugador
- Ejemplo:
- SET_YAW 10 false
SPIN
- Info: Hace girar al objetivo
- Ajustes del comando:
{duration ticks}: La duración del giro{velocity}: La velocidad del giro
- Ejemplo:
- SPIN 20 1
P: ¿Cómo congelar objetivos/jugadores/mobs?
R: ejecuta SPIN {duration} 0 por ejemplo
STEAL
- Info: Roba un ítem del inventario del objetivo
- Ajustes del comando:
{slot}: -1 para la mano principal. Consulta la referencia de slots a continuación.[remove item]: (Opcional) (por defecto = true)
- Ejemplo:
- STEAL 10
STRIKELIGHTNING
- Info: Invoca un rayo sin daño para quien ejecuta el comando
- Sin ajuste de comando
- Ejemplo:
- STRIKELIGHTNING
Esto no es lo mismo que el comando smite de Essentials. Si quieres fulminar a tus objetivos, ponlo en target commands o entity commands junto con los activadores adecuados como PLAYER_CLICK_ON_PLAYER por ejemplo.
STUN ENABLE/DISABLE
- Info: Activa o desactiva el stun para el jugador (lo tumba y le bloquea el movimiento de la cámara
- Comandos:
- STUN_ENABLE
- STUN_DISABLE
- Ejemplo:
- STUN_ENABLE
- DELAY 5
- STUN_DISABLE
TELEPORT
- Info: Teletransporta al jugador/entidad a la ubicación
- Ajustes del comando:
{world}: El mundo de la ubicación a la que teletransportar{x}: La coordenada x de la ubicación a la que teletransportar.{y}: La coordenada y de la ubicación a la que teletransportar.{z}: La coordenada z de la ubicación a la que teletransportar.[pitch]: (Opcional) (por defecto = mantiene el pitch del jugador) pitch de la ubicación de teletransporte[yaw]: (Opcional) (por defecto = mantiene el yaw del jugador) yaw de la ubicación de teletransporte[keepVelocity]: (Opcional) (por defecto = true) Permite no detener la velocidad del jugador.
- Ejemplo:
- TELEPORT ApocalypseWorld 70 70 70
TELEPORT_ON_CURSOR
- Info: Te teletransporta sobre tu cursor
- Ajustes del comando:
{range}: A qué distancia quieres teletransportarte{acceptAir}: Para poder teletransportarte incluso en el aire, debes poner esto en true
- Ejemplo:
- TELEPORT_ON_CURSOR 8 true
TRANSFER_ITEM
- Info: Transfiere un ítem en el inventario
- Ajustes del comando:
{slot of launcher}: Slot del ítem que se va a mover{slot of receiver}: Slot donde aterrizará el ítem
- Ejemplo:
- TRANSFER_ITEM 38 40
UNSAFE_TELEPORT_ON_CURSOR
- Info: Te teletransporta sobre tu cursor sin tener en cuenta que puedas acabar en lugares imposibles
- Ajuste del comando:
[maxRange]: (Opcional) (por defecto = 200) A qué distancia quieres teletransportarte
- Ejemplo:
UNSAFE_TELEPORT_ON_CURSOR 20
WORLD_TELEPORT
- Info: Teletransporta a un mundo en la misma ubicación
- Ajuste del comando:
{world}: El nombre del mundo al que quieres teletransportar al jugador/objetivo.- Ejemplo:
- WORLD_TELEPORT spawn_end
Comandos de Animación
- BREAK_BOOTS_ANIMATION
- BREAK_CHESTPLATE_ANIMATION
- BREAK_HELMET_ANIMATION
- BREAK_LEGGINGS_ANIMATION
- BREAK_MAIN_HAND_ANIMATION
- BREAK_OFF_HAND_ANIMATION
- HURT_ANIMATION
- SWING_MAIN_HAND
- SWING_OFF_HAND
- TELEPORT_ENDER_ANIMATION
- TOTEM_ANIMATION
Pruébalo ahora
Copia esto en ExecutableItems y recarga
Tomado de esta página. Pégalo en una configuración, ejecuta el comando de reload del plugin y tendrás un punto de partida funcional para editar.
activators:
  activator0: # Activator ID, you can create as many activators on the activators list
    option: # Here goes an activator that is at least instance of player
    playerCommands:
    - ALL_PLAYERS SEND_MESSAGE Hello %parseother_`{%around_target%}`_`{player_name}`%
  activator1: # Activator ID, you can create as many activators on the activators list
    option: # Here goes an activator that is at least instance of target
    targetCommands:
    - ALL_PLAYERS SEND_MESSAGE %target% has been hit by %player%
  activator2: # Activator ID, you can create as many activators on the activators list
    option: # Here goes an activator that is at least instance of entity
    entityCommands:
- ALL_PLAYERS SEND_MESSAGE %entity% has been hit by %player%Plugin usado en esta página
ExecutableItemsÍtems personalizados con habilidades, activadores y comandos, sin código.
- 5.0/5 según 10 reseñas
- 3.2K servidores usándolo ahora mismo (bStats)
- 61 descargas en SPlugins
€19.99
pago único, actualizaciones de por vida