
Questa pagina è stata tradotta dall'inglese con l'aiuto dell'IA. Migliora questa traduzione o leggi l'originale.
Comandi Player e Target
Devi sapere che per impostazione predefinita tutti i comandi vengono eseguiti dalla console, quindi se vuoi che il player esegua il comando, aggiungi prima SUDO o SUDO_OP.
(Clicca su SUDO o SUDO_OP per maggiori informazioni)
Non usare questa opzione per i comandi vanilla e i CUSTOM COMMANDS. Per usare correttamente i comandi vanilla, vai alla FAQ e a "How to use vanilla commands",
Compatibilità "multi-world" per i comandi vanilla.
execute in <<NAMEOFYOUR_WORLD>> run ...
Esempio: vuoi evocare uno Zombie nel mondo SsomarWorld:
execute in <<SsomarWorld>> run summon zombie 100 50 100
Esempio con un placeholder:
execute in <<%player_world%>> run summon zombie 100 50 100
Vuoi mantenere la forma HEX grezza nel tuo comando? Aggiungi il tag BRUT_HEX al comando. Funziona in qualsiasi punto della riga di comando, ma è consigliato inserirlo nella prima parte del comando per evitare confusione.
Per impostazione predefinita nessun comando viene eseguito se il player è offline (i comandi verranno eseguiti alla connessione del player).
Ma puoi aggiungere il tag [<OFFLINE>] ai tuoi comandi per rimuovere questa restrizione.
(Molto utile per i comandi broadcast, boost, giveall, ...)
Esempio:
- [<OFFLINE>] broadcast hello !
- [<OFFLINE>] execute at %player% run setblock %block_x_int%+3 %block_y_int%-1 %block_z_int%-14 minecraft:air
Puoi usare [<CLEAR_IF_DISCONNECT>] se vuoi annullare i comandi quando il player si disconnette.
Esempio:
- [<CLEAR_IF_DISCONNECT>] say meow
Comandi misti
Oltre al seguente elenco di comandi puoi usare anche:
docs/tools-for-all-plugins-score/custom-commands/mixed-commands-player-and-entity
Questi comandi possono essere usati nei comandi relativi al Player OPPURE nei comandi relativi alle Entity.
Comandi personalizzati
Ordinati in ordine alfabetico
ABSORPTION
- Info: Assegna l'effetto di assorbimento al player
- Impostazioni del comando:
{amount}: quantità di mezzi cuori di assorbimento. Supporta valori negativi per rimuoverli.{time}: durata dell'effetto in tick. Lascialo vuoto o imposta "0" se vuoi che sia infinito.
- Esempio:
activators:
  activator0: # Activator ID, you can create as many activator on the activators list
    option: # Here goes an activator that is at least instance of player
    playerCommands:
    - ABSORPTION amount:5 time:200 # Gives the player absorption
  activator1: # Activator ID, you can create as many activator on the activators list
    option: # Here goes an activator that is at least instance of target
    targetCommands:
    - ABSORPTION amount:5 time:200 # Gives the target absorption
Il valore del tuo attributo MAX_ABSORPTION deve essere maggiore di 0!
Controlla il valore digitando: /attribute PLAYER_NAME minecraft
_absorption base getE puoi aumentarlo digitando: /attribute PLAYER_NAME minecraft
_absorption base set 20activators:
activator0: # Activator ID, you can create as many activator on the activators list
option: # Here goes an activator that is at least instance of player
playerCommands:
# You can do that to temporary up the max_absorption value of the player
- minecraft:attribute %player% minecraft:max_absorption base set 5**
- ABSORPTION amount:5 time:200
- DELAY_TICK 200
- minecraft:attribute PLAYER_NAME minecraft:max_absorption base set 0
activator1: # Activator ID, you can create as many activator on the activators list
option: # Here goes an activator that is at least instance of target
targetCommands:
# You can do that to temporary up the max_absorption value of the target
- minecraft:attribute %player% minecraft:max_absorption base set 5
- ABSORPTION amount:5 time:200
- DELAY_TICK 200
- minecraft:attribute PLAYER_NAME minecraft:max_absorption base set 0
ACTIONBAR
- Info: Mostra l'action bar con il tuo testo + il tempo rimanente (59, 58, 57...).
- Impostazioni del comando:
{text}: Il testo da mostrare{delay}: Durata in secondi
- Esempio:
activators:
  activator0: # Activator ID, you can create as many activator on the activators list
    option: # Here goes an activator that is at least instance of player
    playerCommands:
    - `ACTIONBAR &6Hey &e%player% ! 10` # Sends an ACTIONBAR to the player
  activator1: # Activator ID, you can create as many activator on the activators list
    option: # Here goes an activator that is at least instance of target
    targetCommands:
    - `ACTIONBAR &6Hey &e%player% ! 10`# Sends an ACTIONBAR to the target
ADD_ITEM_ATTRIBUTE
- Info: Aggiunge un attributo a un item come operazione di somma o sottrazione.
- Impostazioni del comando:
{slot}: Lo slot in cui verrà applicato. -1 per la mano principale{attribute}: L'attributo che vuoi aggiungere. Elenco degli attributi{value}: Il valore dell'operazione{equipmentSlot}: Lo slot in cui l'attributo sarà attivo. Elenco EquipmentSlot{mode}: seleziona la modalità di aggiuntamode:ADD: Aggiunge l'attributo all'itemmode:OVERRIDE: Rimuove gli attributi attuali dello stesso tipo dell'item + Aggiunge l'attributo all'itemmode:STACK: Si somma all'attributo presente sull'item; se non ne esiste nessuno, lo aggiunge
- affectDefaultAttributes: true o false # Quando è true la modalità OVERRIDE sovrascrive anche gli attributi predefiniti, e per la modalità stack permette di sommarsi agli attributi predefiniti (in verde)
- Esempio:
activators:
  activator0: # Activator ID, you can create as many activator on the activators list
    option: # Here goes an activator that is at least instance of player
    playerCommands:
    - ADD_ITEM_ATTRIBUTE slot:%slot% attribute:GENERIC_ATTACK_DAMAGE value:1.0 equipmentSlot:HAND mode:ADD # Add this attribute to the player
  activator1: # Activator ID, you can create as many activator on the activators list
    option: # Here goes an activator that is at least instance of target
    targetCommands:
    - ADD_ITEM_ATTRIBUTE slot:%slot% attribute:GENERIC_ATTACK_DAMAGE value:1.0 equipmentSlot:HAND mode:STACK affectDefaultAttributes: true # Add this attribute to the target
ADD_ITEM_ENCHANTMENT
- Info: Aggiunge un incantesimo a un item in uno slot specifico con un certo livello
- Impostazioni del comando:
{slot}: Lo slot in cui verrà applicato. -1 per la mano principale{enchantment}: L'incantesimo che vuoi applicare, non usare spazi, usa gli incantesimi di Minecraft e non quelli visualizzati. Incantesimi{level}: Il livello dell'incantesimo
- Esempio:
activators:
  activator0: # Activator ID, you can create as many activator on the activators list
    option: # Here goes an activator that is at least instance of player
    playerCommands:
    - ADD_ITEM_ENCHANTMENT slot:-1 enchantment:unbreaking level:1
  activator1: # Activator ID, you can create as many activator on the activators list
    option: # Here goes an activator that is at least instance of target
    targetCommands:
    - ADD_ITEM_ENCHANTMENT slot:-1 enchantment:unbreaking level:1
ADD_ITEM_LORE
- Info: Aggiunge una riga di lore
- Impostazioni del comando:
{slot}: Lo slot in cui verrà applicato. -1 per la mano principale{text}: Il testo della nuova riga di lore
- Esempio:
activators:
  activator0: # Activator ID, you can create as many activator on the activators list
    option: # Here goes an activator that is at least instance of player
    playerCommands:
    - ADD_ITEM_LORE slot:%slot% text:&7Item of %player%
  activator1: # Activator ID, you can create as many activator on the activators list
    option: # Here goes an activator that is at least instance of target
    playerCommands:
    - ADD_ITEM_LORE slot:%slot% text:&7Item of %target% added by %player%
BOOTS
- Info: Mette l'item che hai in mano principale nello slot degli stivali. (Non funziona se l'item ha "Curse of Binding")
- Nessuna impostazione del comando
- Esempio:
activators:
  activator0: # Activator ID, you can create as many activator on the activators list
    option: # Here goes an activator that is at least instance of player
    playerCommands:
    - BOOTS
BOSSBAR
- Info: Crea un testo di bossbar per una certa durata.
- Impostazioni del comando:
{time}: La durata della bossbar in tick{color}: Colore del testo della bossbar{text}: testo sulla bossbar (Usa i trattini bassi "_" per aggiungere spazi al tuo argomento.){count}: quante volte vuoi che conti- se questa opzione è presente, l'argomento del tempo non conterà più
{countTicks}: true/false per indicare se vuoi che conti in tick oppure in secondi{countOrder}:- ascending: fa partire il timer da 0
- descending: fa partire il timer dal valore indicato
{overrideMode}:- NO_OVERRIDE: Non sovrascrive le altre Bossbar
- OVERRIDE_ALL: Sovrascrive tutte le altre BossBar inviate da SCore
- OVERRIDE_SAME_TEXT: Sovrascrive le altre Bossbar inviate da SCore che contengono lo stesso testo
{barProgress}: (default = 1.0) Il progresso iniziale della barra (da 0.0 a 1.0). Funziona sia con le barre statiche sia con quelle a conto alla rovescia (solo descending)
- Esempio:
activators:
  activator0: # Activator ID, you can create as many activator on the activators list
    option: # Here goes an activator that is at least instance of player
    playerCommands:
    - BOSSBAR time:200 color:RED text:This_is_a_bossbar text
    - BOSSBAR time:20 color:BLUE text:Hello_world count:50 countTicks:true countOrder:ascending
    - BOSSBAR time:200 color:RED text:This is a bossbar text overrideMode:OVERRIDE_SAME_TEXT
    - BOSSBAR time:200 color:GREEN text:Half filled bar barProgress:0.5
CANCEL_PICKUP
- Info: Disattiva la raccolta degli item per un player per un certo periodo di tempo
- Impostazioni del comando:
{time}: La durata in tick prima che il player possa raccogliere di nuovo gli item{material}: Se impostato, il player non può raccogliere solo il materiale specificato; se è null non può raccogliere nulla
- Esempio:
activators:
  activator0: # Activator ID, you can create as many activator on the activators list
    option: # Here goes an activator that is at least instance of player
    playerCommands:
    - CANCEL_PICKUP time:600
    - CANCEL_PICKUP time:600 material:stone
L'unico modo per RESETTARE questo comando dopo aver impostato un tempo in tick è ricaricare o riavviare il server. Se vorresti un modo per resettarlo, suggeriscilo nel canale #suggestions su Discord.
CHAT
- Info: Invia un messaggio dal player alla chat
- Impostazioni del comando:
{text}: Testo da inviare
- Esempio:
activators:
  activator0: # Activator ID, you can create as many activator on the activators list
    option: # Here goes an activator that is at least instance of player
    playerCommands:
    - CHAT &6Hello !!
CHESTPLATE
- Info: Mette l'item che hai in mano principale nello slot del corpetto. (Non funziona se l'item ha "Curse of Binding")
- Nessuna impostazione del comando
- Esempio:
activators:
  activator0: # Activator ID, you can create as many activator on the activators list
    option: # Here goes an activator that is at least instance of player
    playerCommands:
    - CHESTPLATE
CLOSE_INVENTORY
- Info: Chiude l'inventario al player
- Nessuna impostazione del comando
- Esempio:
activators:
  activator0: # Activator ID, you can create as many activator on the activators list
    option: # Here goes an activator that is at least instance of player
    playerCommands:
    - CLOSE_INVENTORY
CROPS_GROWTH_BOOST
- Info: Accelera la crescita delle colture intorno a te
- Impostazioni del comando:
{radius}: Il raggio del boost (Default 5){delay}: L'intervallo in tick tra un boost di crescita e l'altro{duration}: La durata totale del boost in tick{chance}: La probabilità di crescita dei blocchi quando viene applicato il boost
- Esempio:
Il comando seguente genererà 20 boost di crescita ogni 10 tick.
Tutti i blocchi entro il raggio avranno il 50% di probabilità di crescere a ogni boost applicato.
activators:
  activator0: # Activator ID, you can create as many activator on the activators list
    option: # Here goes an activator that is at least instance of player
    playerCommands:
    - CROPS_GROWTH_BOOST radius:5 delay:10 durations:200 chance:50
DISABLE_FLY_ACTIVATION
- Info: Impedisce l'uso del volo a un player (planare con l'Elytra non è considerato volo)
- Impostazione del comando:
{time}: La durata dell'effetto in secondi
- Esempio: (il comando qui sotto disattiva l'attivazione del volo per 1 minuto)
activators:
  activator0: # Activator ID, you can create as many activator on the activators list
    option: # Here goes an activator that is at least instance of player
    playerCommands:
    - DISABLE_FLY_ACTIVATION time:60
DISABLE_GLIDE_ACTIVATION
- Info: Impedisce l'uso dell'elytra per un periodo di tempo
- Impostazioni del comando:
{time}: La durata dell'effetto in secondi
- Esempio: (il comando qui sotto disattiva l'uso dell'elytra per 20 secondi)
activators:
  activator0: # Activator ID, you can create as many activator on the activators list
    option: # Here goes an activator that is at least instance of player
    playerCommands:
    - DISABLE_GLIDE_ACTIVATION time:20
EICOOLDOWN
- Info: Applica un cooldown a un ExecutableItems specifico
- Impostazioni del comando:
{PLAYER}: Il player a cui applicare il comando{ID}: L'id dell'ExecutableItem oppure "all" per tutti gli ExecutableItems{DURATION}: La quantità di tempo{boolean TICKS}: (Default: false) Se false, il valore dell'argomento durata verrà considerato in secondi. Se true, verrà considerato in tick.[optional activator id]: (Opzionale) Puoi applicarlo a un id di attivatore specifico
- Esempio:
activators:
  activator0: # Activator ID, you can create as many activator on the activators list
    option: # Here goes an activator that is at least instance of player
    playerCommands:
    - EICOOLDOWN %player% thisismyid 10 true # For the ExecutableItem thisismyid
    - EICOOLDOWN %player% all 10 true # For all ExecutableItems
EICOOLDOWN può solo aggiungere un cooldown: quando più cooldown sono attivi sullo stesso attivatore, vince il più lungo. Per accorciare o rimuovere un cooldown, usa EICOOLDOWN_RESET.
EICOOLDOWN_RESET
- Info: Rimuove il cooldown di un ExecutableItem per un player (tutti i suoi attivatori, oppure solo un attivatore). Anche il cooldown visivo vanilla (
enableVisualCooldown) viene resettato. - Impostazioni del comando:
{PLAYER}: Il player a cui applicare il comando{ID}: L'id dell'ExecutableItem oppure "all" per tutti gli ExecutableItems[optional activator id]: (Opzionale) Rimuove solo il cooldown di questo attivatore; gli altri attivatori mantengono il proprio
- Esempio:
activators:
  activator0: # Activator ID, you can create as many activator on the activators list
    option: # Here goes an activator that is at least instance of player
    playerCommands:
    - EICOOLDOWN_RESET %player% thisismyid activator1 # Only activator1 of the ExecutableItem thisismyid
    - EICOOLDOWN_RESET %player% thisismyid # All the activators of thisismyid
    - EICOOLDOWN_RESET %player% all # All ExecutableItems
Dalla console, /score cooldowns clear EI:{ID}:{activator id} {player} fa lo stesso per un singolo attivatore.
EBCOOLDOWN
- Info: Applica un cooldown a un ExecutableBlocks specifico
- Impostazioni del comando:
{PLAYER}: Il player a cui applicare il comando{ID}: L'id dell'ExecutableBlocks oppure "all" per tutti gli ExecutableBlocks{DURATION}: La quantità di tempo{boolean TICKS}: (Default: false) Se false, il valore dell'argomento durata verrà considerato in secondi. Se true, verrà considerato in tick.[optional activator id]: (Opzionale) Puoi applicarlo a un id di attivatore specifico
- Esempio:
activators:**
  activator0: # Activator ID, you can create as many activator on the activators list
    option: # Here goes an activator that is at least instance of player
    playerCommands:
    - EBCOOLDOWN %player% thisismyid 10 true # For the ExecutableBlock thisismyid
    - EBCOOLDOWN %player% all 10 true # For all ExecutableBlocks
EECOOLDOWN
- Info: Applica un cooldown a un ExecutableItems specifico
- Impostazioni del comando:
{PLAYER}: Il player a cui applicare il comando{ID}: L'id dell'ExecutableEvent oppure "all" per tutti gli ExecutableEvents{DURATION}: La quantità di tempo{boolean TICKS}: (Default: false) Se false, il valore dell'argomento durata verrà considerato in secondi. Se true, verrà considerato in tick.[optional activator id]: (Opzionale) Puoi applicarlo a un id di attivatore specifico
- Esempio:
activators:
  activator0: # Activator ID, you can create as many activator on the activators list
    option: # Here goes an activator that is at least instance of player
    playerCommands:
    - EECOOLDOWN %player% thisismyid 10 true # For the ExecutableEvent thisismyid
    - EECOOLDOWN %player% all 10 true # For all ExecutableEvents
FIREWORK_BOOST
- Info: Se questo comando viene eseguito mentre chi lo lancia sta planando con l'elytra, genera un razzo pirotecnico in modo simile a quando i player fanno clic destro su un fuoco d'artificio che hanno in mano mentre planano, per guadagnare distanza.
- Impostazioni del comando:
{duration}: La durata del fuoco d'artificio in secondi
- Esempio:
activators:
  activator0: # Activator ID, you can create as many activator on the activators list
    option: # Here goes an activator that is at least instance of player
    playerCommands:
    - FIREWORK_BOOST 20
FLY OFF
- Info: Disattiva il volo creativo del player e, se il volo viene disattivato a mezz'aria, il player verrà teletrasportato sul possibile blocco sotto di lui.
- Impostazione del comando:
[teleportOnTheGround]: (Opzionale) (default = true) Indica se il player verrà teletrasportato a terra oppure no
- Esempio:
activators:
  activator0: # Activator ID, you can create as many activator on the activators list
    option: # Here goes an activator that is at least instance of player
    playerCommands:
    - FLY_OFF teleportOnTheGround:true
FLY_ON
- Info: Assegna al player il volo creativo
- Nessuna impostazione del comando
- Esempio:
activators:
  activator0: # Activator ID, you can create as many activator on the activators list
    option: # Here goes an activator that is at least instance of player
    playerCommands:
    - FLY_ON
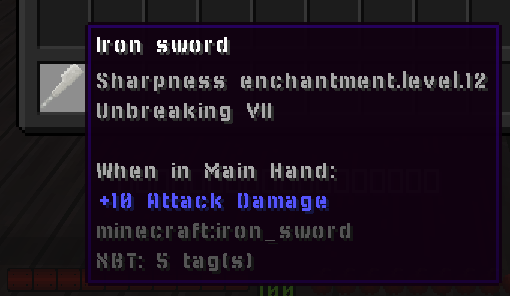
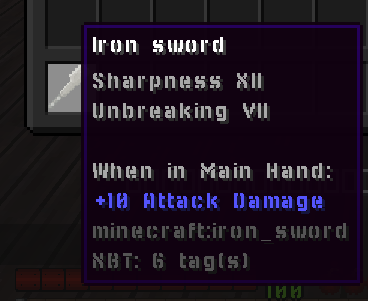
FORMAT_ENCHANTMENTS
- Info: Formatta tutti gli incantesimi nella tua lore
- Impostazioni del comando:
{slot}: Lo slot da usare come bersaglio (-1 per la mano principale)
- Esempio:
activators:
  activator0: # Activator ID, you can create as many activator on the activators list
    option: # Here goes an activator that is at least instance of player
    playerCommands:
    - FORMAT_ENCHANTMENTS %slot%
 ->
GIVE_MONEY
- Info: Dà denaro a un player
- Richiede il plugin Vault
- Impostazioni del comando:
- amount: la quantità da dare
- Esempio:
activators:
  activator0: # Activator ID, you can create as many activator on the activators list
    option: # Here goes an activator that is at least instance of player
    playerCommands:
    - GIVE_MONEY amount:50.0
GRAVITY_DISABLE
- Info: Ferma la gravità per il player, impedendogli di "cadere" verso il basso o di salire.
- Nessuna impostazione del comando
- Esempio:
activators:
  activator0: # Activator ID, you can create as many activator on the activators list
    option: # Here goes an activator that is at least instance of player
    playerCommands:
    - GRAVITY_DISABLE
    - DELAY 5
    - GRAVITY_ENABLE
GRAVITY_ENABLE
- Info: Riattiva la gravità per il player, che quindi cadrà normalmente.
- Nessuna impostazione del comando
- Esempio:
activators:
  activator0: # Activator ID, you can create as many activator on the activators list
    option: # Here goes an activator that is at least instance of player
    playerCommands:
    - GRAVITY_DISABLE
    - DELAY 5
    - GRAVITY_ENABLE
HEAD
- Info: Mette l'item che hai in mano principale nello slot della testa. (Non funziona se l'item ha "Curse of Binding")
- Nessuna impostazione del comando
- Esempio:
activators:
  activator0: # Activator ID, you can create as many activator on the activators list
    option: # Here goes an activator that is at least instance of player
    playerCommands:
    - HEAD
JOBS_MONEY_BOOST
- Info: Aumenta temporaneamente il denaro guadagnato. Per Jobs reborn
- Impostazioni del comando:
{multiplier}: Valore del moltiplicatore{time}: Durata del boost in secondi
- Esempio:
activators:
  activator0: # Activator ID, you can create as many activator on the activators list
    option: # Here goes an activator that is at least instance of player
    playerCommands:
    - JOBS_MONEY_BOOST multiplier:2.0 time:10
Il moltiplicatore non influisce sui valori dell'actionbar di Jobs. Il moltiplicatore di questo comando si applica solo quando il plugin Jobs decide di incrementare il denaro, l'xp e i punti ottenuti.
Se eseguito più volte con una durata sufficiente per ogni boost, tutti i boost in corso possono sommarsi.
JOBS_XP_BOOST
- Info: Moltiplica temporaneamente i guadagni di XP del plugin Jobs. Per Jobs reborn
- Impostazioni del comando:
{multiplier}: Valore del moltiplicatore di XP (es. 2.0 per XP doppi){time}: Durata in secondi prima che il boost scada
- Esempio:
activators:
  activator0: # Activator ID, you can create as many activator on the activators list
    option: # Here goes an activator that is at least instance of player
    playerCommands:
    - JOBS_XP_BOOST multiplier:2.0 time:10
Il moltiplicatore non influisce sui valori dell'actionbar di Jobs. Il moltiplicatore di questo comando si applica solo quando il plugin Jobs decide di incrementare il denaro, l'xp e i punti ottenuti.
Se eseguito più volte con una durata sufficiente per ogni boost, tutti i boost in corso possono sommarsi.
Questo comando supporta il cumulo di più boost in modo moltiplicativo.
LAUNCH
- Info: Lancia un proiettile personalizzato. Riferimento
- Elenco:
Tipi di proiettile
* ARROW * DRAGONFIREBALL * EGG * ENDERPEARL * FIREBALL * LARGEFIREBALL * LINGENRINGPOTION * LLAMASPIT * SHULKERBULLET (Disponibile solo per 1.12+) * SIZEDFIREBALL * SNOWBALL * TRIDENT * WITHERSKULL- Impostazioni del comando:
{projectile}: il tipo di proiettile oppure l'ID del proiettile personalizzato di SCore ( Riferimento )[angleRotationVertical]: (Opzionale) (default = 0) (in gradi) Definisce la direzione in cui verrà lanciata l'entity[angleRotationHorizontal]: (Opzionale) (default = 0) (in gradi) Definisce la direzione in cui verrà lanciata l'entity[velocity]: (Opzionale) (default = 1) Per personalizzare la velocità del proiettile (funziona anche da 1.8 a 1.12)[name]: (Opzionale) Nome personalizzato assegnato al proiettile lanciato, ad esempio per riconoscerlo più avanti in una condizione (name:&cFire_ball).[strictYaw]: (Opzionale) (in gradi) Direzione orizzontale del lancio, usata al posto della direzione in cui guarda il player (0= sud,90= ovest,180= nord,-90= est). Le impostazioniangleRotation...vengono sommate a questo valore.[strictPitch]: (Opzionale) (in gradi) Direzione verticale del lancio, usata al posto della direzione in cui guarda il player (0= dritto davanti,-90= in alto,90= in basso). Le impostazioniangleRotation...vengono sommate a questo valore.- VERSION Cambia anche la velocità delle fireball (FIREBALL, SIZEDFIREBALL, LARGEFIREBALL, DRAGONFIREBALL, WITHERSKULL):
velocity:2vola al doppio della velocità,velocity:1mantiene la velocità vanilla. Prima della 1.20.5 mantengono la velocità vanilla.
- VERSION Cambia anche la velocità delle fireball (FIREBALL, SIZEDFIREBALL, LARGEFIREBALL, DRAGONFIREBALL, WITHERSKULL):
- Esempio:
activators:
  activator0: # Activator ID, you can create as many activator on the activators list
    option: # Here goes an activator that is at least instance of player
    playerCommands:
    - LAUNCH projectile:My_Custom_Proj velocity:5
- Esempio di più lanci:
activators:
  activator0: # Activator ID, you can create as many activator on the activators list
    option: # Here goes an activator that is at least instance of player
    playerCommands:
    - LAUNCH projectile:WITHERSKULL
    - LAUNCH projectile:WITHERSKULL angleRotationVertical:20
    - LAUNCH projectile:WITHERSKULL angleRotationVertical:-20
- Esempio: lancia sempre dritto davanti (in orizzontale), a prescindere dal fatto che il player guardi in alto o in basso, con un proiettile con nome:
activators:
  activator0:
    option: PLAYER_RIGHT_CLICK
    playerCommands:
    - LAUNCH projectile:SNOWBALL strictPitch:0 name:Frost_Ball
Se usi il COMANDO LAUNCH nell'attivatore PLAYER_LAUNCH_PROJECTILE e il proiettile è stato lanciato da un arco, il proiettile lanciato con il comando LAUNCH personalizzato manterrà la stessa velocità.
Se usi SHULKERBULLET come tipo di proiettile, prenderà come bersaglio il cursore di chi lo lancia. Altrimenti punterà all'entity più vicina a chi lo lancia.
Problemi attuali:
- Gli Shulker Bullet non possono essere usati in 1.9.4, 1.10.2, 1.11.2. Dalla 1.12 in poi non dovrebbero esserci complicazioni, a parte il fatto di dover creare un proiettile SCore per dare a uno Shulker Bullet la corretta velocità di volo.
LEGGINGS
- Info: Mette l'item che hai in mano principale nello slot dei pantaloni. (Non funziona se l'item ha "Curse of Binding")
- Nessuna impostazione del comando
- Esempio:
activators:
  activator0: # Activator ID, you can create as many activator on the activators list
    option: # Here goes an activator that is at least instance of player
    playerCommands:
    - LEGGINGS
LOCATED_LAUNCH
- Info: Lancia un proiettile in una posizione specifica
- Impostazioni del comando:
{projectileType}: il tipo di proiettile oppure l'ID del proiettile personalizzato di SCore ( Riferimento )[frontValue]: (Opzionale) (default = 0) positivo = avanti, negativo = indietro - Posizione avanti/indietro. Ad esempio, se vuoi far comparire il proiettile a 5 blocchi di distanza da dove guardi, usa un valore positivo più alto[rightValue]: (Opzionale) (default = 0) destra = positivo, sinistra = negativo - Posizione destra/sinistra. Ad esempio, se vuoi che il proiettile compaia alla tua sinistra, usa un valore negativo più alto[yValue]: (Opzionale) (default = 0) A che altezza rispetto alla tua posizione Y comparirà il proiettile.[velocity]: (Opzionale) (default = 1) Quanto velocemente volerà il proiettile. Imposta il valore a 0 perché il proiettile cada verso il basso non appena compare.[angleRotationVertical]: (Opzionale) (default = 0) VERSION puoi aggiungere una rotazione verticale al tuo proiettile (in gradi)[angleRotationHorizontal]: (Opzionale) (default = 0) VERSION puoi aggiungere una rotazione orizzontale al tuo proiettile (in gradi)
- Esempio:
activators:
  activator0: # Activator ID, you can create as many activator on the activators list
    option: # Here goes an activator that is at least instance of player
    playerCommands:
    - LOCATED_LAUNCH projectile:ARROW frontValue:0 rightValue:0 yValue:0 velocity:1 angleRotationVertical:0 angleRotationHorizontal:0
MINECART_BOOST
- Info: Ti dà una spinta quando sei su una minecart (effetto simile a quando passi su un binario alimentato)
- Impostazione del comando:
{boost}: La velocità della spinta
- Esempio:
activators:
  activator0: # Activator ID, you can create as many activator on the activators list
    option: # Here goes an activator that is at least instance of player
    playerCommands:
    - MINECART_BOOST boost:10
MIX_HOTBAR
- Info: mescola la hotbar del player
- Nessuna impostazione del comando
- Esempio:
activators:
  activator0: # Activator ID, you can create as many activator on the activators list
    option: # Here goes an activator that is at least instance of player
    playerCommands:
    - MIX_HOTBAR
MODIFY_DURABILITY
- Modifica la durabilità di un item specifico in uno slot specifico
- Impostazioni del comando:
{modification}: Valore positivo per aumentare la durabilità. Valore negativo per diminuirla{slot}: Il numero dello slot dell'item (-1 per lo slot in mano)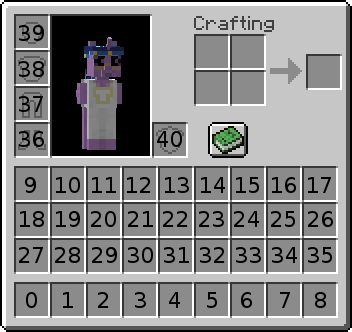
{supportUnbreaking}: (true o false) Indica se supporta l'incantesimo unbreaking oppure no
- Esempio:
activators:
  activator0: # Activator ID, you can create as many activator on the activators list
    option: # Here goes an activator that is at least instance of player
    playerCommands:
    - MODIFY_DURABILITY modification:-1 slot:%slot% supportUnbreaking:true
OPEN_CHEST
- Info: Apre un baule o un barile nella posizione selezionata
- Impostazioni del comando:
{world}: Nome del mondo{x}: Coordinata X{y}: Coordinata Y{z}: Coordinata Z[bypassProtections]: (Opzionale) (default = false) Indica se aprirà il baule in ogni caso, anche se è protetto
- Esempio:
activators:
  activator0: # Activator ID, you can create as many activator on the activators list
    option: # Here goes an activator that is at least instance of player
    playerCommands:
    - OPENCHEST VanillaWorld 100 100 100
OPEN_ENDERCHEST
- Info: Apre l'ender chest al player che esegue l'attivatore
- Nessuna impostazione del comando
- Esempio:
activators:
  activator0: # Activator ID, you can create as many activator on the activators list
    option: # Here goes an activator that is at least instance of player
    playerCommands:
    - OPEN_ENDERCHEST
OPEN_WORKBENCH
- Info: Apre un banco da lavoro al player che esegue l'attivatore
- Nessuna impostazione del comando
- Esempio:
activators:
  activator0: # Activator ID, you can create as many activator on the activators list
    option: # Here goes an activator that is at least instance of player
    playerCommands:
    - OPEN_WORKBENCH
OXYGEN
- Info: Dà ossigeno al bersaglio
- Impostazione del comando:
{time}: La durata in tick di ossigeno che vuoi dare
- Esempio:
activators:
  activator0: # Activator ID, you can create as many activator on the activators list
    option: # Here goes an activator that is at least instance of player
    playerCommands:
    - OXYGEN time:200
PROJECTILE_CUSTOMDASH1
- Info: Simile a CUSTOMDASH1, ma le coordinate xyz verranno sostituite con quelle del proiettile più vicino a te.
- Impostazioni del comando:
{fallDamage}: Indica se subirai danni da caduta oppure no (se dimentichi di impostare true o false, il default sarà false. Per subire danni da caduta, imposta true)
- Esempio:
activators:
  activator0: # Activator ID, you can create as many activator on the activators list
    option: # Here goes an activator that is at least instance of player
    playerCommands:
    - PROJECTILE_CUSTOMDASH1 fallDamage:false
REGAIN_FOOD
- Info: Ti dà una quantità specifica di cibo/saturazione
- Impostazioni del comando:
{amount}: La quantità di punti di saturazione che vuoi ottenere. Usa valori negativi per ridurre i punti fame
- Esempio:
activators:
  activator0: # Activator ID, you can create as many activator on the activators list
    option: # Here goes an activator that is at least instance of player
    playerCommands:
    - REGAIN_FOOD amount:5
REGAIN_MAGIC
- Info: Dà al player valori specifici della magia di Ecoskills.
- Impostazioni del comando:
{ecoSkillsMagicID}: L'ID della magia di Ecoskills.{amount}: La quantità da ottenere.
- Esempio:
activators:
  activator0: # Activator ID, you can create as many activator on the activators list
    option: # Here goes an activator that is at least instance of player
    playerCommands:
    - REGAIN_MAGIC ecoSkillsMagicID:mana amount:15
Supporta valori negativi.
REGAIN_SATURATION
- Info: Ti dà una quantità specifica di saturazione
- Impostazioni del comando:
{amount}: La quantità di saturazione che vuoi dare
- Esempio:
activators:
  activator0: # Activator ID, you can create as many activator on the activators list
    option: # Here goes an activator that is at least instance of player
    playerCommands:
    - REGAIN_SATURATION amount:10
REMOVE_ENCHANTMENT
- Info: Rimuove un incantesimo da uno slot
- Impostazioni del comando:
{slot}: Slot da cui rimuovere l'incantesimo (-1 per lo slot in mano){enchantment}: Incantesimo da rimuovere (ALL per ogni incantesimo)
- Esempio:
activators:
  activator0: # Activator ID, you can create as many activator on the activators list
    option: # Here goes an activator that is at least instance of player
    playerCommands:
    - REMOVE_ENCHANTMENT slot:-1 enchantment:ALL
REMOVE_LORE
- Info: Rimuove una riga di lore
- Impostazioni del comando:
{slot}: Slot da cui rimuovere la lore (-1 per lo slot in mano){line}: La riga che vuoi rimuovere
- Esempio:
activators:
  activator0: # Activator ID, you can create as many activator on the activators list
    option: # Here goes an activator that is at least instance of player
    playerCommands:
    - REMOVE_LORE slot:1 line:5
REPLACE_BLOCK
- Info: Sostituisce il blocco che il player sta guardando con uno diverso
- Impostazioni del comando:
{material}: ID del blocco (gli stati del blocco sono supportati)
- Esempio:
activators:
  activator0: # Activator ID, you can create as many activator on the activators list
    option: # Here goes an activator that is at least instance of player
    playerCommands:
    - REPLACE_BLOCK STONE_BRICKS
    - REPLACE_BLOCK WATER[LEVEL=0]
SEND_BLANK_MESSAGE
- Info: Ti invia un messaggio vuoto
- Nessuna impostazione del comando
- Esempio:
activators:
  activator0: # Activator ID, you can create as many activator on the activators list
    option: # Here goes an activator that is at least instance of player
    playerCommands:
    - SEND_BLANK_MESSAGE
SEND_MESSAGE
- Info: Ti invia un messaggio
- MiniMessage supportato
- Impostazioni del comando:
{message}: il messaggio che vuoi inviare
- Esempio:
activators:
  activator0: # Activator ID, you can create as many activator on the activators list
    playerCommands:
    - SEND_MESSAGE text:&fThis is a somewhat random text.
    - SEND_MESSAGE text:<yellow>Hello </yellow><blue>World</blue><yellow>!</yellow> # MiniMessage Suported, but dont use MiniMessage + vanilla at the same time
SEND_CENTERED_MESSAGE
- Info: Ti invia un messaggio centrato nella chat
- MiniMessage supportato
- Impostazioni del comando:
{message}: il messaggio che vuoi inviare
- Esempio:
activators:
  activator0: # Activator ID, you can create as many activator on the activators list
    option: # Here goes an activator that is at least instance of player
    playerCommands:
    - SEND_CENTERED_MESSAGE text:&fThis is a somewhat random text.
    - SEND_CENTERED_MESSAGE text:<yellow>Hello </yellow><blue>World</blue><yellow>!</yellow> # MiniMessage Suported, but dont use MiniMessage + vanilla at the same time
SET_ARMOR_TRIM
- Info: Imposta il trim dell'armatura con il pattern specificato per lo slot specificato
- Impostazioni del comando:
{slot}: Lo slot a cui applicare il comando (slot -1 per la mano principale){pattern}: Il pattern del trim (se 'null' o 'remove' rimuove il pattern attuale). Elenco TrimPattern{patternMaterial}: Il materiale del pattern. Elenco TrimMaterial
- Esempio:
activators:
  activator0: # Activator ID, you can create as many activator on the activators list
    option: # Here goes an activator that is at least instance of player
    playerCommands:
    - SET_ARMOR_TRIM slot:38 pattern:vex patternMaterial:netherite
    - SET_ARMOR_TRIM slot:38 pattern:null #to clear the armor trim
SET_BLOCK
- Info: Piazza un blocco sul blocco puntato dal player
- Impostazioni del comando:
{blockface}: Puoi specificare o meno una blockFace per forzare il posizionamento, ad esempio, sopra. BlockFaces{material}: ID del blocco (gli stati del blocco sono supportati){bypassProtection}: Indica se il blocco verrà piazzato anche se il player non ha il permesso[whitelistCurrentBlock]: (Opzionale) (default = può essere piazzato su ogni tipo di blocco) Elenco di blocchi a cui il blocco attuale deve corrispondere per essere sostituito- Esempi:
- AIR, WATER
- !STONE, !COBBLESTONE
- Esempio:
activators:
  activator0: # Activator ID, you can create as many activator on the activators list
    option: # Here goes an activator that is at least instance of player
    playerCommands:
    - SET_BLOCK blockface:UP material:OAK_WOOD
    - SET_BLOCK material:FURNACE[LIT=TRUE]
    - SET_BLOCK material:GOLD_BLOCK whitelistCurrentBlock:SAND,DIRT
SET_BLOCK_POS
- Info: Piazza un blocco in una posizione specifica
- Impostazioni del comando:
{x}: Coordinata X{y}: Coordinata Y{z}: Coordinata Z{material}: il materiale del blocco[bypassProtection]: (Opzionale) (default = false), indica se aggira le protezioni di regione, claim e isola[replace]: (Opzionale) (default = true), indica se sostituisce il blocco nel caso ne esista già uno[whitelistCurrentBlock]: (Opzionale) (default = può essere piazzato su ogni tipo di blocco) Elenco di blocchi a cui il blocco attuale deve corrispondere per essere sostituito- Esempi:
- AIR, WATER
- !STONE, !COBBLESTONE
- Esempio:
activators:
  activator0: # Activator ID, you can create as many activator on the activators list
    option: # Here goes an activator that is at least instance of player
    playerCommands:
    - SET_BLOCK_POS x:0 y:0 z:0 material:STONE bypassProtection:false replace:true
    - SET_BLOCK_POS x:0 y:0 z:0 material:GOLD_BLOCK whitelistCurrentBlock:SAND,DIRT
SET_EQUIPPABLE_MODEL
- Info: Imposta i dati del modello equipaggiabile di un item in uno slot specifico
- Impostazioni del comando:
{slot}: Il numero dello slot in cui si trova l'item bersaglio{model}: Il nome del modello di equipaggiamento che vuoi assegnare all'item
- Esempio:
activators:
  activator0: # Activator ID, you can create as many activator on the activators list
    option: # Here goes an activator that is at least instance of player
    playerCommands:
    - SET_EQUIPPABLE_MODEL slot:-1 model:minecraft:diamond
SET_EXECUTABLE_BLOCK
- Info: Setblock, ma per gli Executable Blocks. (EXECUTABLE BLOCKS DEVE ESSERE INSTALLATO)
- Impostazioni del comando:
{id}: ID dell'executable block che stai cercando di piazzare{x}: Coordinata X{y}: Coordinata Y{z}: Coordinata Z{world}: Nome del mondo[replace]: (Opzionale) (default = true). Indica se sostituirà il blocco esistente nelle coordinate indicate oppure no[bypassProtection]: (Opzionale) (default = false) se vuoi aggirare le protezioni come WorldGuard[ownerUUID]: (Opzionale) (default = nessun proprietario) L'uuid del presunto proprietario dell'executable block
- Esempio:
activators:
  activator0: # Activator ID, you can create as many activator on the activators list
    option: # Here goes an activator that is at least instance of player
    playerCommands:
    - SET_EXECUTABLE_BLOCK id:Mithril_Ore x:%block_x_int% y:%block_y_int% z:%block_z_int% world:%block_world% replace:false bypassProtection:true ownerUUID:%player_uuid%
SET_ITEM_COLOR
- Info: Imposta un colore specifico per l'item (item colorabili come l'armatura di cuoio / la stella di fuoco d'artificio)
- Impostazioni del comando:
{slot}: Lo slot in cui verrà applicato. (-1 per la mano principale)
{color}: valore numerico del colore. Sito per il selettore di colori- Esempio:
activators:
  activator0: # Activator ID, you can create as many activator on the activators list
    option: # Here goes an activator that is at least instance of player
    playerCommands:
    - SET_ITEM_COLOR slot:1 color:0
SET_ITEM_ATTRIBUTE
- Info: Imposta un attributo su un item.
- Impostazioni del comando:
{slot}: Lo slot in cui verrà applicato. (-1 per la mano principale){attribute}: L'attributo che vuoi aggiungere. Attributi{value}: Il valore dell'operazione{equipmentSlot}: Lo slot per l'attributo EquipmentSlots
- Esempio:
activators:
  activator0: # Activator ID, you can create as many activator on the activators list
    option: # Here goes an activator that is at least instance of player
    playerCommands:
    - SET_ITEM_ATTRIBUTE slot:%slot% attribute:GENERIC_ARMOR value:10 equipmentSlot:CHEST
SET_ITEM_COOLDOWN
- Assegna al player/target un cooldown su un item
- Impostazioni del comando:
{material or group}: Il tipo di materiale o il gruppo. Maggiori informazioni sul gruppo{cooldown}: cooldown in secondi
- Esempio:
activators:
  activator0: # Activator ID, you can create as many activator on the activators list
    option: # Here goes an activator that is at least instance of player
    playerCommands:
    - SET_ITEM_COOLDOWN material:ENDER_PEARL cooldown:10
activators:
  activator0: # Activator ID, you can create as many activator on the activators list
    option: # Here goes an activator that is at least instance of player
    playerCommands:
    - SET_ITEM_COOLDOWN group:my_cooldown_group cooldown:10
SET_ITEM_CUSTOM_MODEL_DATA
- Info: Imposta un custom model data specifico su un item specifico
- Impostazioni del comando:
{slot}: Lo slot in cui verrà applicato. (-1 per la mano principale){customModelData}: valore del customModelData
- Esempio:
activators:
  activator0: # Activator ID, you can create as many activator on the activators list
    option: # Here goes an activator that is at least instance of player
    playerCommands:
    - SET_ITEM_CUSTOM_MODEL_DATA slot:10 customModelData:10
SET_ITEM_LORE
- Info: Imposta una riga di lore
- Impostazioni del comando:
{slot}: Numero dello slot (-1 per la mano principale)
{line}: Se vuoi impostare la prima riga di lore, digita 1{text}: Il testo della nuova riga- Esempio:
activators:
  activator0: # Activator ID, you can create as many activator on the activators list
    option: # Here goes an activator that is at least instance of player
    playerCommands:
    - SET_ITEM_LORE slot:%slot% line:3 text:&6LEGENDARY SWORD
SET_ITEM_MATERIAL
VERSION
- Sostituisce il materiale dell'item con un materiale diverso mantenendo l'nbt dell'item bersaglio
- Impostazioni del comando:
{slot}: Numero dello slot (-1 per la mano principale)
{material}: Il materiale in cui vuoi trasformare l'item- Esempio:
activators:
  activator0: # Activator ID, you can create as many activator on the activators list
    option: # Here goes an activator that is at least instance of player
    playerCommands:
    - SET_ITEM_MATERIAL slot:10 material:DIAMOND_HOE
SET_ITEM_MODEL
- Info: Imposta un modello personalizzato per il tuo item in uno slot specifico
- Impostazioni del comando:
{slot}: Lo slot in cui verrà applicato. (-1 per la mano principale){model}: il valore del modello che vuoi applicare all'item bersaglio
- Esempio:
activators:
  activator0: # Activator ID, you can create as many activator on the activators list
    option: # Here goes an activator that is at least instance of player
    playerCommands:
    - SET_ITEM_MODEL slot:-1 model:minecraft:stone
SET_ITEM_NAME
- Info: Imposta un nome personalizzato per il tuo item in uno slot specifico
- Impostazioni del comando:
{slot}: Lo slot in cui verrà applicato. (-1 per la mano principale){name}: il nuovo nome dell'item
- Esempio:
activators:
  activator0: # Activator ID, you can create as many activator on the activators list
    option: # Here goes an activator that is at least instance of player
    playerCommands:
    - SET_ITEM_NAME slot:%slot% name:&eThis is the new name of the item
SET_ITEM_POTIONCOLOR
- Info: Imposta un colore personalizzato al colore della pozione di un item in uno slot specifico
- Impostazioni del comando:
{slot}: Lo slot in cui verrà applicato. (-1 per la mano principale){color}: Il colore che vuoi applicare. Per il colore, vai suhttps://www.tydac.ch/color/e prendi il valoreMapInfo Colordel colore che preferisci.
- Esempio:
activators:
  activator0: # Activator ID, you can create as many activator on the activators list
    option: # Here goes an activator that is at least instance of player
    playerCommands:
    - SET_ITEM_POTIONCOLOR slot:%slot% color:10944256
SET_ITEM_TOOLTIPSTYLE
- Info: Imposta lo stile di tooltip personalizzato dell'item nello slot.
- Impostazioni del comando:
{slot}: Lo slot in cui verrà applicato. (-1 per la mano principale){tooltipModel}: (Valore predefinito:namespace:id) L'id del tooltip.
- Esempio:
activators:
  activator0: # Activator ID, you can create as many activator on the activators list
    option: # Here goes an activator that is at least instance of player
    playerCommands:
    - SET_ITEM_TOOLTIPSTYLE slot:-1 tooltipModel:namespace:id
SET_PLAYER_TIME
- Info: Imposta l'ora del player senza influire sull'ora lato server.
- Impostazioni del comando:
{time}: Il valore dell'ora. Inserisci-1per far tornare l'ora del player a dipendere dall'ora lato server.{relative}: (Valore predefinito: false) Se non è true, imposterà l'ora dal punto di vista dell'utente a quel valore letteralmente. Se invece è true, prenderà l'ora attuale del mondo e vi sommerà il valore fornito per impostare l'ora attuale dal tuo punto di vista.
- Esempio:
activators:
  activator0: # Activator ID, you can create as many activator on the activators list
    option: # Here goes an activator that is at least instance of player
    playerCommands:
    - SET_PLAYER_TIME time:6000 relative:false
SET_PLAYER_WEATHER
- Info: Imposta il meteo del player senza influire sul meteo lato server.
- Impostazioni del comando:
{weather The time value}: Imposta il meteo del player dal suo punto di vista- Opzioni:
- RESET : Ripristina il meteo lato server
- DOWNFALL : Pioggia o neve a seconda del bioma
- CLEAR : Meteo sereno, nuvole ma senza pioggia.
- Opzioni:
- Esempio:
activators:
  activator0: # Activator ID, you can create as many activator on the activators list
    option: # Here goes an activator that is at least instance of player
    playerCommands:
    - SET_PLAYER_WEATHER weather:CLEAR
SET_TEMP_BLOCK_POS
- Info : Piazza un blocco temporaneo
- Impostazioni del comando:
{x}: Coordinata X{y}: Coordinata Y{z}: Coordinata Z{world}: Nome del mondo{material}: ID del blocco{time}: Tempo in tick[bypassProtection]: (Opzionale) (default = false) Indica se ignorare o meno l'intervento di terze parti[whitelistCurrentBlock]: (Opzionale) (default = può essere piazzato su ogni tipo di blocco) Elenco di blocchi da tenere d'occhio- Esempi:
- AIR, WATER
- !STONE, !COBBLESTONE
activators:
  activator0: # Activator ID, you can create as many activator on the activators list
    option: # Here goes an activator that is at least instance of player
    playerCommands:
    - SET_TEMP_BLOCK_POS x:%entity_x% y:%entity_y% z:%entity_z% world:%entity_world% material:BEDROCK time:40 bypassProtection:true whitelistCurrentBlock:!AIR,!WATER
Non sostituisce i blocchi che hanno dati extra (inventario, rotazione, ecc.)
SPAWN_ENTITY_ON_CURSOR
- Info: Fa comparire entity sul tuo cursore
- Puoi specificare un EntityType
- Oppure una definizione di entity, ad esempio:
{HasVisualFire:1b,id:"minecraft:bee"}(1.21.+) - Oppure un ID di MythicMob
- Impostazioni del comando:
{entity}: La specifica dell'entity{amount}: La quantità di mob che compariranno in quel punto[maxRange]: (Opzionale) (default = 200) La portata massima dello spawn
- Esempio:
activators:
  activator0: # Activator ID, you can create as many activator on the activators list
    option: # Here goes an activator that is at least instance of player
    playerCommands:
    - SPAWN_ENTITY_ON_CURSOR entity:CREEPER amount:1
# With EntitySnapshot
- SPAWN_ENTITY_ON_CURSOR entity:{HasVisualFire:1b,id:"minecraft:bee"} amount:1

# With MythicMob ID
- SPAWN_ENTITY_ON_CURSOR entity:MyCustomBossID amount:1
SUDO
- Info: Ti costringe a eseguire un comando
- Impostazione del comando:
{command}: Il comando da eseguire
- Esempio:
activators:
  activator0: # Activator ID, you can create as many activator on the activators list
    option: # Here goes an activator that is at least instance of player
    playerCommands:
    - SUDO sit
    - SUDO say hi
SUDO_OP
- Info: Dà l'OP al player, esegue il SUDO sul player e gli toglie l'OP
- Info extra: Durante l'OP, il player può eseguire solo il comando specificato dopo il SUDOOP, tutti gli altri comandi sono bloccati mentre il player è OP, e se il server va in crash non c'è problema. Al player verrà tolto l'OP quando si riconnetterà.
- Impostazioni del comando:
{command}: Il comando da eseguire con l'OP
- Esempio:
activators:
  activator0: # Activator ID, you can create as many activator on the activators list
    option: # Here goes an activator that is at least instance of player
    playerCommands:
    - SUDO_OP summon zombie
    - SUDO_OP fly
    - SUDO_OP god
    - SUDO_OP /replacenear 20 tnt
Non è consigliato usarlo molto. Come spiegato all'inizio di questa pagina, se vuoi eseguire comandi vanilla usa il comando execute (spiegato nella FAQ How to use vanilla commands).
Usa SUDOOP solo se non esiste assolutamente nessun'altra opzione: dovrebbe essere il tuo ultimo ripiego, non la prima scelta.
SWAP_HAND
- Info: Scambia l'item attuale con l'item della tua mano secondaria
- Nessuna impostazione del comando
- Esempio:
activators:
  activator0: # Activator ID, you can create as many activator on the activators list
    option: # Here goes an activator that is at least instance of player
    playerCommands:
    - SWAP_HAND
TRANSFER_ITEM
- Info: Scambia 2 item nell'inventario in base allo slot
- Impostazioni del comando:
{slot of launcher}: Slot bersaglio per lo slot n.1{slot of receiver}: Slot bersaglio per lo slot n.2
[boolean drop]: (Opzionale) (default = false) Indica se lo slot di chi lancia il comando viene droppato durante lo scambio oppure no
XP_BOOST
- Info: Potenzia il guadagno di xp per un certo tempo.
- Impostazioni del comando:
{multiplier}: Valore del moltiplicatore di XP{timeinsecs}: Durata in secondi
- Esempio:
activators:
  activator0: # Activator ID, you can create as many activator on the activators list
    option: # Here goes an activator that is at least instance of player
    playerCommands:
    - XP_BOOST 2 10
Fai attenzione! Questo comando può sommarsi, quindi se lo esegui più volte otterrai moltiplicatori sempre più alti se il tempo tra un'esecuzione e l'altra non è sufficiente perché l'ultimo boost scompaia.\
- XP_BOOST 2 5
- DELAY 1
- XP_BOOST 2 5
Questo significa che l'XP verrà potenziata in quest'ordine:
- 1 secondo: x2
- 4 secondi: x4
- 1 secondo: x2
Provalo ora
Copia questo in ExecutableItems e ricarica
Preso da questa pagina. Incollalo in una config, esegui il comando di reload del plugin e avrai una base funzionante da modificare.
activators:
  activator0: # Activator ID, you can create as many activator on the activators list
    option: # Here goes an activator that is at least instance of player
    playerCommands:
    - ABSORPTION amount:5 time:200 # Gives the player absorption
  activator1: # Activator ID, you can create as many activator on the activators list
    option: # Here goes an activator that is at least instance of target
    targetCommands:
- ABSORPTION amount:5 time:200 # Gives the target absorptionPlugin usato in questa pagina
ExecutableItemsItem personalizzati con abilità, attivatori e comandi, senza codice.
- 5.0/5 da 10 recensioni
- 3.1K server lo usano in questo momento (bStats)
- 103 download su SPlugins
€19.99
pagamento unico, aggiornamenti a vita