
Questa pagina è stata tradotta dall'inglese con l'aiuto dell'IA. Migliora questa traduzione o leggi l'originale.
Comandi misti (giocatore ed entità)
Questi comandi personalizzati funzionano per il giocatore ma anche per l'entità
Quindi in:
- playerCommands
- targetCommands
- entityCommands
- ownerCommands
- ...
Ordinati in ordine alfabetico
ADD_TEMPORARY_ATTRIBUTE
- Info: aggiunge attributi temporanei a un giocatore/entità
- Impostazioni del comando:
{attribute}: Elenco degli attributi{amount}: valore double che avrà l'attributo temporaneo{operation}: Elenco delle operazioni{time in ticks}: tempo che deve trascorrere prima che l'attributo scada
- Esempio:
ADD_TEMPORARY_ATTRIBUTE GRAVITY 2 ADD_NUMBER 5ADD_TEMPORARY_ATTRIBUTE attribute:SCALE amount:1.2 operation:ADD_NUMBER timeinticks:120
ALL_PLAYERS
- Info: prende di mira tutti i giocatori.
- Impostazione del comando:
{command}: il comando che verrà eseguito
- Esempio:
activators:
  activator0: # Activator ID, you can create as many activators on the activators list
    option: # Here goes an activator that is at least instance of player
    playerCommands:
    - ALL_PLAYERS SEND_MESSAGE Hello %parseother_`{%around_target%}`_`{player_name}`%
  activator1: # Activator ID, you can create as many activators on the activators list
    option: # Here goes an activator that is at least instance of target
    targetCommands:
    - ALL_PLAYERS SEND_MESSAGE %target% has been hit by %player%
  activator2: # Activator ID, you can create as many activators on the activators list
    option: # Here goes an activator that is at least instance of entity
    entityCommands:
    - ALL_PLAYERS SEND_MESSAGE %entity% has been hit by %player%
Eseguire più comandi: dai un item casuale a tutti i giocatori, non tutti riceveranno lo stesso.
activators:
  activator0: # Activator ID, you can create as many activators on the activators list
    option: # Here goes an activator that is at least instance of player
    playerCommands:
    - ALL_PLAYERS RANDOM_RUN selectionCount:1 <+> ei give %around_target% candy1 1 <+> ei give %around_target% candy2 1 <+> ei give %around_target% candy3 1 <+> RANDOM_END
  activator1: # Activator ID, you can create as many activators on the activators list
    option: # Here goes an activator that is at least instance of target
    targetCommands:
    - ALL_PLAYERS RANDOM_RUN selectionCount:1 <+> ei give %around_target% candy1 1 <+> ei give %around_target% candy2 1 <+> ei give %around_target% candy3 1 <+> RANDOM_END
  activator2: # Activator ID, you can create as many activators on the activators list
    option: # Here goes an activator that is at least instance of entity
    entityCommands:
    - ALL_PLAYERS RANDOM_RUN selectionCount:1 <+> ei give %around_target% candy1 1 <+> ei give %around_target% candy2 1 <+> ei give %around_target% candy3 1 <+> RANDOM_END
ALL_MOBS
- Info: prende di mira tutti i giocatori.
- Impostazione del comando:
{command(s)}: il comando che verrà eseguito
- Esempio:
activators:
  activator0: # Activator ID, you can create as many activators on the activators list
    option: # Here goes an activator that is at least instance of player
    playerCommands:
    - ALL_MOBS DAMAGE 5
    - ALL_MOBS BLACKLIST(ZOMBIE,ARMORSTAND) DAMAGE 20
    - ALL_MOBS WHITELIST(ZOMBIE) DAMAGE 20
  activator1: # Activator ID, you can create as many activators on the activators list
    option: # Here goes an activator that is at least instance of target
    targetCommands:
    - ALL_MOBS DAMAGE 5
    - ALL_MOBS BLACKLIST(ZOMBIE,ARMORSTAND) DAMAGE 20
    - ALL_MOBS WHITELIST(ZOMBIE) DAMAGE 20
  activator2: # Activator ID, you can create as many activators on the activators list
    option: # Here goes an activator that is at least instance of entity
    entityCommands:
    - ALL_MOBS DAMAGE 5
    - ALL_MOBS BLACKLIST(ZOMBIE,ARMORSTAND) DAMAGE 20
    - ALL_MOBS WHITELIST(ZOMBIE) DAMAGE 20
Eseguire più playerCommands:
activators:
  activator0: # Activator ID, you can create as many activators on the activators list
    option: # Here goes an activator that is at least instance of player
    playerCommands:
    - ALL_MOBS DAMAGE 5 <+> effect give %around_target_uuid% strength 10 1
  activator1: # Activator ID, you can create as many activators on the activators list
    option: # Here goes an activator that is at least instance of target
    targetCommands:
    - ALL_MOBS DAMAGE 5 <+> effect give %around_target_uuid% strength 10 1
  activator2: # Activator ID, you can create as many activators on the activators list
    option: # Here goes an activator that is at least instance of entity
    entityCommands:
    - ALL_MOBS DAMAGE 5 <+> effect give %around_target_uuid% strength 10 1
Supporta blacklist e whitelist
AROUND
- Info: prende di mira i giocatori in un raggio specifico e fa eseguire loro dei comandi
- Impostazioni del comando:
{distance}: fino a che raggio il comando selezionerà i giocatori (predefinito 3){displayMsgIfNoPlayer}: (true o false) per notificare o meno all'utente dell'item se è riuscito a colpire dei giocatori (predefinito true){throughBlocks}: influenzerà o meno i giocatori che si trovano dietro dei blocchi (predefinito true){safeDistance}: se la distanza tra il bersaglio e chi lancia il comando è inferiore o uguale al valore di safeDistance, il bersaglio non sarà influenzato. (predefinito 0){offsetYaw}: la direzione yaw che vuoi dare al tuo offset (indipendente dal valore di yaw dell'origine){offsetPitch}: la direzione pitch che vuoi dare al tuo offset (indipendente dal valore di yaw dell'origine){offsetDistance}: dopo aver calcolato offsetYaw e offsetPitch, usando il valore di questa impostazione, sposterà la posizione/il punto centrale del comando AROUND rispetto alla posizione xyz dell'origine.{limit}: il numero di bersagli che possono essere influenzati{sort}: utile per l'opzione limit.- NEAREST : seleziona le entità più vicine all'origine.
- RANDOM : seleziona casualmente una qualsiasi entità nel raggio del comando.
{regionCheck}: true/false. Se true, il comando AROUND controllerà se il bersaglio si trova nella wilderness o nel claim di chi lancia il comando (nel contesto del plugin GriefPrevention) (verrà aggiornato presto per essere controllato anche con altri plugin di claim){commands}: i comandi che verranno eseguiti per i giocatori bersaglio.
Puoi aggiungere più comandi! Usa il separatore <+>
Esempio: SEND_MESSAGE &cYou will be damaged in 5 seconds <+> DELAY 5 <+> DAMAGE 5
Placeholder: i placeholder sono gli stessi dei Placeholder del giocatore ma devi sostituire "player" con "around_target"
Esempio: %around_target%, %around_target_uuid%
Numero di bersagli: %around_target_count% restituisce il numero di giocatori selezionati dal comando. È lo stesso per ogni bersaglio e conta i bersagli rimasti dopo distance, safeDistance, throughBlocks e regionCheck e limit. Le CONDITIONS(...) controllate su ciascun bersaglio non vengono prese in considerazione. Accetta la scorciatoia +N / -N: %around_target_count%-1.
Esempio: AROUND distance:10 displayMsgIfNoPlayer:false SEND_MESSAGE &eYou are one of the %around_target_count% players hit !
- Esempi:
Questo fa cadere un fulmine sui giocatori in un raggio di 20 blocchi
activators:
  activator0: # Activator ID, you can create as many activator on the activators list
    option: # Here goes an activator that is at least instance of player
    playerCommands:
    - AROUND distance:20 displayMsgIfNoPlayer:false execute at %around_target% run summon lightning_bolt
Invia un messaggio ai giocatori tra 5 e 10 blocchi
activators:
  activator0: # Activator ID, you can create as many activator on the activators list
    option: # Here goes an activator that is at least instance of player
    playerCommands:
    - AROUND distance:10 displayMsgIfNoPlayer:true throughBlocks:true safeDistance:5 SENDMESSAGE &eIt is a test !
Puoi annidare AROUND con i comandi: AROUND, IF, NEAREST, ALL_PLAYERS
In tal caso il separatore e i placeholder cambiano in base al livello di annidamento.
separatore del comando base : <+>
primo comando annidato : <+::step1>
... : <+::step2>; , <+::step3>, ...
placeholder base : %around_target%
primo comando annidato : %around_target::step1%
... : %around_target::step2%, %around_target::step3%, ...
Esempi:
activators:
  activator0: # Activator ID, you can create as many activator on the activators list
    option: # Here goes an activator that is at least instance of player
    playerCommands:
    - AROUND distance:5 displayMsgIfNoPlayer:false say &a(0)&e%around_target% <+> DELAY 3 <+> AROUND distance:5 displayMsgIfNoPlayer:false say &a(1)&e%around_target::step1% <+::step1> DELAY 3 <+::step1> AROUND distance:5 displayMsgIfNoPlayer:false say &a(2)&e%around_target::step2%
activators:
  activator0: # Activator ID, you can create as many activator on the activators list
    option: # Here goes an activator that is at least instance of player
    playerCommands:
    - AROUND say &a(0)&e%around_target% <+> DELAY 3 <+> NEAREST 10 say &a(1)&e%around_target::step1%
activators:
  activator0: # Activator ID, you can create as many activator on the activators list
    option: # Here goes an activator that is at least instance of player
    playerCommands:
    - AROUND distance:10 throughBlocks:false displayMsgIfNoPlayer:false say &a(0)&e%around_target% <+> DELAY 3 <+> AROUND distance:5 displayMsgIfNoPlayer:false say &a(1)&e%around_target::step1% and x &c%around_target_x::step1% <+::step1> IF %around_target_x::step1%>10 say &aThe target &e%around_target_x::step2% <+::step2> effect give %around_target::step2% slowness 20
Puoi aggiungere condizioni con placeholder personalizzati per regolare i giocatori colpiti
Formato: AROUND <settings> CONDITIONS(<conditions>) <command>
 \<settings>  sono le impostazioni del comando

 \<conditions> sono le condizioni
Formato delle condizioni: CONDITIONS(%::<my_placeholder_name>::%<comparator><value>)
  \<my\_placeholder\_name> è il nome del placeholder

  \<comparator> il comparatore: "`<`", "`<=`", "`=`", "`>`", "`>=`"

  \<value> il valore
Puoi aggiungere più condizioni usando il separatore "&&"
- Esempi:
activators:
  activator0: # Activator ID, you can create as many activator on the activators list
    option: # Here goes an activator that is at least instance of player
    playerCommands:
    - 'AROUND distance:10 CONDITIONS(%::player_health::%>10&&%::player_name::%=2Ssomar) SEND_MESSAGE &eclick'
Tieni presente che la parte CONDITIONS() interpreta i placeholder al suo interno con il giocatore selezionato dal comando AROUND. Quindi quello che succede in realtà nei placeholder qui sopra è che controlla se la salute del bersaglio è maggiore di 10 e se il giocatore selezionato dal comando AROUND si chiama "2Ssomar"
activators:
  activator0: # Activator ID, you can create as many activator on the activators list
    option: # Here goes an activator that is at least instance of player
    playerCommands:
    - AROUND distance:10 displayMsgIfNoPlayer:false CONDITIONS(%::parseother_`{%player%}`_`{betterteams_name}`::%!=%::betterteams_name::%) effect give %around_target% weakness 10 10 true
activators:
  activator0: # Activator ID, you can create as many activator on the activators list
    option: # Here goes an activator that is at least instance of player
    playerCommands:
    - 'AROUND distance:2 CONDITIONS(%::player_name::%!=%player%) DAMAGE 15'
I placeholder provenienti da plugin come ExecutableItems, ExecutableBlocks non verranno interpretati con il giocatore influenzato dal comando AROUND.
Per esempio, con ExecutableBlocks, CONDITIONS(%var_faction%=%::factionsuuid_faction_name::%) funziona controllando se il valore della variabile factions del blocco è uguale alla fazione del giocatore bersaglio
Fonte del placeholder: PlaceholderAPI)
BACK_DASH
- Info: lancia il giocatore/bersaglio nella direzione opposta a quella in cui sta guardando (NON PUOI ESSERE LANCIATO IN ARIA)
- Impostazione del comando:
{amount}: il valore che determina quanto sarà forte il lancio
- Esempio:
activators:
  activator0: # Activator ID, you can create as many activators on the activators list
    option: # Here goes an activator that is at least instance of player
    playerCommands:
    - BACK_DASH 5
  activator1: # Activator ID, you can create as many activators on the activators list
    option: # Here goes an activator that is at least instance of target
    targetCommands:
    - BACK_DASH 5
  activator2: # Activator ID, you can create as many activators on the activators list
    option: # Here goes an activator that is at least instance of entity
    entityCommands:
    - BACK_DASH 5
BURN
- Info: fa bruciare il giocatore/bersaglio
- Impostazione del comando:
{timeinsecs}: durata dell'incendio in secondi- Esempio:
activators:
  activator0: # Activator ID, you can create as many activators on the activators list
    option: # Here goes an activator that is at least instance of player
    playerCommands:
    - BURN 200
  activator1: # Activator ID, you can create as many activators on the activators list
    option: # Here goes an activator that is at least instance of target
    targetCommands:
    - BURN 200
  activator2: # Activator ID, you can create as many activators on the activators list
    option: # Here goes an activator that is at least instance of entity
    entityCommands:
    - BURN 200
CONSOLE_MESSAGE
- Info: invia un messaggio alla console
- Impostazione del comando:
{text}: testo da inviare alla console
- Esempio:
activators:
  activator0: # Activator ID, you can create as many activators on the activators list
    option: # Here goes an activator that is at least instance of player
    playerCommands:
    - CONSOLE_MESSAGE This is a debug message sent to the %player%
  activator1: # Activator ID, you can create as many activators on the activators list
    option: # Here goes an activator that is at least instance of target
    targetCommands:
    - CONSOLE_MESSAGE This is a debug message sent to the %player% triggered by %target%
  activator2: # Activator ID, you can create as many activators on the activators list
    option: # Here goes an activator that is at least instance of entity
    entityCommands:
    - CONSOLE_MESSAGE This is a debug message sent to the %player% triggered by %entity%
COPY_EFFECTS
- Info: copia gli effetti del bersaglio
- Impostazione del comando:
[limitDuration]: (opzionale) (predefinito = nessun limite) significa che, se per esempio il bersaglio ha 3 minuti di effetto veleno e lo limiti a 5 secondi, riceverai solo un effetto veleno di 5 secondi
- Esempio:
activators:
  activator0: # Activator ID, you can create as many activators on the activators list
    option: # Here goes an activator that is at least instance of player
    playerCommands:
    - COPY_EFFECTS 5 # Using this will copy the player's own effects
  activator1: # Activator ID, you can create as many activators on the activators list
    option: # Here goes an activator that is at least instance of target
    targetCommands:
    - COPY_EFFECTS 5 # Using this will copy the target effects into the player
  activator2: # Activator ID, you can create as many activators on the activators list
    option: # Here goes an activator that is at least instance of entity
    entityCommands:
    - COPY_EFFECTS 5 # Using this will copy the entity effects into the player
CUSTOMDASH1
- Info: ti lancia verso una posizione specifica
- Impostazioni del comando:
{x}: coordinata X{y}: coordinata Y{z}: coordinata Z{fallDamage}: true o false. Se il giocatore subirà o meno danni da caduta dopo essere stato lanciato.
- Esempio:
activators:
  activator0: # Activator ID, you can create as many activators on the activators list
    option: # Here goes an activator that is at least instance of player
    playerCommands:
    - CUSTOMDASH1 %player_x% %player_y%+5 %player_z% true # This will dash up the player
  activator1: # Activator ID, you can create as many activators on the activators list
    option: # Here goes an activator that is at least instance of target
    targetCommands:
    - CUSTOMDASH1 %target_x% %target_y%+5 %target_z% true # This will dash up the target
  activator2: # Activator ID, you can create as many activators on the activators list
    option: # Here goes an activator that is at least instance of entity
    entityCommands:
    - CUSTOMDASH1 %entity_x% %entity_y% %entity_z% true # This will dash up the entity
Se hai attivatori che collegano due tipi di bersagli, puoi fare così
- Esempio 1 | Istanza di giocatore - entità | Lancia il giocatore verso l'entità
activators:
  activator0: # Activator ID, you can create as many activators on the activators list
    option: # Activator instance of player and entity
    playerCommands:
    - CUSTOMDASH1 %entity_x% %entity_y% %entity_z% true
    entityCommands: []
- Esempio 2 | Istanza di giocatore - entità | Lancia l'entità verso il giocatore
activators:
  activator0: # Activator ID, you can create as many activators on the activators list
    option: # Activator instance of player and entity
    playerCommands: []
    entityCommands:
    - CUSTOMDASH1 %player_x% %player_y% %player_z% true
- Esempio 3 | Istanza di giocatore - blocco | Lancia il giocatore verso il blocco
activators:
  activator0: # Activator ID, you can create as many activators on the activators list
    option: # Activator instance of player and block
    playerCommands:
    - CUSTOMDASH1 %block_x% %block_y% %block_z% true
    blockCommands: []
Puoi aumentare la forza del comando eseguendolo più volte (ma non nello stesso tick: le esecuzioni devono essere distanziate nel tempo, altrimenti non avrebbe senso, dato che farebbero lanciare il giocatore dalla stessa posizione verso la posizione di destinazione), esempi:
- Eseguendolo più volte manualmente
activators:
  activator0: # Activator ID, you can create as many activators on the activators list
    option: # Here goes an activator that is at least instance of player
    playerCommands:
    - CUSTOMDASH1 %player_x% %player_y%+5 %player_z% true # This will dash up the player
    - DELAYTICK 1
    - CUSTOMDASH1 %player_x% %player_y%+5 %player_z% true # This will dash up the player
    - DELAYTICK 1
    - CUSTOMDASH1 %player_x% %player_y%+5 %player_z% true # This will dash up the player
- Usando il comando di utilità LOOP START
activators:
  activator0: # Activator ID, you can create as many activators on the activators list
    option: # Here goes an activator that is at least instance of player
    playerCommands:
    - 'LOOP START: 3'
    - CUSTOMDASH1 %player_x% %player_y%+5 %player_z% true # This will dash up the player
    - DELAYTICK 1
    - LOOP END
CUSTOMDASH2
- Info: ti lancia lontano da una posizione specifica
- Impostazioni del comando:
{x}: coordinata X{y}: coordinata Y{z}: coordinata Z{strength}: forza del dash
- Esempio:
activators:
  activator0: # Activator ID, you can create as many activators on the activators list
    option: # Here goes an activator that is at least instance of player
    playerCommands:
    - CUSTOMDASH2 %player_x% %player_y%+5 %player_z% 5 # This will dash down the player with strength 5
  activator1: # Activator ID, you can create as many activators on the activators list
    option: # Here goes an activator that is at least instance of target
    targetCommands:
    - CUSTOMDASH2 %target_x% %target_y%+5 %target_z% 5 # This will dash down the target with strength 5
  activator2: # Activator ID, you can create as many activators on the activators list
    option: # Here goes an activator that is at least instance of entity
    entityCommands:
    - CUSTOMDASH2 %entity_x% %entity_y% %entity_z% 5 # This will dash down the entity with strength 5
Se hai attivatori che collegano due tipi di bersagli, puoi fare così
- Esempio 1 | Istanza di giocatore - entità | Lancia il giocatore lontano dall'entità
activators:
  activator0: # Activator ID, you can create as many activators on the activators list
    option: # Activator instance of player and entity
    playerCommands:
    - CUSTOMDASH1 %entity_x% %entity_y% %entity_z% 5
    entityCommands: []
- Esempio 2 | Istanza di giocatore - entità | Lancia l'entità lontano dal giocatore
activators:
  activator0: # Activator ID, you can create as many activators on the activators list
    option: # Activator instance of player and entity
    playerCommands: []
    entityCommands:
    - CUSTOMDASH1 %player_x% %player_y% %player_z% 5
- Esempio 3 | Istanza di giocatore - blocco | Lancia il giocatore lontano dal blocco
activators:
  activator0: # Activator ID, you can create as many activators on the activators list
    option: # Activator instance of player and block
    playerCommands:
    - CUSTOMDASH1 %block_x% %block_y% %block_z% 5
    blockCommands: []
CUSTOMDASH3
- Info: lancia il bersaglio seguendo una specifica funzione matematica
- Impostazioni del comando:
{function}: la funzione matematica da seguire. Sito per calcolare le funzioni{max x value}: valore massimo di x della funzione{front z}: se il dash è in avanti o all'indietro
- Esempio:
activators:
  activator0: # Activator ID, you can create as many activators on the activators list
    option: # Here goes an activator that is at least instance of player
    playerCommands:
    - CUSTOMDASH3 cosx 10 true
  activator1: # Activator ID, you can create as many activators on the activators list
    option: # Here goes an activator that is at least instance of target
    targetCommands:
    - CUSTOMDASH3 cosx 10 true
  activator2: # Activator ID, you can create as many activators on the activators list
    option: # Here goes an activator that is at least instance of entity
    entityCommands:
    - CUSTOMDASH3 cosx 10 true
DAMAGE
- Info: infligge al giocatore una quantità specifica di danno. (Il danno inflitto tramite questo comando viene conteggiato come danno del giocatore)
-
Questo comando attiva gli attivatori legati al danno di ExecutableItems e ExecutableEvents
-
Il tipo di danno spigot è ENTITY_ATTACK se nell'attivatore è coinvolto un giocatore.
Altrimenti, il tipo di danno spigot è CUSTOM
-
- Impostazioni del comando:
{amount}: quantità di danno in punti ferita (non in cuori){amplified If Strength Effect}: true o false, Strength 1 -> + 1.5 di danno, ....{amplified with attack attribute}: true o false, prenderà la somma di tutti i tuoi attributi ATTACK_DAMAGE esistenti che hanno l'operatoreMULTIPLY_SCALAR_1, e la moltiplicherà in base al tuo danno d'attacco attuale (incluso l'effetto Strength se attivato)
InfoFormula:
total damage= (amount*strength effect) * (sum of all of your attack damage attributes with the operator (add_multiplied_total/MULTIPLY_SCALAR_1)+1){damageType}: il tipo di danno -> Elenco di DamageType
- Esempio:
activators:
  activator0: # Activator ID, you can create as many activators on the activators list
    option: # Here goes an activator that is at least instance of player
    playerCommands:
    - DAMAGE 20 true true # Apply 20 of damage to the player
  activator1: # Activator ID, you can create as many activators on the activators list
    option: # Here goes an activator that is at least instance of target
    targetCommands:
    - DAMAGE 20 true true # Apply 20 of damage to the target
  activator2: # Activator ID, you can create as many activators on the activators list
    option: # Here goes an activator that is at least instance of entity
    entityCommands:
    - DAMAGE 20 true true # Apply 20 of damage to the entity
activators:
  activator0: # Activator ID, you can create as many activators on the activators list
    option: # Here goes an activator that is at least instance of player
    playerCommands:
    - DAMAGE 25% # Will apply 25% of the max health of the player as damage
  activator1: # Activator ID, you can create as many activators on the activators list
    option: # Here goes an activator that is at least instance of target
    targetCommands:
    - DAMAGE 25% # Will apply 25% of the max health of the target as damage
  activator2: # Activator ID, you can create as many activators on the activators list
    option: # Here goes an activator that is at least instance of entity
    entityCommands:
    - DAMAGE 25% # Will apply 25% of the max health of the entity as damage
Per applicare danno reale puoi usare:
- 1.20.5++ usa il comando /minecraft:damage, per esempio
minecraft:damage %target% 10 by %player%
- 1.20.5-- usa il comando REGAIN HEALTH, non è la soluzione migliore ma è un'alternativa.
DAMAGE_NO_KNOCKBACK
- Info: infligge al giocatore una quantità specifica di danno senza applicare knockback. (Il danno inflitto tramite questo comando non viene conteggiato come danno del giocatore ed è più che altro un danno indiretto)
-
Questo comando attiva gli attivatori legati al danno di ExecutableItems e ExecutableEvents
-
Il tipo di danno spigot è ENTITY_ATTACK se nell'attivatore è coinvolto un giocatore.
Altrimenti, il tipo di danno spigot è CUSTOM
-
- Impostazioni del comando:
{amount}: quantità di danno in punti ferita (non in cuori){amplified If Strength Effect}: true o false, Strength 1 -> + 1.5 di danno, ....{amplified with attack attribute}: true o false, con un giocatore con il 500% di danno bonus, il comando farà 5 x "<damage>".
- Esempio:
activators:
  activator0: # Activator ID, you can create as many activators on the activators list
    option: # Here goes an activator that is at least instance of player
    playerCommands:
    - DAMAGE_NO_KNOCKBACK 20 true true # Apply 20 of damage to the player
  activator1: # Activator ID, you can create as many activators on the activators list
    option: # Here goes an activator that is at least instance of target
    targetCommands:
    - DAMAGE_NO_KNOCKBACK 20 true true # Apply 20 of damage to the target
  activator2: # Activator ID, you can create as many activators on the activators list
    option: # Here goes an activator that is at least instance of entity
    entityCommands:
    - DAMAGE_NO_KNOCKBACK 20 true true # Apply 20 of damage to the entity
activators:
  activator0: # Activator ID, you can create as many activators on the activators list
    option: # Here goes an activator that is at least instance of player
    playerCommands:
    - DAMAGE_NO_KNOCKBACK 25% # Will apply 25% of the max health of the player as damage
  activator1: # Activator ID, you can create as many activators on the activators list
    option: # Here goes an activator that is at least instance of target
    targetCommands:
    - DAMAGE_NO_KNOCKBACK 25% # Will apply 25% of the max health of the target as damage
  activator2: # Activator ID, you can create as many activators on the activators list
    option: # Here goes an activator that is at least instance of entity
    entityCommands:
    - DAMAGE_NO_KNOCKBACK 25% # Will apply 25% of the max health of the entity as damage
DAMAGE_BOOST
- Info: ti permette di darti un bonus di danno personalizzato
- Questo comando potenzia anche il danno dei comandi personalizzati, per esempio (DAMAGE, DAMAGE_NO_KNOCKBACK)
- Questo comando non potenzia il danno dei proiettili
- Impostazioni del comando:
{modification in percentage example 100}: entità del bonus. Esempio qui sotto:- 50 = ti fa infliggere +50% di danno
- -80 = ti fa infliggere -80% di danno
{timeinticks}: la durata del bonus di danno personalizzato
- Esempio: (il comando qui sotto ti dà +50% di danno inflitto per 10s)
activators:
  activator0: # Activator ID, you can create as many activators on the activators list
    option: # Here goes an activator that is at least instance of player
    playerCommands:
    - DAMAGE_BOOST 50 200 # This will boost the damage of the player
  activator1: # Activator ID, you can create as many activators on the activators list
    option: # Here goes an activator that is at least instance of target
    targetCommands:
    - DAMAGE_BOOST 50 200 # This will boost the damage of the target
  activator2: # Activator ID, you can create as many activators on the activators list
    option: # Here goes an activator that is at least instance of entity
    entityCommands:
    - DAMAGE_BOOST 50 200 # This will boost the damage of the entity
Questo comando può essere usato più volte e i bonus si sommano: in questo esempio vedrai che da [0-10] secondi il giocatore infligge il 50% di danno in più, poi da [10-20] secondi infligge il 100% di danno in più e infine da [20-30] secondi il 50% di danno in più, perché in [10-20] si sono sommati due comandi DAMAGE_BOOST.
activators:
  activator0: # Activator ID, you can create as many activators on the activators list
    option: # Here goes an activator that is at least instance of player
    playerCommands:
    - DAMAGE_BOOST 50 200 # This will boost the damage of the player by 50% for 200 ticks (10 seconds)
    - DELAY 10 # Delay of 10 seconds
    - DAMAGE_BOOST 50 200 # This will boost the damage of the player by 50% for 200 ticks (10 seconds)
DAMAGE_RESISTANCE
- Info: ti permette di darti una resistenza al danno personalizzata, applicando delle maggiorazioni personalizzate al danno subito
- Impostazioni del comando:
{modification in percentage example 100}: entità della maggiorazione. Esempio qui sotto:- 50 = ti fa subire +50% di danno
-80 = ti fa subire -80% di danno
- 50 = ti fa subire +50% di danno
{timeinticks}: la durata della resistenza al danno personalizzata
- Esempio: (il comando qui sotto ti fa subire +50% di danno per 10s)
- DAMAGE_RESISTANCE 50 200
EQUIPMENT_VISUAL_REPLACE
- Info: sostituisce VISIVAMENTE (non c'è alcun rischio di perdere item) uno slot dell'equipaggiamento con un certo materiale
- Richiede ProtocolLib.
- L'effetto visivo viene mostrato ai giocatori che vedono il giocatore / l'entità (e al giocatore stesso). Un giocatore che si avvicina in seguito lo vede a sua volta.
- Un'entità ha un solo effetto visivo per slot: un nuovo EQUIPMENT_VISUAL_REPLACE sullo stesso slot sostituisce il precedente, con il nuovo tempo. L'effetto visivo termina dopo
{timeinticks}, con EQUIPMENT_VISUAL_CANCEL, oppure quando l'entità muore, scompare o il giocatore esce.
- Impostazioni del comando:
{EquipmentSlot}: lo slot- Opzioni:
- -1
- 40
- 36
- 37
- 38
- 39
- Opzioni:
{material}: l'id dell'item del materiale con cui vuoi sostituire oppure l'id EI{amount}: la quantità dello stack{timeinticks}: quanto durerà il travestimento. (20 tick = 1 sec)
- Esempio:
- EQUIPMENT_VISUAL_REPLACE 39 CARVED_PUMPKIN 1 100
- EQUIPMENT_VISUAL_REPLACE 39 EI:test 1 100
EQUIPMENT_VISUAL_CANCEL
- Info: annulla il comando EQUIPMENT_VISUAL_REPLACE
- Funziona sui giocatori e sui mob: i giocatori che vedono l'entità rivedono il suo item reale in questo slot.
- Impostazione del comando:
{EquipmentSlot}: lo slot- Opzioni:
- -1
- 40
- 36
- 37
- 38
- 39
- Opzioni:
- Esempio:
- EQUIPMENT_VISUAL_CANCEL 39
FORCE_DROP
- Alias:
FORCEDROP,DROPSPECIFICEI - Info: costringe il giocatore/l'entità a lasciare cadere un item. Supporta due modalità:
- Modalità slot: lascia cadere l'item nello slot dell'inventario specificato
- Modalità EI ID: lascia cadere dall'inventario tutti gli item che corrispondono all'ID ExecutableItem indicato (solo giocatore)
- Impostazioni del comando:
slot:: numero, -1 per la mano principale (predefinito: -1). Vedi l'immagine di riferimento degli slot qui sotto.ei_id:: l'ID dell'ExecutableItem da lasciare cadere (ha la precedenza sulla modalità slot quando è indicato)
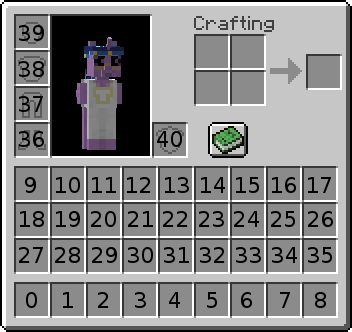
- Esempi:
# Drop the item in main hand
- FORCE_DROP slot:-1

# Drop the item in slot 5
- FORCE_DROP slot:5

# Drop all items with the EI id "excalibursword" from the player's inventory
- FORCE_DROP ei_id:excalibursword
FRONTDASH
- Info: lancia il giocatore/bersaglio nella direzione in cui sta guardando
- Impostazioni del comando:
{number}: il valore che determina quanto sarà forte il lancio{custom_y}: per impostare una spinta verticale (consiglio di usare un valore piccolo come 0.5 - 1 se non vuoi un salto troppo alto.){falldamage}: impostalo per attivare o disattivare il danno da caduta
- Esempio:
- FRONTDASH 5 0.5 false
GLACIAL_FREEZE
- Info: applica il congelamento della neve polverosa di Minecraft 1.18
- Impostazione del comando:
{time in ticks}: durata del congelamento in tick. (20 tick = 1 sec)- Esempio:
- GLACIAL_FREEZE 160
GLOWING
- Info: applica il bagliore al giocatore
- Impostazioni del comando:
{time in ticks}: durata del bagliore in tick{color}: di che colore sarà il bagliore. Riferimento dei colori
- Esempio:
- GLOWING 100 BLUE
HITSCAN_ENTITIES
- Info: permette di eseguire un comando in una certa direzione sulle entità
- Impostazioni del comando:
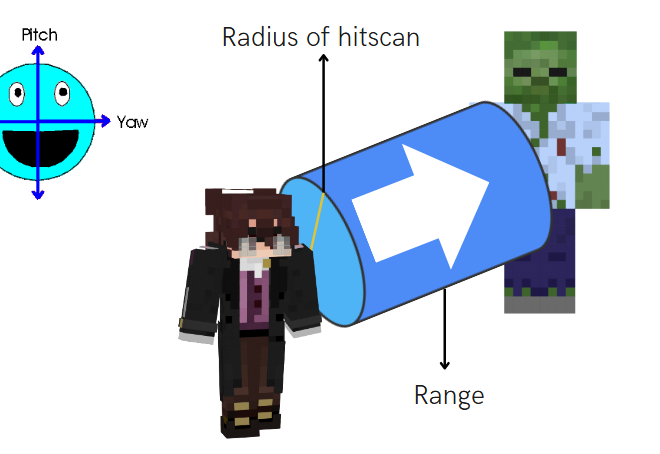
{range}: a che distanza può trovarsi un'entità per essere presa di mira dal comando HITSCAN{radiusOfHitscan}: quanto è LARGO il cilindro. È fondamentalmente la differenza tra sparare un proiettile e sparare una palla di cannone.{pitch}: in quale direzione sparare, relativa al pitch del giocatore{yaw}: la stessa cosa del Pitch ma con lo yaw{leftRightShift}:- -5 = l'hitscan PARTE da 5 blocchi a sinistra.
- 0 = l'hitscan è centrato dove si trova il giocatore.
- 5 = l'hitscan PARTE da 5 blocchi a destra del giocatore.
{yShift}: come sinistra, destra, ma su un asse diverso.{throughEntities}: booleano: se l'HITSCAN può attraversare o meno le entità.{throughBlocks}: booleano: se l'HITSCAN può attraversare o meno i blocchi.{limit}: il numero di bersagli che possono essere influenzati{sort}: utile per l'opzione limit.- NEAREST : seleziona le entità più vicine all'origine.
- RANDOM : seleziona casualmente una qualsiasi entità nel raggio del comando.
{regionCheck}: true/false. Se true, il comando AROUND controllerà se il bersaglio si trova nella wilderness o nel claim di chi lancia il comando (nel contesto del plugin GriefPrevention) (verrà aggiornato presto per essere controllato anche con altri plugin di claim){command(s)}: lo stesso dei comandi AROUND, puoi scriverecommand1 <+> command2... e usare il placeholder %around_target%
- Esempio:
HITSCAN_ENTITIES range:5 radius:0 pitch:0 yaw:0 leftRightShift:0 yShift:0 throughBlocks:true throughEntities:true HEAL 10 <+> BACKDASH 5
I comandi dopo HITSCAN_ENTITIES (e dopo ogni <+>) vengono eseguiti su ogni entità colpita, come i comandi delle entità: REGAIN_HEALTH 4 cura l'entità colpita, non chi lancia il comando. Per agire su chi lancia il comando, usa un comando vanilla con %player%, per esempio HITSCAN_ENTITIES range:8 DAMAGE 4 <+> effect give %player% instant_health 1 0 true.
- Immagine per capire:
HITSCAN_PLAYERS
- Info: permette di eseguire un comando in una certa direzione sui giocatori
- Impostazioni del comando:
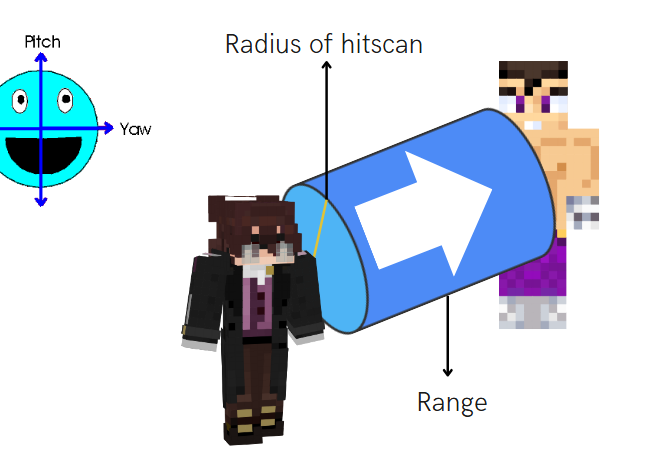
{range}: a che distanza può trovarsi un'entità per essere presa di mira dal comando HITSCAN{radiusOfHitscan}: quanto è LARGO il cilindro. È fondamentalmente la differenza tra sparare un proiettile e sparare una palla di cannone.{pitch}: in quale direzione sparare, relativa al pitch del giocatore{yaw}: la stessa cosa del Pitch ma con lo yaw{leftRightShift}:- -5 = l'hitscan PARTE da 5 blocchi a sinistra.
- 0 = l'hitscan è centrato dove si trova il giocatore.
- 5 = l'hitscan PARTE da 5 blocchi a destra del giocatore.
{yShift}: come sinistra, destra, ma su un asse diverso.{throughEntities}: booleano: se l'HITSCAN può attraversare o meno le entità.{throughBlocks}: booleano: se l'HITSCAN può attraversare o meno i blocchi.{limit}: il numero di bersagli che possono essere influenzati{sort}: utile per l'opzione limit.- NEAREST : seleziona le entità più vicine all'origine.
- RANDOM : seleziona casualmente una qualsiasi entità nel raggio del comando.
{regionCheck}: true/false. Se true, il comando AROUND controllerà se il bersaglio si trova nella wilderness o nel claim di chi lancia il comando (nel contesto del plugin GriefPrevention) (verrà aggiornato presto per essere controllato anche con altri plugin di claim){command(s)}: lo stesso dei comandi AROUND, puoi scriverecommand1 <+> command2... e usare il placeholder %around_target%
- Esempio:
- HITSCAN_PLAYERS range:5 radius:0 pitch:0 yaw:0 leftRightShift:0 yShift:0 throughBlocks:true throughEntities:true DAMAGE 5 <+> JUMP 5
- Immagine per capire:
INVULNERABILITY
- Info: rende il giocatore invulnerabile per un certo periodo di tempo
- Impostazione del comando:
{ticks}: durata dell'invulnerabilità in tick. (20 tick = 1 sec)- Supporta valori negativi per ridurre il tempo di invulnerabilità, come quello che segue un colpo subito.
- Esempio:
- INVULNERABILITY 60
JUMP
- Info: lancia il giocatore in aria
- Impostazioni del comando:
{number}: quanto sarà forte il lancio{fall damage}: (opzionale) (predefinito = false) seleziona se vuoi che il comando causi danni da caduta.
- Esempio:
- JUMP 20
LAUNCH_ENTITY
- Info: lancia un'entità nella tua direzione
- Impostazioni del comando:
{entityType}: ID del mob dell'entità lanciata (TUTTO MAIUSCOLO) Elenco di EntityType{speed}: (numero, Double) definisce la velocità dell'entità[angle rotation y]: (solo per 1.14 e +) (opzionale) (predefinito = 0) (in gradi) definisce la direzione in cui verrà lanciata l'entità
- Esempio:
- LAUNCH_ENTITY PIG 2
- Esempio per fare un tri-shoot:
- LAUNCH_ENTITY PIG 2
- LAUNCH_ENTITY PIG 2 15
- LAUNCH_ENTITY PIG 2 -15
MLIB_DAMAGE
- Info: infligge danno al bersaglio, ma il tipo di danno proviene principalmente dal plugin MythicLib
- Impostazioni del comando:
{number}: danno inflitto ai bersagli (predefinito: 10){damage_type}: tipo di danno inflitto (predefinito: PHYSICAL)- Esempio: MAGIC, PHYSICAL, WEAPON, SKILL, PROJECTILE, UNARMED, ON_HIT, MINION, DOT;
{knockback}: true/false, se respinge o meno il bersaglio (predefinito: false){element}: specifica che tipo di elemento è l'attacco (predefinito: FIRE)- Riferimento: Elenco degli elementi di MythicLib
{crit}: true/false, se ilCRITICAL_STRIKE_POWERdell'attaccante viene aggiunto o meno all'equazione del danno (predefinito: false)- Equazione:
number * (number * (total critical_strike_power/100))
- Equazione:
- Esempio:
- MLIB_DAMAGE 10 PHYSICAL false FIRE true
MOB_AROUND
- Info: prende di mira le entità in un raggio specifico e fa eseguire loro dei comandi
- Entità disponibili -> Elenco di LivingEntity
- Impostazioni del comando:
{distance}: fino a che raggio il comando selezionerà le entità{displayMsgIfNoEntity}: (true o false) per notificare all'utente dell'item se non è riuscito a colpire alcun mob.- Imposta su false per nascondere il messaggio
{throughBlocks}: influenzerà o meno i mob che si trovano dietro dei blocchi{safeDistance}: se la distanza tra il bersaglio e chi lancia il comando è inferiore o uguale al valore di safeDistance, il bersaglio non sarà influenzato.{offsetYaw}: la direzione yaw che vuoi dare al tuo offset (indipendente dal valore di yaw dell'origine){offsetPitch}: la direzione pitch che vuoi dare al tuo offset (indipendente dal valore di yaw dell'origine){offsetDistance}: dopo aver calcolato offsetYaw e offsetPitch, usando il valore di questa impostazione, sposterà la posizione/il punto centrale del comando AROUND rispetto alla posizione xyz dell'origine.{limit}: il numero di bersagli che possono essere influenzati{sort}: utile per l'opzione limit.- NEAREST : seleziona le entità più vicine all'origine.
- RANDOM : seleziona casualmente una qualsiasi entità nel raggio del comando.
{regionCheck}: true/false. Se true, il comando AROUND controllerà se il bersaglio si trova nella wilderness o nel claim di chi lancia il comando (nel contesto del plugin GriefPrevention) (verrà aggiornato presto per essere controllato anche con altri plugin di claim){nonliving}: true/false. Se true, prenderà di mira anche altre entità come Arrows e Armor Stands. Gli eventuali bug che si verificano eseguendo comandi delle entità con questo argomento attivato verranno molto probabilmente ignorati a causa dell'espansione dello scopo.- Puoi mettere in BLACKLIST o WHITELIST delle entità aggiungendo una di queste in un punto qualsiasi del comando:
- BLACKLIST(ZOMBIE,ARMOR_STAND)
- WHITELIST(CHICKEN)
Puoi aggiungere più comandi! Usa il separatore <+>
Esempio: minecraft:effect give .. <+> DELAY 5 <+> DAMAGE 5
Placeholder: i placeholder sono gli stessi dei Placeholder delle entità ma devi sostituire "player" con "around_target"
Esempio: %around_target%, %around_target_uuid%
Numero di bersagli: %around_target_count% restituisce il numero di entità selezionate dal comando. È lo stesso per ogni bersaglio e conta i bersagli rimasti dopo distance, safeDistance, throughBlocks, regionCheck e dopo WHITELIST(...) / BLACKLIST(...) e limit. Le CONDITIONS(...) controllate su ciascun bersaglio non vengono prese in considerazione. Accetta la scorciatoia +N / -N: %around_target_count%-1.
Esempio: MOB_AROUND distance:8 WHITELIST(ZOMBIE) DAMAGE %around_target_count%
- Esempi:
activators:
  activator0: # Activator ID, you can create as many activator on the activators list
    option: # Here goes an activator that is at least instance of player
    playerCommands:
    - MOB_AROUND distance:3 displayMsgIfNoEntity:true throughBlocks:true safeDistance:0 [conditions] COMMAND1 <+> COMMAND2 <+> ...
    - MOB_AROUND distance:3 displayMsgIfNoEntity:false BURN 10
    - MOB_AROUND distance:5 execute at %around_target_uuid% run summon lightning_bolt
    - MOB_AROUND distance:5 BLACKLIST(ZOMBIE,ARMOR_STAND) DAMAGE 20
    - MOB_AROUND distance:5 displayMsgIfNoEntity:false effect give %around_target_uuid% poison 10 10
    - MOB_AROUND distance:10 WHITELIST(ZOMBIE`{CustomName:"*"}`) say HELLO
Per usare gli NBT delle entità nel campo WHITELIST/BLACKLIST, devi installare il plugin NBT API
Supporta gli NBT Tags, quindi puoi aggiungere per esempio qualcosa come: ZOMBIE{IsBaby:1}
Esempi:
activators:
  activator0: # Activator ID, you can create as many activator on the activators list
    option: # Here goes an activator that is at least instance of player
    playerCommands:
    - MOB_AROUND distance:7 BLACKLIST(ZOMBIE`{CustomName:"Test Test"}`,ZOMBIE`{CustomName:"Miyamoto"}`) false BURN 3
    - MOB_AROUND distance:5 WHITELIST(ZOMBIE`{IsBaby:1}`) DAMAGE 20
    - MOB_AROUND distance:9 WHITELIST(WOLF`{Owner:"%player%"}`) HEAL 5
    - MOB_AROUND distance:9 WHITELIST(WOLF`{Owner:%player_uuid%}`) HEAL 5
Puoi annidare MOB_AROUND con i comandi: MOB_AROUND, IF, MOB_NEAREST, ALL_MOBS
In tal caso il separatore e i placeholder cambiano in base al livello di annidamento.\
separatore del comando base : <+>
primo comando annidato : <+::step1>
... : <+::step2> , <+::step3>, ...
placeholder base : %around_target%
primo comando annidato : %around_target::step1%
... : %around_target::step2%, %around_target::step3%, ...
MOB_NEAREST
- Info: prende di mira il mob più vicino al giocatore/bersaglio.
- Impostazioni del comando:
{max accepted distance}: distanza massima accettata a cui può trovarsi l'"entità".{command(s)}: i comandi che verranno eseguiti
Puoi aggiungere più comandi! Usa il separatore <+>
Esempio: minecraft:effect give .. <+> DELAY 5 <+> DAMAGE 5
Placeholder: i placeholder sono gli stessi dei Placeholder delle entità ma devi sostituire "player" con "around_target"
Esempio: %around_target%, %around_target_uuid%
- Esempio:
Danneggia il giocatore più vicino
- MOB_NEAREST 10 DAMAGE 5
Puoi annidare MOB_NEAREST con i comandi: MOB_AROUND, IF, MOB_NEAREST, ALL_MOBS
In tal caso il separatore e i placeholder cambiano in base al livello di annidamento.\
separatore del comando base : <+>
primo comando annidato : <+::step1>
... : <+::step2> , <+::step3>, ...
placeholder base : %around_target%
primo comando annidato : %around_target::step1%
... : %around_target::step2%, %around_target::step3%, ...
NEAREST
- Info: prende di mira il giocatore più vicino al giocatore/bersaglio.
- Impostazioni del comando:
{max accepted distance}: distanza massima accettata a cui può trovarsi il "bersaglio".{command}: il comando che verrà eseguito
Puoi aggiungere più comandi! Usa il separatore <+>
Esempio: SEND_MESSAGE &cYou will be damaged in 5 seconds <+> DELAY 5 <+> DAMAGE 5
Placeholder: i placeholder sono gli stessi dei Placeholder del giocatore ma devi sostituire "player" con "around_target"
Esempio: %around_target%, %around_target_uuid%
- Esempio:
Danneggia il giocatore più vicino
- NEAREST 8 DAMAGE 5
Puoi annidare NEAREST con i comandi: AROUND, IF, NEAREST, ALL_PLAYERS
In tal caso il separatore e i placeholder cambiano in base al livello di annidamento.\
separatore del comando base : <+>
primo comando annidato : <+::step1>
... : <+::step2> , <+::step3>, ...
placeholder base : %around_target%
primo comando annidato : %around_target::step1%
... : %around_target::step2%, %around_target::step3%, ...
OPMESSAGE
- Info: invia un messaggio ai giocatori OP online e alla console
- Impostazione del comando:
{text}: testo da inviare
- Esempio:
- OPMESSAGE This is my debug message
PARTICLE
-
Info: genera particelle nella posizione del giocatore/bersaglio. Elenco delle particelle
-
Impostazioni del comando:
{type}: il tipo di particella (TUTTO MAIUSCOLO){quantity}: la quantità di particelle che verranno generate{offset}: il raggio dell'area in cui le particelle possono apparire attorno alla posizione del giocatore/bersaglio{speed}: quanto saranno veloci o grandi le particelle
-
Esempio:
- PARTICLE FIREWORKS_SPARK 10 0.1 0.5
REGAIN_HEALTH
- Info: ti dà una quantità specifica di HP
- Impostazione del comando:
{amount}: la quantità di HP che vuoi ottenere- Supporta valori negativi nel caso tu voglia infliggere "danno reale".
- Esempio:
- REGAIN_HEALTH 10
- REGAIN_HEALTH -5
REMOVE_BURN
- Info: ti spegne se stai bruciando
- Nessuna impostazione del comando
- Esempio:
- REMOVE_BURN
REMOVE_GLOW
- Info: rimuove l'effetto di bagliore di un colore specifico dal giocatore | bersaglio.
- Impostazione del comando:
[color]: (opzionale) (predefinito = WHITE) il colore da rimuovere. Riferimento dei colori- Esempio:
- REMOVE_GLOW BLACK
SET_GLOW
- Info: aggiunge l'effetto di bagliore con un colore specifico al giocatore | bersaglio.
- Impostazione del comando:
[color]: (opzionale) (predefinito = WHITE) il colore da rimuovere. Riferimento dei colori- Esempio:
- SET_GLOW BLACK
Compatibile con il plugin TAB usando -> %score_cmd-glow%
SET_HEALTH
- Info: imposta la tua salute a una quantità specifica
- Impostazione del comando:
{amount}: la quantità di salute a cui vuoi impostarla
- Esempio:
SET_HEALTH 10
SET_PITCH
- Info: costringe il giocatore a guardare in una certa posizione di pitch (-90/90 gradi, direzione alto basso)
- Impostazioni del comando:
{pitch_number}: il numero che vuoi inserire. Funzionano anche i placeholder{keepVelocity}: permette di mantenere la velocità del giocatore
- Esempio:
- SET_PITCH 0 false
- SET_PITCH %target_pitch% false
SET_YAW
- Info: costringe il giocatore a guardare in una certa posizione di yaw (360 gradi, direzione sinistra destra)
- Impostazioni del comando:
{yaw_number}: il numero che vuoi inserire. Funzionano anche i placeholder{keepVelocity}: permette di mantenere la velocità del giocatore
- Esempio:
- SET_YAW 10 false
SPIN
- Info: fa ruotare il bersaglio
- Impostazioni del comando:
{duration ticks}: la durata della rotazione{velocity}: la velocità della rotazione
- Esempio:
- SPIN 20 1
D: come si congelano bersagli/giocatori/mob?
R: esegui SPIN {duration} 0 per esempio
STEAL
- Info: ruba un item dall'inventario del bersaglio
- Impostazioni del comando:
{slot}: -1 per la mano principale. Controlla il riferimento degli slot qui sotto.[remove item]: (opzionale) (predefinito = true)
- Esempio:
- STEAL 10
STRIKELIGHTNING
- Info: fa cadere un fulmine senza danni su chi esegue il comando
- Nessuna impostazione del comando
- Esempio:
- STRIKELIGHTNING
Non è la stessa cosa del comando smite di Essentials. Se vuoi colpire con un fulmine i tuoi bersagli, mettilo nei comandi del bersaglio o nei comandi delle entità insieme agli attivatori appropriati, come PLAYER_CLICK_ON_PLAYER per esempio.
STUN ENABLE/DISABLE
- Info: attiva o disattiva lo stordimento per il giocatore (lo fa stendere a terra e gli impedisce di muovere la visuale)
- Comandi:
- STUN_ENABLE
- STUN_DISABLE
- Esempio:
- STUN_ENABLE
- DELAY 5
- STUN_DISABLE
TELEPORT
- Info: teletrasporta il giocatore/l'entità nella posizione indicata
- Impostazioni del comando:
{world}: il mondo della posizione in cui teletrasportare{x}: la coordinata x della posizione in cui teletrasportare.{y}: la coordinata y della posizione in cui teletrasportare.{z}: la coordinata z della posizione in cui teletrasportare.[pitch]: (opzionale) (predefinito = mantiene il pitch del giocatore) pitch della posizione di teletrasporto[yaw]: (opzionale) (predefinito = mantiene lo yaw del giocatore) yaw della posizione di teletrasporto[keepVelocity]: (opzionale) (predefinito = true) permette di non fermare la velocità del giocatore.
- Esempio:
- TELEPORT ApocalypseWorld 70 70 70
TELEPORT_ON_CURSOR
- Info: ti teletrasporta sul cursore
- Impostazioni del comando:
{range}: fino a che distanza vuoi teletrasportarti{acceptAir}: per poterti teletrasportare anche in aria, devi impostarlo su true
- Esempio:
- TELEPORT_ON_CURSOR 8 true
TRANSFER_ITEM
- Info: trasferisce un item nell'inventario
- Impostazioni del comando:
{slot of launcher}: slot dell'item che verrà spostato{slot of receiver}: slot in cui l'item verrà collocato
- Esempio:
- TRANSFER_ITEM 38 40
UNSAFE_TELEPORT_ON_CURSOR
- Info: ti teletrasporta sul cursore senza considerare che potresti finire in posti impossibili
- Impostazione del comando:
[maxRange]: (opzionale) (predefinito = 200) fino a che distanza vuoi teletrasportarti
- Esempio:
UNSAFE_TELEPORT_ON_CURSOR 20
WORLD_TELEPORT
- Info: teletrasporta in un mondo nella stessa posizione
- Impostazione del comando:
{world}: il nome del mondo in cui vuoi teletrasportare il giocatore/bersaglio.- Esempio:
- WORLD_TELEPORT spawn_end
Comandi di animazione
- BREAK_BOOTS_ANIMATION
- BREAK_CHESTPLATE_ANIMATION
- BREAK_HELMET_ANIMATION
- BREAK_LEGGINGS_ANIMATION
- BREAK_MAIN_HAND_ANIMATION
- BREAK_OFF_HAND_ANIMATION
- HURT_ANIMATION
- SWING_MAIN_HAND
- SWING_OFF_HAND
- TELEPORT_ENDER_ANIMATION
- TOTEM_ANIMATION
Provalo ora
Copia questo in ExecutableItems e ricarica
Preso da questa pagina. Incollalo in una config, esegui il comando di reload del plugin e avrai una base funzionante da modificare.
activators:
  activator0: # Activator ID, you can create as many activators on the activators list
    option: # Here goes an activator that is at least instance of player
    playerCommands:
    - ALL_PLAYERS SEND_MESSAGE Hello %parseother_`{%around_target%}`_`{player_name}`%
  activator1: # Activator ID, you can create as many activators on the activators list
    option: # Here goes an activator that is at least instance of target
    targetCommands:
    - ALL_PLAYERS SEND_MESSAGE %target% has been hit by %player%
  activator2: # Activator ID, you can create as many activators on the activators list
    option: # Here goes an activator that is at least instance of entity
    entityCommands:
- ALL_PLAYERS SEND_MESSAGE %entity% has been hit by %player%Plugin usato in questa pagina
ExecutableItemsItem personalizzati con abilità, attivatori e comandi, senza codice.
- 5.0/5 da 10 recensioni
- 3.1K server lo usano in questo momento (bStats)
- 103 download su SPlugins
€19.99
pagamento unico, aggiornamenti a vita