
Diese Seite wurde mithilfe von KI aus dem Englischen übersetzt. Übersetzung verbessern oder Original lesen.
Player & Target Commands
Du musst wissen, dass standardmäßig alle Befehle von der Konsole ausgeführt werden. Wenn der Spieler den Befehl ausführen soll, füge davor SUDO oder SUDO_OP hinzu.
(Klicke auf SUDO oder SUDO_OP für mehr Infos)
Verwende diese Option nicht für Vanilla-Befehle und CUSTOM COMMANDS. Um Vanilla-Befehle richtig zu verwenden, gehe zur FAQ und zu "How to use vanilla commands",
„Multi-world“-Kompatibilität für die Vanilla-Befehle.
execute in <<NAMEOFYOUR_WORLD>> run ...
Beispiel: Du möchtest einen Zombie in der Welt SsomarWorld beschwören:
execute in <<SsomarWorld>> run summon zombie 100 50 100
Beispiel mit einem Platzhalter:
execute in <<%player_world%>> run summon zombie 100 50 100
Möchtest du die rohe HEX-Form in deinem Befehl beibehalten? Füge den Tag BRUT_HEX zu deinem Befehl hinzu. Er funktioniert an beliebiger Stelle der Befehlszeile, es wird aber empfohlen, ihn in den ersten Teil des Befehls zu setzen, um Verwirrung zu vermeiden.
Standardmäßig werden Befehle nicht ausgeführt, wenn der Spieler offline ist. (Die Befehle werden ausgeführt, sobald sich der Spieler verbindet.)
Du kannst aber den Tag [<OFFLINE>] zu deinen Befehlen hinzufügen, um diese Einschränkung aufzuheben.
(Sehr nützlich für Broadcast-, Boost- und giveall-Befehle usw.)
Beispiel:
- [<OFFLINE>] broadcast hello !
- [<OFFLINE>] execute at %player% run setblock %block_x_int%+3 %block_y_int%-1 %block_z_int%-14 minecraft:air
Du kannst [<CLEAR_IF_DISCONNECT>] verwenden, wenn du Befehle löschen möchtest, sobald sich der Spieler trennt.
Beispiel:
- [<CLEAR_IF_DISCONNECT>] say meow
Gemischte Befehle
Zusätzlich zur folgenden Befehlsliste kannst du auch Folgendes verwenden:
docs/tools-for-all-plugins-score/custom-commands/mixed-commands-player-and-entity
Diese Befehle können in den Player-bezogenen Befehlen ODER in den Entity-bezogenen Befehlen verwendet werden.
Benutzerdefinierte Befehle
Alphabetisch sortiert
ABSORPTION
- Info: Gibt dem Spieler den Absorptionseffekt
- Befehlseinstellungen:
{amount}: Anzahl der Absorptions-Halbherzen. Unterstützt negative Werte zum Entfernen.{time}: Dauer des Effekts in Ticks. Lass das Feld leer oder setze "0", wenn der Effekt unendlich sein soll.
- Beispiel:
activators:
  activator0: # Activator ID, you can create as many activator on the activators list
    option: # Here goes an activator that is at least instance of player
    playerCommands:
    - ABSORPTION amount:5 time:200 # Gives the player absorption
  activator1: # Activator ID, you can create as many activator on the activators list
    option: # Here goes an activator that is at least instance of target
    targetCommands:
    - ABSORPTION amount:5 time:200 # Gives the target absorption
Der Wert deines MAX_ABSORPTION-Attributs muss größer als 0 sein!
Prüfe den Wert mit: /attribute PLAYER_NAME minecraft
_absorption base getDu kannst ihn erhöhen mit: /attribute PLAYER_NAME minecraft
_absorption base set 20activators:
activator0: # Activator ID, you can create as many activator on the activators list
option: # Here goes an activator that is at least instance of player
playerCommands:
# You can do that to temporary up the max_absorption value of the player
- minecraft:attribute %player% minecraft:max_absorption base set 5**
- ABSORPTION amount:5 time:200
- DELAY_TICK 200
- minecraft:attribute PLAYER_NAME minecraft:max_absorption base set 0
activator1: # Activator ID, you can create as many activator on the activators list
option: # Here goes an activator that is at least instance of target
targetCommands:
# You can do that to temporary up the max_absorption value of the target
- minecraft:attribute %player% minecraft:max_absorption base set 5
- ABSORPTION amount:5 time:200
- DELAY_TICK 200
- minecraft:attribute PLAYER_NAME minecraft:max_absorption base set 0
ACTIONBAR
- Info: Zeigt die Actionbar mit deinem Text + der verbleibenden Zeit an (59, 58, 57...).
- Befehlseinstellungen:
{text}: Dein anzuzeigender Text{delay}: Dauer in Sekunden
- Beispiel:
activators:
  activator0: # Activator ID, you can create as many activator on the activators list
    option: # Here goes an activator that is at least instance of player
    playerCommands:
    - `ACTIONBAR &6Hey &e%player% ! 10` # Sends an ACTIONBAR to the player
  activator1: # Activator ID, you can create as many activator on the activators list
    option: # Here goes an activator that is at least instance of target
    targetCommands:
    - `ACTIONBAR &6Hey &e%player% ! 10`# Sends an ACTIONBAR to the target
ADD_ITEM_ATTRIBUTE
- Info: Fügt einem Item ein Attribut als Additions- oder Subtraktionsoperation hinzu.
- Befehlseinstellungen:
{slot}: Der Slot, auf den der Befehl angewendet wird. -1 für die Haupthand{attribute}: Das Attribut, das du hinzufügen möchtest. Attributliste{value}: Der Wert für die Operation{equipmentSlot}: Der Slot, in dem das Attribut aktiv ist. EquipmentSlot-Liste{mode}: Wähle den Hinzufügungsmodusmode:ADD: Fügt das Attribut zum Item hinzumode:OVERRIDE: Entfernt die aktuellen Attribute desselben Typs vom Item + fügt das Attribut zum Item hinzumode:STACK: Addiert sich zum auf dem Item vorhandenen Attribut, falls keines existiert, wird es hinzugefügt
- affectDefaultAttributes: true or false # Bei true überschreibt der Modus OVERRIDE auch die Standardattribute, und beim Modus STACK kann sich der Wert mit den Standardattributen (grün) addieren
- Beispiel:
activators:
  activator0: # Activator ID, you can create as many activator on the activators list
    option: # Here goes an activator that is at least instance of player
    playerCommands:
    - ADD_ITEM_ATTRIBUTE slot:%slot% attribute:GENERIC_ATTACK_DAMAGE value:1.0 equipmentSlot:HAND mode:ADD # Add this attribute to the player
  activator1: # Activator ID, you can create as many activator on the activators list
    option: # Here goes an activator that is at least instance of target
    targetCommands:
    - ADD_ITEM_ATTRIBUTE slot:%slot% attribute:GENERIC_ATTACK_DAMAGE value:1.0 equipmentSlot:HAND mode:STACK affectDefaultAttributes: true # Add this attribute to the target
ADD_ITEM_ENCHANTMENT
- Info: Fügt einem Item in einem bestimmten Slot eine Verzauberung mit einem bestimmten Level hinzu
- Befehlseinstellungen:
{slot}: Der Slot, auf den der Befehl angewendet wird. -1 für die Haupthand{enchantment}: Die Verzauberung, die angewendet werden soll. Verwende keine Leerzeichen und nutze die Minecraft-Verzauberungen, nicht die angezeigten Namen. Verzauberungen{level}: Das Level der Verzauberung
- Beispiel:
activators:
  activator0: # Activator ID, you can create as many activator on the activators list
    option: # Here goes an activator that is at least instance of player
    playerCommands:
    - ADD_ITEM_ENCHANTMENT slot:-1 enchantment:unbreaking level:1
  activator1: # Activator ID, you can create as many activator on the activators list
    option: # Here goes an activator that is at least instance of target
    targetCommands:
    - ADD_ITEM_ENCHANTMENT slot:-1 enchantment:unbreaking level:1
ADD_ITEM_LORE
- Info: Fügt eine Lore-Zeile hinzu
- Befehlseinstellungen:
{slot}: Der Slot, auf den der Befehl angewendet wird. -1 für die Haupthand{text}: Der Text der neuen Lore-Zeile
- Beispiel:
activators:
  activator0: # Activator ID, you can create as many activator on the activators list
    option: # Here goes an activator that is at least instance of player
    playerCommands:
    - ADD_ITEM_LORE slot:%slot% text:&7Item of %player%
  activator1: # Activator ID, you can create as many activator on the activators list
    option: # Here goes an activator that is at least instance of target
    playerCommands:
    - ADD_ITEM_LORE slot:%slot% text:&7Item of %target% added by %player%
BOOTS
- Info: Legt das Item in deiner Haupthand in deinen Stiefel-Slot. (Funktioniert nicht, wenn das Item "Curse of Binding" hat)
- Keine Befehlseinstellung
- Beispiel:
activators:
  activator0: # Activator ID, you can create as many activator on the activators list
    option: # Here goes an activator that is at least instance of player
    playerCommands:
    - BOOTS
BOSSBAR
- Info: Erstellt für eine bestimmte Dauer einen Bossbar-Text.
- Befehlseinstellungen:
{time}: Die Dauer der Bossbar in Ticks{color}: Farbe des Bossbar-Textes{text}: Text auf der Bossbar (Verwende Unterstriche "_", um Leerzeichen in deinem Argument einzufügen.){count}: Wie oft der Zähler zählen soll- Wenn diese Option vorhanden ist, spielt das Zeit-Argument keine Rolle mehr
{countTicks}: true/false, ob stattdessen in Ticks oder in Sekunden gezählt werden soll{countOrder}:- ascending: Der Timer zählt von 0 aufwärts
- descending: Der Timer zählt vom angegebenen Wert abwärts
{overrideMode}:- NO_OVERRIDE: Überschreibt die anderen Bossbars nicht
- OVERRIDE_ALL: Überschreibt alle anderen von SCore gesendeten Bossbars
- OVERRIDE_SAME_TEXT: Überschreibt die anderen von SCore gesendeten Bossbars, die denselben Text enthalten
{barProgress}: (Standard = 1.0) Der anfängliche Fortschritt der Leiste (0.0 bis 1.0). Funktioniert sowohl mit statischen Leisten als auch mit Countdown-Leisten (nur absteigender Countdown)
- Beispiel:
activators:
  activator0: # Activator ID, you can create as many activator on the activators list
    option: # Here goes an activator that is at least instance of player
    playerCommands:
    - BOSSBAR time:200 color:RED text:This_is_a_bossbar text
    - BOSSBAR time:20 color:BLUE text:Hello_world count:50 countTicks:true countOrder:ascending
    - BOSSBAR time:200 color:RED text:This is a bossbar text overrideMode:OVERRIDE_SAME_TEXT
    - BOSSBAR time:200 color:GREEN text:Half filled bar barProgress:0.5
CANCEL_PICKUP
- Info: Deaktiviert das Aufheben von Items für einen Spieler für eine festgelegte Zeit
- Befehlseinstellungen:
{time}: Die Dauer in Ticks, bis der Spieler wieder Items aufheben kann{material}: Wenn gesetzt, kann der Spieler nur das angegebene Material nicht aufheben, bei null kann er gar nichts aufheben
- Beispiel:
activators:
  activator0: # Activator ID, you can create as many activator on the activators list
    option: # Here goes an activator that is at least instance of player
    playerCommands:
    - CANCEL_PICKUP time:600
    - CANCEL_PICKUP time:600 material:stone
Der einzige Weg, diesen Befehl nach dem Setzen einer Zeit in Ticks zurückzusetzen, ist ein Reload oder ein Neustart des Servers. Wenn du dir eine Möglichkeit zum Zurücksetzen wünschst, schlage sie im Kanal #suggestions auf Discord vor.
CHAT
- Info: Sendet eine Nachricht des Spielers in den Chat
- Befehlseinstellungen:
{text}: Der zu sendende Text
- Beispiel:
activators:
  activator0: # Activator ID, you can create as many activator on the activators list
    option: # Here goes an activator that is at least instance of player
    playerCommands:
    - CHAT &6Hello !!
CHESTPLATE
- Info: Legt das Item in deiner Haupthand in deinen Brustplatten-Slot. (Funktioniert nicht, wenn das Item "Curse of Binding" hat)
- Keine Befehlseinstellung
- Beispiel:
activators:
  activator0: # Activator ID, you can create as many activator on the activators list
    option: # Here goes an activator that is at least instance of player
    playerCommands:
    - CHESTPLATE
CLOSE_INVENTORY
- Info: Schließt das Inventar des Spielers
- Keine Befehlseinstellung
- Beispiel:
activators:
  activator0: # Activator ID, you can create as many activator on the activators list
    option: # Here goes an activator that is at least instance of player
    playerCommands:
    - CLOSE_INVENTORY
CROPS_GROWTH_BOOST
- Info: Beschleunigt das Wachstum der Pflanzen um dich herum
- Befehlseinstellungen:
{radius}: Der Radius des Boosts (Standard 5){delay}: Die Verzögerung in Ticks zwischen den einzelnen Wachstums-Boosts{duration}: Die Gesamtdauer des Boosts in Ticks{chance}: Die Wachstumschance der Blöcke, wenn der Boost angewendet wird
- Beispiel:
Der folgende Befehl erzeugt alle 10 Ticks einen Wachstums-Boost, insgesamt 20 Mal.
Alle Blöcke innerhalb des Radius haben bei jedem Boost eine Chance von 50 %, zu wachsen.
activators:
  activator0: # Activator ID, you can create as many activator on the activators list
    option: # Here goes an activator that is at least instance of player
    playerCommands:
    - CROPS_GROWTH_BOOST radius:5 delay:10 durations:200 chance:50
DISABLE_FLY_ACTIVATION
- Info: Verbietet einem Spieler die Nutzung des Flugs (Gleiten mit der Elytra gilt nicht als Fliegen)
- Befehlseinstellung:
{time}: Die Dauer des Effekts in Sekunden
- Beispiel: (Der folgende Befehl deaktiviert die Aktivierung des Flugs für 1 Minute)
activators:
  activator0: # Activator ID, you can create as many activator on the activators list
    option: # Here goes an activator that is at least instance of player
    playerCommands:
    - DISABLE_FLY_ACTIVATION time:60
DISABLE_GLIDE_ACTIVATION
- Info: Verbietet die Nutzung der Elytra für einen bestimmten Zeitraum
- Befehlseinstellungen:
{time}: Die Dauer des Effekts in Sekunden
- Beispiel: (Der folgende Befehl deaktiviert die Nutzung der Elytra für 20 Sekunden)
activators:
  activator0: # Activator ID, you can create as many activator on the activators list
    option: # Here goes an activator that is at least instance of player
    playerCommands:
    - DISABLE_GLIDE_ACTIVATION time:20
EICOOLDOWN
- Info: Wendet einen Cooldown auf ein bestimmtes ExecutableItems an
- Befehlseinstellungen:
{PLAYER}: Der Spieler, auf den der Befehl abzielt{ID}: Die ID des ExecutableItem oder "all" für alle ExecutableItems{DURATION}: Die Zeitspanne{boolean TICKS}: (Standard: false) Bei false wird der Wert des Dauer-Arguments als Sekunden interpretiert. Bei true wird er als Ticks interpretiert.[optional activator id]: (Optional) Du kannst ihn auf eine bestimmte Aktivator-ID anwenden
- Beispiel:
activators:
  activator0: # Activator ID, you can create as many activator on the activators list
    option: # Here goes an activator that is at least instance of player
    playerCommands:
    - EICOOLDOWN %player% thisismyid 10 true # For the ExecutableItem thisismyid
    - EICOOLDOWN %player% all 10 true # For all ExecutableItems
EICOOLDOWN kann einen Cooldown nur hinzufügen: Wenn mehrere Cooldowns auf demselben Aktivator laufen, gilt der längste. Um einen Cooldown zu verkürzen oder zu entfernen, verwende EICOOLDOWN_RESET.
EICOOLDOWN_RESET
- Info: Entfernt den Cooldown eines ExecutableItem für einen Spieler (alle seine Aktivatoren oder nur einen Aktivator). Der visuelle Vanilla-Cooldown (
enableVisualCooldown) wird ebenfalls zurückgesetzt. - Befehlseinstellungen:
{PLAYER}: Der Spieler, auf den der Befehl abzielt{ID}: Die ID des ExecutableItem oder "all" für alle ExecutableItems[optional activator id]: (Optional) Entfernt nur den Cooldown dieses Aktivators, die anderen Aktivatoren behalten ihren
- Beispiel:
activators:
  activator0: # Activator ID, you can create as many activator on the activators list
    option: # Here goes an activator that is at least instance of player
    playerCommands:
    - EICOOLDOWN_RESET %player% thisismyid activator1 # Only activator1 of the ExecutableItem thisismyid
    - EICOOLDOWN_RESET %player% thisismyid # All the activators of thisismyid
    - EICOOLDOWN_RESET %player% all # All ExecutableItems
Über die Konsole bewirkt /score cooldowns clear EI:{ID}:{activator id} {player} dasselbe für einen Aktivator.
EBCOOLDOWN
- Info: Wendet einen Cooldown auf ein bestimmtes ExecutableBlocks an
- Befehlseinstellungen:
{PLAYER}: Der Spieler, auf den der Befehl abzielt{ID}: Die ID des ExecutableBlocks oder "all" für alle ExecutableBlocks{DURATION}: Die Zeitspanne{boolean TICKS}: (Standard: false) Bei false wird der Wert des Dauer-Arguments als Sekunden interpretiert. Bei true wird er als Ticks interpretiert.[optional activator id]: (Optional) Du kannst ihn auf eine bestimmte Aktivator-ID anwenden
- Beispiel:
activators:**
  activator0: # Activator ID, you can create as many activator on the activators list
    option: # Here goes an activator that is at least instance of player
    playerCommands:
    - EBCOOLDOWN %player% thisismyid 10 true # For the ExecutableBlock thisismyid
    - EBCOOLDOWN %player% all 10 true # For all ExecutableBlocks
EECOOLDOWN
- Info: Wendet einen Cooldown auf ein bestimmtes ExecutableItems an
- Befehlseinstellungen:
{PLAYER}: Der Spieler, auf den der Befehl abzielt{ID}: Die ID des ExecutableEvent oder "all" für alle ExecutableEvents{DURATION}: Die Zeitspanne{boolean TICKS}: (Standard: false) Bei false wird der Wert des Dauer-Arguments als Sekunden interpretiert. Bei true wird er als Ticks interpretiert.[optional activator id]: (Optional) Du kannst ihn auf eine bestimmte Aktivator-ID anwenden
- Beispiel:
activators:
  activator0: # Activator ID, you can create as many activator on the activators list
    option: # Here goes an activator that is at least instance of player
    playerCommands:
    - EECOOLDOWN %player% thisismyid 10 true # For the ExecutableEvent thisismyid
    - EECOOLDOWN %player% all 10 true # For all ExecutableEvents
FIREWORK_BOOST
- Info: Wenn dieser Befehl ausgeführt wird, während der Ausführende mit der Elytra gleitet, wird eine Feuerwerksrakete erzeugt, ähnlich wie wenn Spieler beim Gleiten ein Feuerwerk in ihrer Hand per Rechtsklick benutzen, um Strecke zu gewinnen.
- Befehlseinstellungen:
{duration}: Die Lebensdauer des Feuerwerks in Sekunden
- Beispiel:
activators:
  activator0: # Activator ID, you can create as many activator on the activators list
    option: # Here goes an activator that is at least instance of player
    playerCommands:
    - FIREWORK_BOOST 20
FLY OFF
- Info: Deaktiviert den Kreativflug des Spielers. Wenn der Flug mitten in der Luft deaktiviert wird, wird der Spieler auf den nächsten möglichen Block unter ihm teleportiert.
- Befehlseinstellung:
[teleportOnTheGround]: (Optional) (Standard = true) Ob der Spieler auf den Boden teleportiert wird oder nicht
- Beispiel:
activators:
  activator0: # Activator ID, you can create as many activator on the activators list
    option: # Here goes an activator that is at least instance of player
    playerCommands:
    - FLY_OFF teleportOnTheGround:true
FLY_ON
- Info: Gibt dem Spieler den Kreativflug
- Keine Befehlseinstellung
- Beispiel:
activators:
  activator0: # Activator ID, you can create as many activator on the activators list
    option: # Here goes an activator that is at least instance of player
    playerCommands:
    - FLY_ON
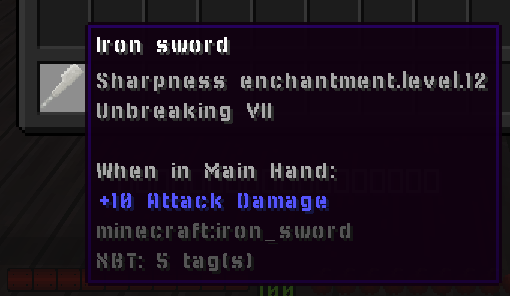
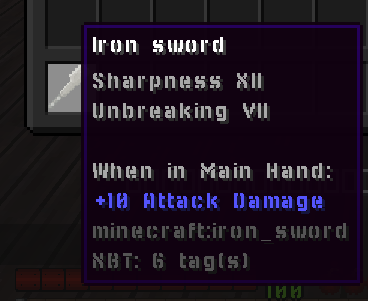
FORMAT_ENCHANTMENTS
- Info: Formatiert alle Verzauberungen in deiner Lore
- Befehlseinstellungen:
{slot}: Der Ziel-Slot (-1 für die Haupthand)
- Beispiel:
activators:
  activator0: # Activator ID, you can create as many activator on the activators list
    option: # Here goes an activator that is at least instance of player
    playerCommands:
    - FORMAT_ENCHANTMENTS %slot%
 ->
GIVE_MONEY
- Info: Gibt einem Spieler Geld
- Erfordert das Plugin Vault
- Befehlseinstellungen:
- amount: Der zu gebende Betrag
- Beispiel:
activators:
  activator0: # Activator ID, you can create as many activator on the activators list
    option: # Here goes an activator that is at least instance of player
    playerCommands:
    - GIVE_MONEY amount:50.0
GRAVITY_DISABLE
- Info: Deaktiviert die Schwerkraft für den Spieler, sodass er weder nach unten "fällt" noch nach oben steigt.
- Keine Befehlseinstellungen
- Beispiel:
activators:
  activator0: # Activator ID, you can create as many activator on the activators list
    option: # Here goes an activator that is at least instance of player
    playerCommands:
    - GRAVITY_DISABLE
    - DELAY 5
    - GRAVITY_ENABLE
GRAVITY_ENABLE
- Info: Aktiviert die Schwerkraft für den Spieler wieder, sodass er normal fällt.
- Keine Befehlseinstellung
- Beispiel:
activators:
  activator0: # Activator ID, you can create as many activator on the activators list
    option: # Here goes an activator that is at least instance of player
    playerCommands:
    - GRAVITY_DISABLE
    - DELAY 5
    - GRAVITY_ENABLE
HEAD
- Info: Legt das Item in deiner Haupthand in deinen Kopf-Slot. (Funktioniert nicht, wenn das Item "Curse of Binding" hat)
- Keine Befehlseinstellung
- Beispiel:
activators:
  activator0: # Activator ID, you can create as many activator on the activators list
    option: # Here goes an activator that is at least instance of player
    playerCommands:
    - HEAD
JOBS_MONEY_BOOST
- Info: Erhöht vorübergehend das verdiente Geld. Für Jobs reborn
- Befehlseinstellungen:
{multiplier}: Multiplikatorwert{time}: Dauer des Boosts in Sekunden
- Beispiel:
activators:
  activator0: # Activator ID, you can create as many activator on the activators list
    option: # Here goes an activator that is at least instance of player
    playerCommands:
    - JOBS_MONEY_BOOST multiplier:2.0 time:10
Der Multiplikator wirkt sich nicht auf die Actionbar-Werte von Jobs aus. Der Multiplikator dieses Befehls wird erst angewendet, sobald das Plugin Jobs beschließt, erhaltenes Geld, XP und Punkte zu erhöhen.
Wenn der Befehl mehrfach mit ausreichender Dauer pro Boost ausgeführt wird, können sich alle laufenden Boosts stapeln.
JOBS_XP_BOOST
- Info: Multipliziert vorübergehend die XP-Gewinne des Plugins Jobs. Für Jobs reborn
- Befehlseinstellungen:
{multiplier}: XP-Multiplikatorwert (z. B. 2.0 für doppelte XP){time}: Dauer in Sekunden, bis der Boost abläuft
- Beispiel:
activators:
  activator0: # Activator ID, you can create as many activator on the activators list
    option: # Here goes an activator that is at least instance of player
    playerCommands:
    - JOBS_XP_BOOST multiplier:2.0 time:10
Der Multiplikator wirkt sich nicht auf die Actionbar-Werte von Jobs aus. Der Multiplikator dieses Befehls wird erst angewendet, sobald das Plugin Jobs beschließt, erhaltenes Geld, XP und Punkte zu erhöhen.
Wenn der Befehl mehrfach mit ausreichender Dauer pro Boost ausgeführt wird, können sich alle laufenden Boosts stapeln.
Dieser Befehl unterstützt das multiplikative Stapeln mehrerer Boosts.
LAUNCH
- Info: Schießt ein benutzerdefiniertes Projektil ab. Referenz
- Liste:
Projektiltypen
* ARROW * DRAGONFIREBALL * EGG * ENDERPEARL * FIREBALL * LARGEFIREBALL * LINGENRINGPOTION * LLAMASPIT * SHULKERBULLET (Nur ab 1.12 verfügbar) * SIZEDFIREBALL * SNOWBALL * TRIDENT * WITHERSKULL- Befehlseinstellungen:
{projectile}: Der Typ des Projektils oder die ID des benutzerdefinierten Projektils aus SCore ( Referenz )[angleRotationVertical]: (Optional) (Standard = 0) (in Grad) Legt die Richtung fest, in die die Entity abgeschossen wird[angleRotationHorizontal]: (Optional) (Standard = 0) (in Grad) Legt die Richtung fest, in die die Entity abgeschossen wird[velocity]: (Optional) (Standard = 1) Zum Anpassen der Geschwindigkeit des Projektils (funktioniert auch von 1.8 bis 1.12)[name]: (Optional) Benutzerdefinierter Name für das abgeschossene Projektil, zum Beispiel um es später in einer Bedingung wiederzuerkennen (name:&cFire_ball).[strictYaw]: (Optional) (in Grad) Horizontale Abschussrichtung, die anstelle der Blickrichtung des Spielers verwendet wird (0= Süden,90= Westen,180= Norden,-90= Osten). Die EinstellungenangleRotation...werden dazu addiert.[strictPitch]: (Optional) (in Grad) Vertikale Abschussrichtung, die anstelle der Blickrichtung des Spielers verwendet wird (0= geradeaus,-90= nach oben,90= nach unten). Die EinstellungenangleRotation...werden dazu addiert.- VERSION Es ändert auch die Geschwindigkeit der Fireballs (FIREBALL, SIZEDFIREBALL, LARGEFIREBALL, DRAGONFIREBALL, WITHERSKULL):
velocity:2fliegt doppelt so schnell,velocity:1behält die Vanilla-Geschwindigkeit bei. Vor 1.20.5 behalten sie ihre Vanilla-Geschwindigkeit.
- VERSION Es ändert auch die Geschwindigkeit der Fireballs (FIREBALL, SIZEDFIREBALL, LARGEFIREBALL, DRAGONFIREBALL, WITHERSKULL):
- Beispiel:
activators:
  activator0: # Activator ID, you can create as many activator on the activators list
    option: # Here goes an activator that is at least instance of player
    playerCommands:
    - LAUNCH projectile:My_Custom_Proj velocity:5
- Beispiel für mehrere Schüsse:
activators:
  activator0: # Activator ID, you can create as many activator on the activators list
    option: # Here goes an activator that is at least instance of player
    playerCommands:
    - LAUNCH projectile:WITHERSKULL
    - LAUNCH projectile:WITHERSKULL angleRotationVertical:20
    - LAUNCH projectile:WITHERSKULL angleRotationVertical:-20
- Beispiel: Immer geradeaus (horizontal) werfen, egal ob der Spieler nach oben oder unten schaut, mit einem benannten Projektil:
activators:
  activator0:
    option: PLAYER_RIGHT_CLICK
    playerCommands:
    - LAUNCH projectile:SNOWBALL strictPitch:0 name:Frost_Ball
Wenn du den LAUNCH-Befehl im Aktivator PLAYER_LAUNCH_PROJECTILE verwendest und das Projektil von einem Bogen abgeschossen wurde, behält das mit dem benutzerdefinierten LAUNCH-Befehl abgeschossene Projektil dieselbe Geschwindigkeit.
Wenn du SHULKERBULLET als Projektiltyp verwendest, wählt es den Cursor des Ausführenden als Ziel. Andernfalls zielt es auf die dem Ausführenden nächste Entity.
Aktuelle Probleme:
- Shulker Bullets können in 1.9.4, 1.10.2 und 1.11.2 nicht verwendet werden. Ab 1.12 sollte es keine Komplikationen geben, außer dass du ein SCore-Projektil erstellen musst, damit eine Shulker Bullet die richtige Fluggeschwindigkeit erhält.
LEGGINGS
- Info: Legt das Item in deiner Haupthand in deinen Beinschutz-Slot. (Funktioniert nicht, wenn das Item "Curse of Binding" hat)
- Keine Befehlseinstellung
- Beispiel:
activators:
  activator0: # Activator ID, you can create as many activator on the activators list
    option: # Here goes an activator that is at least instance of player
    playerCommands:
    - LEGGINGS
LOCATED_LAUNCH
- Info: Schießt ein Projektil an einer bestimmten Position ab
- Befehlseinstellungen:
{projectileType}: Der Typ des Projektils oder die ID des benutzerdefinierten Projektils aus SCore ( Referenz )[frontValue]: (Optional) (Standard = 0) positiv = vorne, negativ = hinten - Position vorne/hinten. Wenn das Projektil zum Beispiel 5 Blöcke entfernt in deiner Blickrichtung erscheinen soll, verwende einen höheren positiven Wert[rightValue]: (Optional) (Standard = 0) rechts = positiv, negativ = links - Position rechts/links. Wenn das Projektil zum Beispiel links von dir erscheinen soll, verwende einen höheren negativen Wert[yValue]: (Optional) (Standard = 0) Wie weit über deiner Y-Position das Projektil erscheint.[velocity]: (Optional) (Standard = 1) Wie schnell das Projektil fliegt. Setze den Wert auf 0, damit das Projektil nach dem Erscheinen nach unten fällt.[angleRotationVertical]: (Optional) (Standard = 0) VERSION kannst du eine vertikale Rotation für dein Projektil hinzufügen (in Grad)[angleRotationHorizontal]: (Optional) (Standard = 0) VERSION kannst du eine horizontale Rotation für dein Projektil hinzufügen (in Grad)
- Beispiel:
activators:
  activator0: # Activator ID, you can create as many activator on the activators list
    option: # Here goes an activator that is at least instance of player
    playerCommands:
    - LOCATED_LAUNCH projectile:ARROW frontValue:0 rightValue:0 yValue:0 velocity:1 angleRotationVertical:0 angleRotationHorizontal:0
MINECART_BOOST
- Info: Gibt dir einen Boost, wenn du in einer Lore fährst (ähnlicher Effekt wie auf einer angetriebenen Schiene)
- Befehlseinstellung:
{boost}: Die Boost-Geschwindigkeit
- Beispiel:
activators:
  activator0: # Activator ID, you can create as many activator on the activators list
    option: # Here goes an activator that is at least instance of player
    playerCommands:
    - MINECART_BOOST boost:10
MIX_HOTBAR
- Info: Mischt die Hotbar des Spielers
- Keine Befehlseinstellung
- Beispiel:
activators:
  activator0: # Activator ID, you can create as many activator on the activators list
    option: # Here goes an activator that is at least instance of player
    playerCommands:
    - MIX_HOTBAR
MODIFY_DURABILITY
- Verändert die Haltbarkeit eines bestimmten Items in einem bestimmten Slot
- Befehlseinstellungen:
{modification}: Positiver Wert, um die Haltbarkeit zu erhöhen. Negativer Wert, um die Haltbarkeit zu verringern{slot}: Die Slot-Nummer des Items (-1 für den gehaltenen Slot)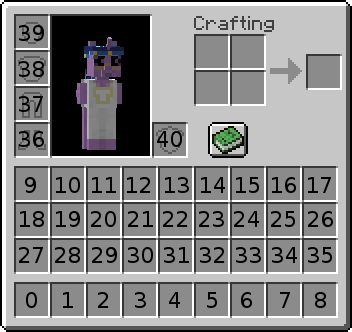
{supportUnbreaking}: (true oder false) Ob die Verzauberung Unbreaking berücksichtigt wird oder nicht
- Beispiel:
activators:
  activator0: # Activator ID, you can create as many activator on the activators list
    option: # Here goes an activator that is at least instance of player
    playerCommands:
    - MODIFY_DURABILITY modification:-1 slot:%slot% supportUnbreaking:true
OPEN_CHEST
- Info: Öffnet eine Truhe oder ein Fass an der ausgewählten Position
- Befehlseinstellungen:
{world}: Weltname{x}: X-Koordinate{y}: Y-Koordinate{z}: Z-Koordinate[bypassProtections]: (Optional) (Standard = false) Ob die Truhe auch dann geöffnet wird, wenn sie geschützt ist
- Beispiel:
activators:
  activator0: # Activator ID, you can create as many activator on the activators list
    option: # Here goes an activator that is at least instance of player
    playerCommands:
    - OPENCHEST VanillaWorld 100 100 100
OPEN_ENDERCHEST
- Info: Öffnet die Endertruhe für den Spieler, der den Aktivator ausführt
- Keine Befehlseinstellung
- Beispiel:
activators:
  activator0: # Activator ID, you can create as many activator on the activators list
    option: # Here goes an activator that is at least instance of player
    playerCommands:
    - OPEN_ENDERCHEST
OPEN_WORKBENCH
- Info: Öffnet eine Werkbank für den Spieler, der den Aktivator ausführt
- Keine Befehlseinstellung
- Beispiel:
activators:
  activator0: # Activator ID, you can create as many activator on the activators list
    option: # Here goes an activator that is at least instance of player
    playerCommands:
    - OPEN_WORKBENCH
OXYGEN
- Info: Gibt dem Ziel Sauerstoff
- Befehlseinstellung:
{time}: Die Dauer des Sauerstoffs in Ticks, den du geben möchtest
- Beispiel:
activators:
  activator0: # Activator ID, you can create as many activator on the activators list
    option: # Here goes an activator that is at least instance of player
    playerCommands:
    - OXYGEN time:200
PROJECTILE_CUSTOMDASH1
- Info: Ähnlich wie CUSTOMDASH1, aber xyz wird durch die xyz-Koordinaten des Projektils ersetzt, das dir am nächsten ist.
- Befehlseinstellungen:
{fallDamage}: Ob du Fallschaden erhältst oder nicht (Wenn du vergessen hast, true oder false zu setzen, ist der Standard false. Um Fallschaden zu erhalten, setze den Wert auf true)
- Beispiel:
activators:
  activator0: # Activator ID, you can create as many activator on the activators list
    option: # Here goes an activator that is at least instance of player
    playerCommands:
    - PROJECTILE_CUSTOMDASH1 fallDamage:false
REGAIN_FOOD
- Info: Gibt dir eine bestimmte Menge an Nahrung/Sättigung
- Befehlseinstellungen:
{amount}: Die Menge an Sättigungspunkten, die du erhalten möchtest. Verwende negative Werte, um Hungerpunkte zu verringern
- Beispiel:
activators:
  activator0: # Activator ID, you can create as many activator on the activators list
    option: # Here goes an activator that is at least instance of player
    playerCommands:
    - REGAIN_FOOD amount:5
REGAIN_MAGIC
- Info: Gibt dem Spieler bestimmte Werte der Magie eines bestimmten Ecoskills.
- Befehlseinstellungen:
{ecoSkillsMagicID}: Die ID der Magie von Ecoskills.{amount}: Die zu erhaltende Menge.
- Beispiel:
activators:
  activator0: # Activator ID, you can create as many activator on the activators list
    option: # Here goes an activator that is at least instance of player
    playerCommands:
    - REGAIN_MAGIC ecoSkillsMagicID:mana amount:15
Negative Werte werden unterstützt.
REGAIN_SATURATION
- Info: Gibt dir eine bestimmte Menge an Sättigung
- Befehlseinstellungen:
{amount}: Die Menge an Sättigung, die du geben möchtest
- Beispiel:
activators:
  activator0: # Activator ID, you can create as many activator on the activators list
    option: # Here goes an activator that is at least instance of player
    playerCommands:
    - REGAIN_SATURATION amount:10
REMOVE_ENCHANTMENT
- Info: Entfernt eine Verzauberung aus einem Slot
- Befehlseinstellungen:
{slot}: Slot, aus dem die Verzauberung entfernt wird (-1 für den gehaltenen Slot){enchantment}: Zu entfernende Verzauberung (ALL für jede Verzauberung)
- Beispiel:
activators:
  activator0: # Activator ID, you can create as many activator on the activators list
    option: # Here goes an activator that is at least instance of player
    playerCommands:
    - REMOVE_ENCHANTMENT slot:-1 enchantment:ALL
REMOVE_LORE
- Info: Entfernt eine Lore-Zeile
- Befehlseinstellungen:
{slot}: Slot, aus dem die Lore entfernt wird (-1 für den gehaltenen Slot){line}: Die Zeile, die du entfernen möchtest
- Beispiel:
activators:
  activator0: # Activator ID, you can create as many activator on the activators list
    option: # Here goes an activator that is at least instance of player
    playerCommands:
    - REMOVE_LORE slot:1 line:5
REPLACE_BLOCK
- Info: Ersetzt den Block, auf den der Spieler schaut, durch einen anderen
- Befehlseinstellungen:
{material}: Block-ID (Block States werden unterstützt)
- Beispiel:
activators:
  activator0: # Activator ID, you can create as many activator on the activators list
    option: # Here goes an activator that is at least instance of player
    playerCommands:
    - REPLACE_BLOCK STONE_BRICKS
    - REPLACE_BLOCK WATER[LEVEL=0]
SEND_BLANK_MESSAGE
- Info: Sendet dir eine leere Nachricht
- Keine Befehlseinstellung
- Beispiel:
activators:
  activator0: # Activator ID, you can create as many activator on the activators list
    option: # Here goes an activator that is at least instance of player
    playerCommands:
    - SEND_BLANK_MESSAGE
SEND_MESSAGE
- Info: Sendet dir eine Nachricht
- MiniMessage wird unterstützt
- Befehlseinstellungen:
{message}: Die Nachricht, die du senden möchtest
- Beispiel:
activators:
  activator0: # Activator ID, you can create as many activator on the activators list
    playerCommands:
    - SEND_MESSAGE text:&fThis is a somewhat random text.
    - SEND_MESSAGE text:<yellow>Hello </yellow><blue>World</blue><yellow>!</yellow> # MiniMessage Suported, but dont use MiniMessage + vanilla at the same time
SEND_CENTERED_MESSAGE
- Info: Sendet dir eine im Chat zentrierte Nachricht
- MiniMessage wird unterstützt
- Befehlseinstellungen:
{message}: Die Nachricht, die du senden möchtest
- Beispiel:
activators:
  activator0: # Activator ID, you can create as many activator on the activators list
    option: # Here goes an activator that is at least instance of player
    playerCommands:
    - SEND_CENTERED_MESSAGE text:&fThis is a somewhat random text.
    - SEND_CENTERED_MESSAGE text:<yellow>Hello </yellow><blue>World</blue><yellow>!</yellow> # MiniMessage Suported, but dont use MiniMessage + vanilla at the same time
SET_ARMOR_TRIM
- Info: Setzt den angegebenen Rüstungsschmuck mit dem angegebenen Muster für den angegebenen Slot
- Befehlseinstellungen:
{slot}: Der Slot, auf den der Befehl angewendet wird (Slot -1 für die Haupthand){pattern}: Das Muster des Schmucks (bei 'null' oder 'remove' wird das aktuelle Muster entfernt). TrimPattern-Liste{patternMaterial}: Das Material des Musters. TrimMaterial-Liste
- Beispiel:
activators:
  activator0: # Activator ID, you can create as many activator on the activators list
    option: # Here goes an activator that is at least instance of player
    playerCommands:
    - SET_ARMOR_TRIM slot:38 pattern:vex patternMaterial:netherite
    - SET_ARMOR_TRIM slot:38 pattern:null #to clear the armor trim
SET_BLOCK
- Info: Platziert einen Block auf dem Block, auf den der Spieler zielt
- Befehlseinstellungen:
{blockface}: Du kannst eine blockFace angeben oder nicht, um die Platzierung zum Beispiel erzwungen oberhalb vorzunehmen. BlockFaces{material}: Block-ID (Block States werden unterstützt){bypassProtection}: Ob der Block auch dann platziert wird, wenn der Spieler die Berechtigung nicht hat[whitelistCurrentBlock]: (Optional) (Standard = kann auf jedem Blocktyp gesetzt werden) Liste von Blöcken, denen der aktuelle Block entsprechen muss, damit er ersetzt wird- Beispiele:
- AIR, WATER
- !STONE, !COBBLESTONE
- Beispiel:
activators:
  activator0: # Activator ID, you can create as many activator on the activators list
    option: # Here goes an activator that is at least instance of player
    playerCommands:
    - SET_BLOCK blockface:UP material:OAK_WOOD
    - SET_BLOCK material:FURNACE[LIT=TRUE]
    - SET_BLOCK material:GOLD_BLOCK whitelistCurrentBlock:SAND,DIRT
SET_BLOCK_POS
- Info: Setzt einen Block an einer bestimmten Position
- Befehlseinstellungen:
{x}: X-Koordinate{y}: Y-Koordinate{z}: Z-Koordinate{material}: Das Material des Blocks[bypassProtection]: (Optional) (Standard = false) Ob Regionen, Claims und Insel-Schutz umgangen werden[replace]: (Optional) (Standard = true) Ob ein bereits vorhandener Block ersetzt wird[whitelistCurrentBlock]: (Optional) (Standard = kann auf jedem Blocktyp gesetzt werden) Liste von Blöcken, denen der aktuelle Block entsprechen muss, damit er ersetzt wird- Beispiele:
- AIR, WATER
- !STONE, !COBBLESTONE
- Beispiel:
activators:
  activator0: # Activator ID, you can create as many activator on the activators list
    option: # Here goes an activator that is at least instance of player
    playerCommands:
    - SET_BLOCK_POS x:0 y:0 z:0 material:STONE bypassProtection:false replace:true
    - SET_BLOCK_POS x:0 y:0 z:0 material:GOLD_BLOCK whitelistCurrentBlock:SAND,DIRT
SET_EQUIPPABLE_MODEL
- Info: Setzt die Equippable-Model-Daten eines Items in einem bestimmten Slot
- Befehlseinstellungen:
{slot}: Die Slot-Nummer, in der sich das Ziel-Item befindet{model}: Der Name des Ausrüstungsmodells, das du dem Item zuweisen möchtest
- Beispiel:
activators:
  activator0: # Activator ID, you can create as many activator on the activators list
    option: # Here goes an activator that is at least instance of player
    playerCommands:
    - SET_EQUIPPABLE_MODEL slot:-1 model:minecraft:diamond
SET_EXECUTABLE_BLOCK
- Info: Setblock, aber für Executable Blocks. (EXECUTABLE BLOCKS MÜSSEN INSTALLIERT SEIN)
- Befehlseinstellungen:
{id}: ID des Executable Blocks, den du platzieren möchtest{x}: X-Koordinate{y}: Y-Koordinate{z}: Z-Koordinate{world}: Name der Welt[replace]: (Optional) (Standard = true). Ob der vorhandene Block an den angegebenen Koordinaten ersetzt wird oder nicht[bypassProtection]: (Optional) (Standard = false) Wenn du Schutzsysteme wie WorldGuard umgehen möchtest[ownerUUID]: (Optional) (Standard = kein Besitzer) Die UUID des vermeintlichen Besitzers des Executable Blocks
- Beispiel:
activators:
  activator0: # Activator ID, you can create as many activator on the activators list
    option: # Here goes an activator that is at least instance of player
    playerCommands:
    - SET_EXECUTABLE_BLOCK id:Mithril_Ore x:%block_x_int% y:%block_y_int% z:%block_z_int% world:%block_world% replace:false bypassProtection:true ownerUUID:%player_uuid%
SET_ITEM_COLOR
- Info: Setzt eine bestimmte Farbe für das Item (einfärbbare Items wie Lederrüstung / Feuerwerksstern)
- Befehlseinstellungen:
{slot}: Der Slot, auf den der Befehl angewendet wird. (-1 für die Haupthand)
{color}: Zahlenwert der Farbe. Website mit Farbwähler- Beispiel:
activators:
  activator0: # Activator ID, you can create as many activator on the activators list
    option: # Here goes an activator that is at least instance of player
    playerCommands:
    - SET_ITEM_COLOR slot:1 color:0
SET_ITEM_ATTRIBUTE
- Info: Setzt ein Attribut auf einem Item.
- Befehlseinstellungen:
{slot}: Der Slot, auf den der Befehl angewendet wird. (-1 für die Haupthand){attribute}: Das Attribut, das du hinzufügen möchtest. Attribute{value}: Der Wert für die Operation{equipmentSlot}: Der Slot für das Attribut EquipmentSlots
- Beispiel:
activators:
  activator0: # Activator ID, you can create as many activator on the activators list
    option: # Here goes an activator that is at least instance of player
    playerCommands:
    - SET_ITEM_ATTRIBUTE slot:%slot% attribute:GENERIC_ARMOR value:10 equipmentSlot:CHEST
SET_ITEM_COOLDOWN
- Gibt dem Spieler/Ziel einen Cooldown auf ein Item
- Befehlseinstellungen:
{material or group}: Der Materialtyp oder die Gruppe. Mehr Infos zur Gruppe{cooldown}: Cooldown in Sekunden
- Beispiel:
activators:
  activator0: # Activator ID, you can create as many activator on the activators list
    option: # Here goes an activator that is at least instance of player
    playerCommands:
    - SET_ITEM_COOLDOWN material:ENDER_PEARL cooldown:10
activators:
  activator0: # Activator ID, you can create as many activator on the activators list
    option: # Here goes an activator that is at least instance of player
    playerCommands:
    - SET_ITEM_COOLDOWN group:my_cooldown_group cooldown:10
SET_ITEM_CUSTOM_MODEL_DATA
- Info: Setzt eine bestimmte CustomModelData auf das angegebene Item
- Befehlseinstellungen:
{slot}: Der Slot, auf den der Befehl angewendet wird. (-1 für die Haupthand){customModelData}: Wert der CustomModelData
- Beispiel:
activators:
  activator0: # Activator ID, you can create as many activator on the activators list
    option: # Here goes an activator that is at least instance of player
    playerCommands:
    - SET_ITEM_CUSTOM_MODEL_DATA slot:10 customModelData:10
SET_ITEM_LORE
- Info: Setzt eine Lore-Zeile
- Befehlseinstellungen:
{slot}: Slot-Nummer (-1 für die Haupthand)
{line}: Wenn du die erste Lore-Zeile setzen möchtest, gib 1 an{text}: Der Text der neuen Zeile- Beispiel:
activators:
  activator0: # Activator ID, you can create as many activator on the activators list
    option: # Here goes an activator that is at least instance of player
    playerCommands:
    - SET_ITEM_LORE slot:%slot% line:3 text:&6LEGENDARY SWORD
SET_ITEM_MATERIAL
VERSION
- Ersetzt das Material des Items durch ein anderes Material und behält dabei die NBT des Ziel-Items bei
- Befehlseinstellungen:
{slot}: Slot-Nummer (-1 für die Haupthand)
{material}: Das Material, zu dem das Item werden soll- Beispiel:
activators:
  activator0: # Activator ID, you can create as many activator on the activators list
    option: # Here goes an activator that is at least instance of player
    playerCommands:
    - SET_ITEM_MATERIAL slot:10 material:DIAMOND_HOE
SET_ITEM_MODEL
- Info: Setzt ein benutzerdefiniertes Modell für dein Item in einem bestimmten Slot
- Befehlseinstellungen:
{slot}: Der Slot, auf den der Befehl angewendet wird. (-1 für die Haupthand){model}: Der Modellwert, den du auf das Ziel-Item anwenden möchtest
- Beispiel:
activators:
  activator0: # Activator ID, you can create as many activator on the activators list
    option: # Here goes an activator that is at least instance of player
    playerCommands:
    - SET_ITEM_MODEL slot:-1 model:minecraft:stone
SET_ITEM_NAME
- Info: Setzt einen benutzerdefinierten Namen für dein Item in einem bestimmten Slot
- Befehlseinstellungen:
{slot}: Der Slot, auf den der Befehl angewendet wird. (-1 für die Haupthand){name}: Der neue Name des Items
- Beispiel:
activators:
  activator0: # Activator ID, you can create as many activator on the activators list
    option: # Here goes an activator that is at least instance of player
    playerCommands:
    - SET_ITEM_NAME slot:%slot% name:&eThis is the new name of the item
SET_ITEM_POTIONCOLOR
- Info: Setzt eine benutzerdefinierte Farbe für die Trankfarbe eines Items in einem bestimmten Slot
- Befehlseinstellungen:
{slot}: Der Slot, auf den der Befehl angewendet wird. (-1 für die Haupthand){color}: Die Farbe, die du anwenden möchtest. Gehe für die Farbe aufhttps://www.tydac.ch/color/und hole dir den WertMapInfo Colorder Farbe deiner Wahl.
- Beispiel:
activators:
  activator0: # Activator ID, you can create as many activator on the activators list
    option: # Here goes an activator that is at least instance of player
    playerCommands:
    - SET_ITEM_POTIONCOLOR slot:%slot% color:10944256
SET_ITEM_TOOLTIPSTYLE
- Info: Setzt den benutzerdefinierten Tooltip-Stil des Items im Slot.
- Befehlseinstellungen:
{slot}: Der Slot, auf den der Befehl angewendet wird. (-1 für die Haupthand){tooltipModel}: (Standardwert:namespace:id) Die Tooltip-ID.
- Beispiel:
activators:
  activator0: # Activator ID, you can create as many activator on the activators list
    option: # Here goes an activator that is at least instance of player
    playerCommands:
    - SET_ITEM_TOOLTIPSTYLE slot:-1 tooltipModel:namespace:id
SET_PLAYER_TIME
- Info: Setzt die Zeit des Spielers, ohne die serverseitige Zeit zu beeinflussen.
- Befehlseinstellungen:
{time}: Der Zeitwert. Gib-1ein, um die Zeit des Spielers wieder auf die serverseitige Zeit zurückzusetzen.{relative}: (Standardwert: false) Wenn nicht true, wird die Zeit aus der Sicht des Benutzers wörtlich auf diesen Wert gesetzt. Bei true wird die aktuelle Zeit der Welt genommen und der angegebene Wert dazu addiert, um die aktuelle Zeit aus deiner Sicht zu setzen.
- Beispiel:
activators:
  activator0: # Activator ID, you can create as many activator on the activators list
    option: # Here goes an activator that is at least instance of player
    playerCommands:
    - SET_PLAYER_TIME time:6000 relative:false
SET_PLAYER_WEATHER
- Info: Setzt das Wetter des Spielers, ohne die serverseitige Zeit zu beeinflussen.
- Befehlseinstellungen:
{weather The time value}: Setzt das Wetter aus der Sicht des Spielers- Optionen:
- RESET : Stellt das serverseitige Wetter wieder her
- DOWNFALL : Regen oder Schnee, je nach Biom
- CLEAR : Klares Wetter, Wolken, aber kein Regen.
- Optionen:
- Beispiel:
activators:
  activator0: # Activator ID, you can create as many activator on the activators list
    option: # Here goes an activator that is at least instance of player
    playerCommands:
    - SET_PLAYER_WEATHER weather:CLEAR
SET_TEMP_BLOCK_POS
- Info : Setzt einen temporären Block
- Befehlseinstellungen:
{x}: X-Koordinate{y}: Y-Koordinate{z}: Z-Koordinate{world}: Name der Welt{material}: Block-ID{time}: Zeit in Ticks[bypassProtection]: (Optional) (Standard = false) Ob Eingriffe von Drittanbietern ignoriert werden oder nicht[whitelistCurrentBlock]: (Optional) (Standard = kann auf jedem Blocktyp gesetzt werden) Liste von Blöcken, auf die geachtet werden soll- Beispiele:
- AIR, WATER
- !STONE, !COBBLESTONE
activators:
  activator0: # Activator ID, you can create as many activator on the activators list
    option: # Here goes an activator that is at least instance of player
    playerCommands:
    - SET_TEMP_BLOCK_POS x:%entity_x% y:%entity_y% z:%entity_z% world:%entity_world% material:BEDROCK time:40 bypassProtection:true whitelistCurrentBlock:!AIR,!WATER
Blöcke mit zusätzlichen Daten (Inventar, Rotation usw.) werden nicht ersetzt
SPAWN_ENTITY_ON_CURSOR
- Info: Lässt Entities auf deinem Cursor erscheinen
- Du kannst einen EntityType angeben
- Oder eine Entity-Definition, Beispiel:
{HasVisualFire:1b,id:"minecraft:bee"}(1.21.+) - Oder eine MythicMob-ID
- Befehlseinstellungen:
{entity}: Die Entity-Angabe{amount}: Die Anzahl der Mobs, die an dieser Stelle erscheinen[maxRange]: (Optional) (Standard = 200) Die maximale Reichweite des Spawns
- Beispiel:
activators:
  activator0: # Activator ID, you can create as many activator on the activators list
    option: # Here goes an activator that is at least instance of player
    playerCommands:
    - SPAWN_ENTITY_ON_CURSOR entity:CREEPER amount:1
# With EntitySnapshot
- SPAWN_ENTITY_ON_CURSOR entity:{HasVisualFire:1b,id:"minecraft:bee"} amount:1

# With MythicMob ID
- SPAWN_ENTITY_ON_CURSOR entity:MyCustomBossID amount:1
SUDO
- Info: Zwingt dich, einen Befehl auszuführen
- Befehlseinstellung:
{command}: Der auszuführende Befehl
- Beispiel:
activators:
  activator0: # Activator ID, you can create as many activator on the activators list
    option: # Here goes an activator that is at least instance of player
    playerCommands:
    - SUDO sit
    - SUDO say hi
SUDO_OP
- Info: Gibt dem Spieler OP, führt SUDO für den Spieler aus und entzieht ihm das OP wieder
- Zusätzliche Info: Während des OP kann der Spieler nur den nach SUDOOP angegebenen Befehl ausführen, alle anderen Befehle sind blockiert, solange der Spieler OP hat. Wenn der Server abstürzt, ist das kein Problem: Dem Spieler wird das OP entzogen, sobald er sich erneut verbindet.
- Befehlseinstellungen:
{command}: Der Befehl, der mit OP ausgeführt wird
- Beispiel:
activators:
  activator0: # Activator ID, you can create as many activator on the activators list
    option: # Here goes an activator that is at least instance of player
    playerCommands:
    - SUDO_OP summon zombie
    - SUDO_OP fly
    - SUDO_OP god
    - SUDO_OP /replacenear 20 tnt
Es wird nicht empfohlen, dies häufig zu verwenden. Wie oben auf dieser Seite erklärt, verwende den Befehl execute, wenn du Vanilla-Befehle ausführen möchtest (erklärt in der FAQ How to use vanilla commands).
Verwende SUDOOP nur, wenn es absolut keine andere Möglichkeit gibt: Es sollte dein letzter Ausweg sein, nicht deine erste Wahl.
SWAP_HAND
- Info: Tauscht das aktuelle Item mit deinem Item in der Nebenhand
- Keine Befehlseinstellung
- Beispiel:
activators:
  activator0: # Activator ID, you can create as many activator on the activators list
    option: # Here goes an activator that is at least instance of player
    playerCommands:
    - SWAP_HAND
TRANSFER_ITEM
- Info: Tauscht 2 Items im Inventar anhand ihres Slots
- Befehlseinstellungen:
{slot of launcher}: Ziel-Slot für Slot Nr. 1{slot of receiver}: Ziel-Slot für Slot Nr. 2
[boolean drop]: (Optional) (Standard = false) Ob der Slot des Ausführenden beim Tausch fallen gelassen wird oder nicht
XP_BOOST
- Info: Erhöht für eine bestimmte Zeit den XP-Gewinn.
- Befehlseinstellungen:
{multiplier}: XP-Multiplikatorwert{timeinsecs}: Dauer in Sekunden
- Beispiel:
activators:
  activator0: # Activator ID, you can create as many activator on the activators list
    option: # Here goes an activator that is at least instance of player
    playerCommands:
    - XP_BOOST 2 10
Sei vorsichtig! Dieser Befehl kann sich stapeln. Wenn du diesen Befehl mehrfach ausführst, erhältst du immer höhere Multiplikatoren, solange die Zeit zwischen den Ausführungen nicht ausreicht, damit der letzte Boost abläuft.\
- XP_BOOST 2 5
- DELAY 1
- XP_BOOST 2 5
Das bedeutet, dass die XP in dieser Reihenfolge geboostet werden:
- 1 Sekunde: x2
- 4 Sekunden: x4
- 1 Sekunde: x2
Jetzt ausprobieren
Kopiere das in ExecutableItems und lade neu
Von dieser Seite übernommen. Füge es in eine Config ein, führe den Reload-Befehl des Plugins aus, und du hast einen funktionierenden Ausgangspunkt zum Bearbeiten.
activators:
  activator0: # Activator ID, you can create as many activator on the activators list
    option: # Here goes an activator that is at least instance of player
    playerCommands:
    - ABSORPTION amount:5 time:200 # Gives the player absorption
  activator1: # Activator ID, you can create as many activator on the activators list
    option: # Here goes an activator that is at least instance of target
    targetCommands:
- ABSORPTION amount:5 time:200 # Gives the target absorptionAuf dieser Seite verwendetes Plugin
ExecutableItemsCustom Items mit Fähigkeiten, Aktivatoren und Befehlen, ganz ohne Code.
- 5.0/5 aus 10 Bewertungen
- 3.1K Server nutzen es gerade (bStats)
- 103 Downloads auf SPlugins
€19.99
einmalig, lebenslange Updates